
User Manual


13
Note: The trunnion brackets are not
identical; make sure the bracket with the
raised indicator line is installed on the left
side of the table.
4. Install a lock knob (D) on each threaded
stud and tighten to hold the table in position.
5. See “Adjustments” section for further
instruction on adjusting the disc table.
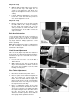
Belt Table
1. Loosen the sanding platen lock screw (E,
Figure 13) with a 6mm hex wrench, and tilt
the belt arm to a vertical position. Re-tighten
the lock screw.
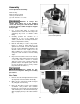
2. Guide the belt table trunnion onto the stud,
as shown in Figure 14. The raised track on
the trunnion must fit into the groove on the
belt arm.
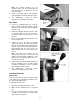
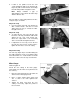
3. Place the remaining M10 flat washer onto
the stud (Figure 15).
4. Thread the nut of the table lock handle
(Figure 15) onto the stud. To do this quickly,
pull out on the handle, while tightening the
nut with a 4mm hex wrench. When the nut is
fully tightened onto the stud, release the
handle, making sure it seats itself back onto
the nut.
Note: The table lock handle can be
repositioned at any time for convenience by
pulling out on the handle, rotating it to new
position, then releasing it. Make sure it re-
seats itself on the nut.
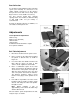
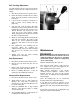
5. Screw the belt tensioning handle (Figure 16)
into the threaded hole in the belt tracking
assembly, and tighten the hex nut against
the shaft with a 13mm wrench.
6. See “Adjustments” section for further
instruction on adjusting the belt table.
Installing Abrasives
Abrasive Disc
Note: You may wish to check the angle setting
of the table before installing the abrasive disc.
See “Disc Table Adjustment”.
To install the abrasive disc:
1. Disconnect machine from power source.
2. Make sure the aluminum disc is clean and
dry.
3. Peel the backing from the abrasive and
carefully insert it between disc and table;
align and press into place.
Figure 14
Figure 15
Figure 16