
Product Manual


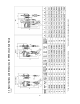
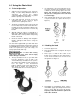
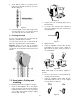

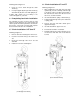
Table Of Contents
- S90 Series Hand Chain Hoists
- 1.0 Warranty and Service
- 2.0 Table of contents
- 3.0 Safety warnings
- 4.0 About this manual
- 5.0 Specifications and Dimensions for S90 Series Chain Hoists
- 6.0 Using the Chain Hoist
- 7.0 Hand chain: Cutting and installing
- 8.0 Load chain: Removing and installing
- 9.0 Inspection and maintenance
- 10.0 Load and wear limits
- 11.0 Replacement Parts
- 11.1.1 S90 Chain Hoists – Exploded View
- 11.1.2 S90-050 Chain Hoist (0.5 Ton) – Parts List
- 11.1.3 S90-100 Chain Hoist (1 Ton) – Parts List
- 11.1.4 S90-150 Chain Hoist (1.5 Ton) – Parts List
- 11.1.5 S90-200 Chain Hoist (2 Ton) – Parts List
- 11.1.6 S90-300 Chain Hoist (3 Ton) – Parts List
- 11.1.7 S90-500 Chain Hoist (5 Ton) – Parts List
- 11.1.8 S90-1000 Chain Hoist (10 Ton) – Parts List
10
Referring back to Figure 10:
4. Insert one end of chain link (D) into chain
anchor (C).
5. Insert pin stopper (B) through chain anchor (C)
and chain link (D) and secure with split pin (A).
Continue with section 8.4, proceeding to the
section that applies to your hoist.
8.4
Completing load chain installation
The following procedure assumes that the load
chain has been attached to the chain anchor and
fed through the load chain sprocket as described in
the previous section. This procedure will complete
the load chain and bottom hook installation.
8.5 Chain installation: 0.5T thru 2T
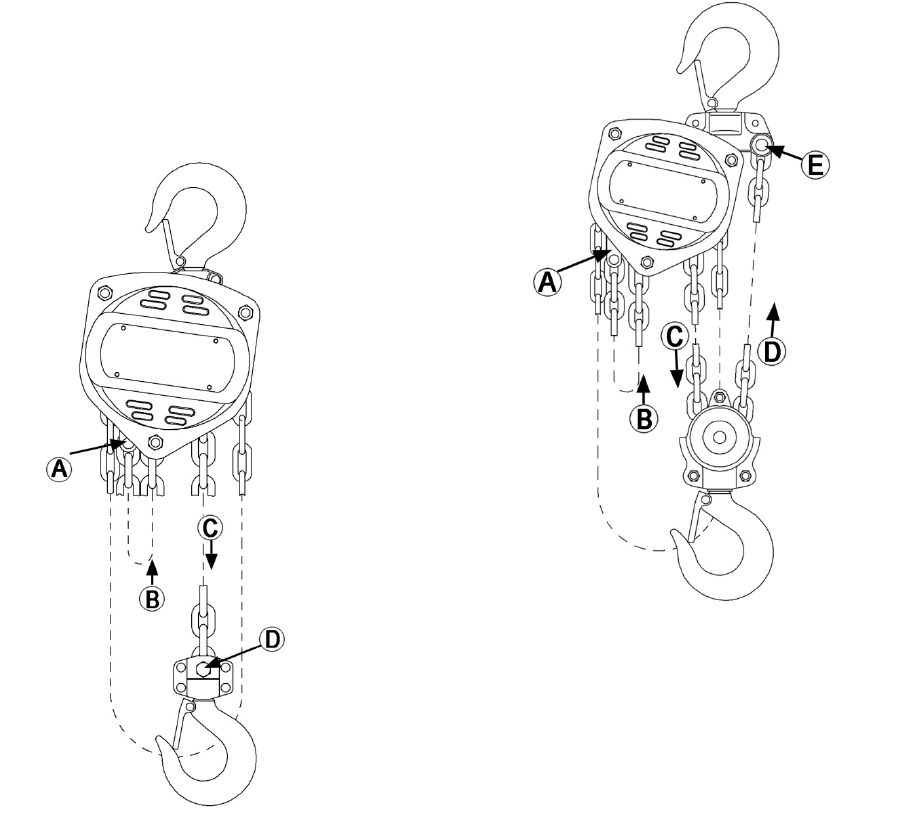
Referring to Figure 12:
1. Remove lock nut and bolt (D) from lower hook.
2. Insert the last chain link (C) into lower hook
slot.
3. Re-insert bolt through lower hook slot and
chain link.
4. Install lock nut onto bolt and tighten.
Figure 12
(1/2 through 2-ton hoists)
8.6 Chain installation: 3T and 5T
Referring to Figure 13:
1. After installing the load chain into load chain
sprocket (B), run the remaining chain through
your hand to remove any twist. The last link of
the chain must be in the same direction as the
first. If not, cut off the last link.
2. Insert the last link into pulley of lower hook (C).
3. Pull load chain through and up from underside
of pulley (C,D).
4. Remove lock nut and chain anchor pin in
upper hook slot (E).
5. Insert the last link into upper hook slot.
6. Check that load chain is not twisted.
7. Reinstall chain anchor pin through upper hook
slot and last chain link, and secure with the
lock nut.
Figure 13
(3-ton and 5-ton hoists)