
Product Manual


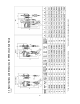
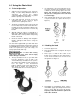
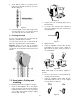

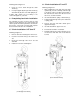
Table Of Contents
- S90 Series Hand Chain Hoists
- 1.0 Warranty and Service
- 2.0 Table of contents
- 3.0 Safety warnings
- 4.0 About this manual
- 5.0 Specifications and Dimensions for S90 Series Chain Hoists
- 6.0 Using the Chain Hoist
- 7.0 Hand chain: Cutting and installing
- 8.0 Load chain: Removing and installing
- 9.0 Inspection and maintenance
- 10.0 Load and wear limits
- 11.0 Replacement Parts
- 11.1.1 S90 Chain Hoists – Exploded View
- 11.1.2 S90-050 Chain Hoist (0.5 Ton) – Parts List
- 11.1.3 S90-100 Chain Hoist (1 Ton) – Parts List
- 11.1.4 S90-150 Chain Hoist (1.5 Ton) – Parts List
- 11.1.5 S90-200 Chain Hoist (2 Ton) – Parts List
- 11.1.6 S90-300 Chain Hoist (3 Ton) – Parts List
- 11.1.7 S90-500 Chain Hoist (5 Ton) – Parts List
- 11.1.8 S90-1000 Chain Hoist (10 Ton) – Parts List

8
5. Check that the chain is not twisted at the
bottom hook. All welds should face the same
direction (Figure 4).
Figure 4
6. For hoists with two or more falls of chain, make
sure the bottom hook is not capsized (turned
over). This may cause the chain to twist.
6.3 Raising the Load
To raise load, pull right side of hand chain (A,
Figure 5) so that wheel turns clockwise.
To lower load, pull left side of hand chain (B,
Figure 5) so that wheel turns counterclockwise.
Important: Make sure hoist has an adequate
length of load chain to raise or lower the load in a
safe manner. Do not attempt to lower hoist beyond
its limit.
Figure 5
7.0 Hand chain: Cutting and
installing
To cut hand chain in order to lengthen or shorten:
1. Insert one link lengthwise into a vise (Figure
6). Be sure that the side opposite the weld lies
completely below surface of vise jaw (about
1/3 of a link). This prevents nicking or cutting
the lower part of the link.
Figure 6
2. Using a hack saw, cut through upper part of
link at the weld.
3. Loosen the link, reposition link vertically at
edge of vise with the level of the cut above the
vise jaw (Figure 7).
Figure 7
4. Tighten vise jaw.
5. Using an adjustable wrench, twist the link
horizontally from front to back. (Figure 8)
Open just far enough to insert (or remove) a
second chain link.
Figure 8
Note: Chain length is now ready to lengthen or
shorten.
6. Insert (or remove) the second end link at the
opening in the first end link.
7. Using an adjustable wrench, twist the link
horizontally until the link is in the original
closed position. See Figure 9.
Figure 9