
Product Manual


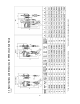

Table Of Contents
- S90 Series Hand Chain Hoists
- 1.0 Warranty and Service
- 2.0 Table of contents
- 3.0 Safety warnings
- 4.0 About this manual
- 5.0 Specifications and Dimensions for S90 Series Chain Hoists
- 6.0 Using the Chain Hoist
- 7.0 Hand chain: Cutting and installing
- 8.0 Load chain: Removing and installing
- 9.0 Inspection and maintenance
- 10.0 Load and wear limits
- 11.0 Replacement Parts
- 11.1.1 S90 Chain Hoists – Exploded View
- 11.1.2 S90-050 Chain Hoist (0.5 Ton) – Parts List
- 11.1.3 S90-100 Chain Hoist (1 Ton) – Parts List
- 11.1.4 S90-150 Chain Hoist (1.5 Ton) – Parts List
- 11.1.5 S90-200 Chain Hoist (2 Ton) – Parts List
- 11.1.6 S90-300 Chain Hoist (3 Ton) – Parts List
- 11.1.7 S90-500 Chain Hoist (5 Ton) – Parts List
- 11.1.8 S90-1000 Chain Hoist (10 Ton) – Parts List
9
Do not push the link inward
from the curved ends. This will distort the link.
Check that the link is closed and free of twist.
8. If installing entire new chain, insert end of
hand chain into groove at top of hand chain
wheel (see Figure 11). Rotate handwheel and
pull chain through.
9. Re-weld the link at the cut.
10. Grind off excess on weld so that it is smooth.
Do not operate the hoist with a
twisted, kinked or damaged load chain. Do not
splice the load chain. Check the chain for
excessive wear or stretch. Failure to comply
may cause serious injury.
8.0 Load chain: Removing and
installing
8.1 Load chain inspection
Over time, the load chain will wear or elongate.
This can cause damage to the hoist, breakage, or
non-engagement of the load sheave.
Do not operate the hoist with a
twisted, kinked or damaged load chain. Do not
splice load chain. Check the chain for
excessive wear or stretch. Failure to comply
may cause serious injury.
To inspect the load chain for wear:
1. Test the hoist under load in both the lifting and
lowering directions, observing the operation of
chain and sprockets. Chain should feed
smoothly into and away from the sprockets.
2. If the chain binds, jumps, or is noisy, make
sure it is clean and properly lubricated. If the
trouble persists, inspect the chain and mating
parts for wear, distortion, or other damage.
3. Clean the chain before inspection. Examine for
gouges, nicks, weld splatter, corrosion, and
distorted links. Slacken the chain and move
adjacent links to one side, looking for wear at
the contact points. If you see wear or suspect
stretching, measure the chain as explained in
section 10.1. If chain matches or exceeds the
limit shown in Table 2, replace the load chain
before using the hoist.
Do not add to the load chain.
Replace entire chain. Failure to comply may
cause serious injury.
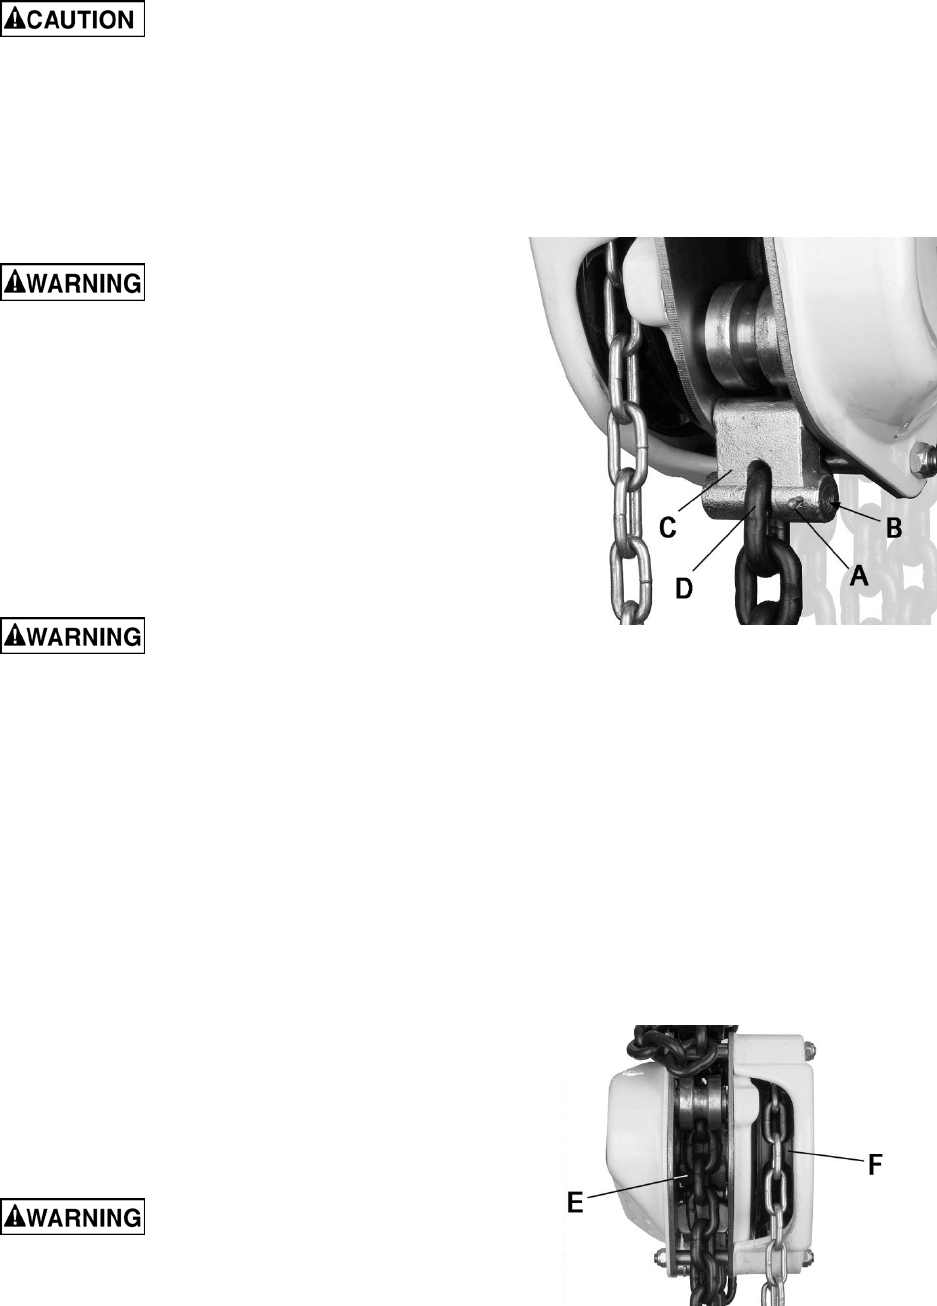
8.2 Load chain removal (all models)
Remove old load chain as follows while referring to
Figure 10:
1. Remove split pin (A) and pin stopper (B) on
the chain anchor C), allowing the end of the
load chain to fall free.
2. Pull the hand chain (Figure 5) until load chain
is completely removed from gear assembly.
Figure 10
8.3 Attaching load chain to load
chain sprocket (all models)
Install new load chain onto load chain sprocket as
follows, referring to Figure 11:
1. Position the load chain sprocket (E) by rotating
hand chain wheel (F) so that the wide and
narrow grooves show.
2. Insert the load chain into the sprocket grooves
so that chain will wind up and back over the
sprocket. Welds must face away from the
sprocket.
3. Rotate hand chain wheel so that load chain
falls six to eight inches at back of sprocket.
Figure 11