
User's Manual


Jetlun Corporation
Jetlun Occupancy Sensor User Guide rev 0.1 DRAFT
8
RD77760
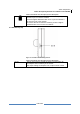
3.0 INSTALLING THE JETLUN OCCUPY SENSOR
Follow these quick steps to install your Jetlun Zigbee Occupy Sensor.
3.1 Install the Occupy Sensor
3.1.1 Join the Network
 STEP 1: Press the Zigbee network button for 3-5 seconds and release the button.
The Zigbee Act LED is blinking.
 STEP 2: The Occupancy Sensor will join the network within 1 minute. The Zigbee
ACT LED should be solid green for 300 seconds.
NOTE: If the Occupancy Sensor fails to join the ZigBee network,
please enter the Gateway utility web interface and check the
following items:
1. The Zigbee network is formed.
2. The Zigbee network allows the Zigbee device to join the
network.
Retry Step 1
3.1.2 Leave the network
 STEP 1: Press and hold the Zigbee network button for 8 -10 seconds then release the
button. The Zigbee Act LED is blinking for about 3 seconds and then it is
off.
 STEP 2: The Occupancy Sensor leaves the network successfully when the link LED
is off.
3.3 TROUBLESHOOTING
1 Q:
The Occupancy Sensor is failed to join the network?
A: Check the configuration of Gateway or RD75613 and assure that the network is
formed. Then refer to the 3.1.1 join the network part
to retry join the network
2 Q: The Power LED is solid red or blinking red?
A: The volumne of battery is low and you should change the battery.
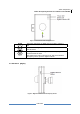
Change out battery procesure:
 STEP 1: Screw out the screw in the bottom panel using screwdriver
 STEP 2: Open the bottom panel.