Inhaltsverzeichnis Vorsichtsmaßnahmen ..................................................................................................................................................... 1 Produkteigenschaften ..................................................................................................................................................... 3 Systemvoraussetzungen................................................................................................................................
Vorgehensweise ............................................................................................................................................... 17 Musik-Untermenü ............................................................................................................................................. 18 Aufnahmen ...................................................................................................................................................................
Referenz ....................................................................................................................................................................... 27 Lyriksynchronisation ......................................................................................................................................... 27 Zurücksetzen ....................................................................................................................................................
Vorsichtsmaßnahmen Für den sicheren Gebrauch dieses Players müssen die Sicherheitshinweise in diesem Handbuch unbedingt beachtet werden. Lesen Sie das Handbuch vor Gebrauch des Players aufmerksam und vollständig durch, und bewahren Sie es für zukünftige Nachschlagezwecke auf. Gebrauchen Sie den Player nicht beim Fahren von Fahrzeugen, um Unfälle zu vermeiden. Außerdem ist dies in einigen Ländern untersagt.
Achtung: Aufgrund der unterschiedlichen Verfahren zur Speicherberechnung seitens der Speicherkartenhersteller und des Gerätes, können die Angaben über die Kapazität der Speicherkarte von einander abweichen. Die tatsächliche Speicherkapazität der Karte ist kleiner, als die vom Hersteller der Karte angegebene. Dies ist normal. Ebenso ist die freie Speicherkapazität auf der Karte von der Größe der verwendeten Firmware abhängig.
Produkteigenschaften Unterstützung der Formate MP3, WMA, WAV Dieser Player erlaubt die Wiedergabe von Musikdateien im MP3-, WMA- und WAV-Format. DRM 9-Wiedergabe Dieser Player unterstützt die Wiedergabe von WMA-Dateien, die mit dem Verfahren DRM 9 geschützt sind. Sprachaufzeichnung (Diktierfunktion) Das eingebaute Mikrofon des Players erlaubt die Aufzeichnung von Sprachnotizen. Schrittzähler/Stoppuhr Dieser Player enthält einen Schrittzähler und eine Stoppuhr.
Herausragende Wiedergabequalität Der Signal/Rauschabstand von mehr als 90 dB sorgt für kristallklaren Sound. Lyriksynchronisation Dieser Player unterstützt die Lyrik-Anzeige. Tragbares Massenspeichergerät mit Plug and Play Ermöglicht einen schnellen Datenaustausch mit einem PC über die USB-Schnittstelle nach Standard 1.1 sowie 2.0. Dabei fungiert der Player als Wechseldatenträger, ohne dass zusätzliche Treiber installiert werden müssen (Ausnahme Windows 98SE).
Systemvoraussetzungen Systemvoraussetzungen des Players: 1. Microsoft® Windows 98SE/2000/Me/XP 2. Pentium-Prozessor mit 200 MHz oder besser 3. USB-Anschluss 4. 120 MB freier Festplattenspeicher 5.
Bedienung - Grundlagen Bedienelemente und Funktionen 1 2 7 8 9 3 4 5 6 10 11 12 (1) Taste Wiedergabe/Pause ( !) (2) Schneller Vorlauf (") (3) Anzeigebereich (4) Taste Zurücksetzen (5) Schneller Rücklauf (#) (6) Menütaste (M) (7) Kopfhöreranschluss (8) Taste Lauter (+) (9) Mikrofon (10) USB-Anschluss (11) Taste Leiser (-) (12) Taste REC Reset: Setzt den Player zurück (zum Drücken einen spitzen Gegenstand wie z.B. eine aufgebogene Büroklammer verwenden).
Tastenfunktionen: Funktion Ein-/Ausschalten A-B wiederholen Wiedergabe, Pause/ Wiedergabe fortsetzen Hauptmenü öffnen Untermenü öffnen Navigation im Menü Auswahl bestätigen Zum vorigen Menü zurück oder Menü beenden Zum vorigen oder nächsten Stück bzw. Datei springen Vor- oder Zurückspulen Leiser Lauter Aktion Halten Sie die Taste Play/Pause/Power [ !] gedrückt. Taste [REC]: Startpunkt des zu wiederholenden Abschnitts (A) wählen. Taste [REC]: Endpunkt (B) des zu wiederholenden Abschnitts wählen.
Mit PC verbinden Treiber für Windows 98SE installieren 1. Starten Sie die Datei setup.exe von der Treiber-CD, und folgen Sie den Anweisungen am Bildschirm, um die Installation durchzuführen. 2. Starten Sie Ihren PC neu. 3. Verbinden Sie den MP3-Player mit dem USB-Anschluss am PC. Vorgehensweise Um die Firmware zu aktualisieren oder Musik auf den Player zu kopieren, schalten Sie den Player zunächst aus und verbinden ihn über ein USB-Kabel mit dem PC.
Hardware entfernen Klicken Sie mit der linken Maustaste auf das Symbol „Hardware sicher entfernen“ unten rechts am Bildschirm. Siehe die Abbildung rechts. Sobald die Bestätigung „Sie können das Gerät jetzt sicher entfernen“ erscheint, klicken Sie auf „Anhalten“ und anschließend auf „OK“. Danach können Sie die USB-Kabelverbindung vom Player zum PC trennen (siehe folgende Abbildung).
Akku aufladen Vor dem erstmaligen Gebrauch sollten Sie den Akku mindestens 2 Stunden lang aufladen. Dieses Produkt besitzt einen eingebauten Lithium-Ionen-Akku. Verbinden Sie den Player mit Ihrem PC. Siehe „Mit PC verbinden“ im vorigen Abschnitt. Die Akkuanzeige rechts oben am Display zeigt den Ladepegel des Akkus an. Während des Ladevorgangs wechselt das Symbol von einer leeren in eine volle Batterie. Das Symbol auf der rechten Seite erscheint anstelle des Ladesymbols, wenn der Akku aufgeladen ist.
WMA (Unterstützung von WMA-DRM) Download von WMA-Musik mit DRM9-Schutz (PD-DRM) Unter Windows 98SE/ Windows ME / Windows 2000/ Windows XP sollten Sie WMA-Dateien mit DRM-Urheberschutz mithilfe des Windows Media Player 9.0 oder 10.0 (Version 10.0 nur für Windows XP) auf den MP3-Player herunterladen. Anderenfalls kann es möglich sein, dass der MP3-Player die WMA-Musik mit DRM-Schutz nicht abspielen kann.
Für Windows Media Player 10.0 (nur unter Windows XP) A. B. Verbinden Sie den Player mit Ihrem PC. Wählen Sie die gewünschte WMA-Musikdatei mit DRM-Schutz aus. C. Klicken Sie mit der rechten Maustaste, und wählen Sie “Hinzufügen zu Synchronisierungsliste”. D. Wählen Sie in den geöffneten Fenstern die Option “Sync”.
E. Wählen Sie im Sync-Fenster die gewünschte WMA-Musikdatei mit DRM-Schutz aus Schritt B aus, und wählen Sie "Wechseldatenträger". F. Klicken Sie auf das Symbol “Sync starten”, um die WMA-Musik mit DRM-Schutz auf Ihren Player zu übertragen.
Musikdateien auf Player kopieren Nachdem Sie den Player erfolgreich mit dem PC verbunden haben, erscheint ein Wechseldatenträger im „Arbeitsplatz“. Machen Sie die gewünschten MP3- und WMA-Dateien unter „Arbeitsplatz“ ausfindig. Wählen Sie diese Dateien mit der Maus aus, klicken Sie sie mit der rechten Maustaste an, und wählen Sie „Kopieren“. Öffnen Sie den Wechseldatenträger im „Arbeitsplatz“, und klicken Sie mit der rechten Maustaste, um die ausgewählten Dateien hier einzufügen.
Ein-/Ausschalten Drücken Sie bei ausgeschaltetem Player die Taste Halten Sie bei eingeschaltetem Player die Taste !, um ihn einzuschalten. ! gedrückt, um ihn auszuschalten. Dadurch werden die aktuellen Einstellungen automatisch gespeichert. (Die Einstellungen werden nur gespeichert, wenn der Player ordnungsgemäß vom Benutzer oder durch den Timer ausgeschaltet wird.) Hauptmenü Halten Sie die Taste Menu gedrückt, um das Hauptmenü einzublenden.
Tastensperre aktivieren und deaktivieren Tastensperre aktivieren Im Musik- und Aufnahmemodus aktivieren Sie die Tastensperre in den Untermenüs unter Music und Recordings. Die Tastensperre wird sofort wirksam, nachdem Sie die Wiedergabetaste zur Bestätigung gedrückt haben. Tastensperre deaktivieren Um die Tastensperre zu deaktivieren, halten Sie die Taste ! gedrückt, bis sich das angezeigte Schloss öffnet (siehe folgende Abbildungen). Dies dauert ca. 3 Sekunden.
Musik LCD-Anzeige Wiedergabemodus Lautstärke Tastensperre Wiedergabestatus Aktuelle Funktion Akkupegel ID3-Anzeige Dateityp/ Abtastfrequenz Aktuelles Stück/ Gesamtanzahl Stücke EQ Verstrichene / Gesamtzeit Vorgehensweise 1. „Musik“ auswählen Die Funktion „Music“ ist standardmäßig nach dem Einschalten des Players ausgewählt. Sie können sie aber auch über den Eintrag „Music“ im Hauptmenü auswählen. 2.
zu starten. Drücken Sie die Taste mit der Wiedergabe fortzufahren. !, um die Wiedergabe vorübergehend anzuhalten. Drücken Sie sie noch einmal, um 3. Voriges Stück Drücken Sie die Taste #, um das aktuelle Stück erneut zu spielen. Falls das aktuelle Stück länger als 5 Sekunden lang gespielt wurde, drücken Sie die Taste Previous, um zum vorigen Stück der Abspielliste zu springen. 4. Nächstes Stück Drücken Sie die Taste ", um zum nächsten Stück zu springen.
Aufnahmen LCD-Anzeige Wiedergabemodus Wiedergabestatus Lautstärke Aktuelle Funktion Akkupegel Tastensperre Dateiname Dateityp/ Abtastfrequenz Aktuelles Stück / Gesamtanzahl Stücke Verstrichene/ Gesamtzeit Vorgehensweise „Recordings“ auswählen Wählen Sie “Recordings” im Hauptmenü, um den Aufnahmemodus zu öffnen, und drücken Sie !, um die Wiedergabe zu starten. Anweisungen zur Wiedergabe Ihrer Aufnahmen finden Sie im Abschnitt zur Musikwiedergabe.
Aufnahmefunktionen Wiedergabe von Aufnahmen, die über das Mikrofon aufgezeichnet wurden. Die Aufnahmen werden im WAV-Format (ADPCM) im Ordner Recordings des Players abgelegt. Recordings-Untermenü Drücken Sie im Aufnahmemodus die Taste Menu , um das Untermenü von „Recordings“ zu öffnen. Drücken Sie die Tasten # bzw. ", um durch die Optionen des Untermenüs zu blättern.
Mikrofon Aufnahme LCD-Anzeige Abtastfrequenz Wiedergabestatus Aktuelle Funktion Tastensperre Akkupegel Dateiname Verstrichene/ Gesamtzeit Vorgehensweise 1. Aufnahme über Mikrofon starten Halten Sie die Taste REC gedrückt, um die Aufnahme über das Mikrofon aus einer beliebigen Betriebsart zu starten. Die Aufnahme beginnt, und das Aufnahmesymbol blinkt. 2. Aufnahme vorübergehend anhalten Drücken Sie die Taste REC, um die Aufnahme vorübergehend anzuhalten.
3. Aufnahme beenden Drücken Sie die Taste Menu, um die Aufnahme anzuhalten und zur Aufnahmefunktion des Players zurückzukehren. Drücken Sie die Taste 4. !, um die aufgenommene Datei V###.WAV abzuspielen. Aufgenommene Dateien Aufgenommene Dateien werden automatisch unter dem Namen V###.WAV gespeichert. Dabei steht ### für eine Zahl, die von 001 für die erste Datei, 002 für die zweite und so weiter sequentiell nummeriert wird. Das Dateiformat für die Aufnahme ist WAV (ADPCM). 5.
Werkzeuge Wählen Sie die Option „Utility“ aus, und öffnen Sie sie. Hier finden Sie die Optionen Pedometer (Schrittmesser), Stopwatch (Stoppuhr) und Exit (Beenden). Drücken Sie die Taste !, um die Funktion zu öffnen. Wählen Sie Exit (Beenden), um zum vorigen Menü zurückzukehren. Schrittmesser Wählen Sie die Option „Pedometer“ aus, und öffnen Sie sie. Es erscheint ein Fenster mit Einstellungen.
Löschen Drücken Sie im Hauptmenü die Tasten# oder " , um „Delete” (Löschen) zu wählen. Hier finden Sie die Funktionen Delete one (Eine Datei löschen), Delete all (Alles löschen) und Exit (Beenden). Drücken Sie die Taste [ !], um die Funktion zu öffnen. Anschließend wird die Musikwiedergabe gestoppt. Wählen Sie „Exit“, oder drücken Sie die Taste M, um zur vorigen Einstellung zurückzukehren.
Einstellungen Wählen Sie die Option „Settings“ aus, und öffnen Sie sie. Sie enthält die Optionen Language (Sprache), Contrast (Kontrast), Timer settings (Timer), Music resume (Musik fortsetzen), Load defaults (Zurücksetzen), Memory/FW (Speicher/Firmware) und Exit (Beenden). Drücken Sie die Taste !, um das ausgewählte Untermenü zu öffnen. Sprache (Language) Wählen Sie zwischen Deutsch, Englisch, Französisch, Spanisch, Italienisch, Ungarisch.
2. Sleep Timer (Aus-Timer) Drücken Sie die Taste # bzw. ", um die Wartezeit einzustellen, nach der sich das Gerät bei Wiedergabe ausschalten soll, und drücken Sie die Taste 3. ! zum Speichern. Backlight (Hintergrundbeleuchtung) Drücken Sie die Taste # bzw. ", um die Wartezeit einzustellen, nach der das Gerät die Hintergrundbeleuchtung ausschalten soll, und drücken Sie die Taste ! zum Speichern. Music resume (Musik fortsetzen) Wählen Sie YES (Ja), um diese Funktion zu verwenden.
Referenz Lyriksynchronisation Dieser Player unterstützt die Lyriksynchronisation, sofern die LRC- und die MP3-Datei denselben Namen tragen. Beispiel: Haben Sie ein Musikstück „Angel.mp3“ gespeichert, so muss die zugehörige Lyrikdatei den Namen „Angel.lrc“ tragen und im selben Ordner abgelegt sein. Zurücksetzen Falls der Player nicht mehr reagiert (dies sollte bei normalem Gebrauch nicht stattfinden), können Sie mithilfe eines spitzen Gegenstandes den Player zurücksetzen.
Problemlösung Falls Sie Probleme mit Ihrem Player haben sollten, lesen Sie zuerst die folgenden Lösungsansätze durch, bevor Sie sich an unsere Servicehotline wenden.. Problem: Kein Ton über die Ohrhörer Überprüfen Sie Folgendes: 1. Stecken Sie die Ohrhörer fest in die vorgesehene Buchse. 2. Prüfen Sie, ob das Format der Musikdatei vom MP3-Player unterstützt wird.
Technische Eigenschaften Abtastfrequenz 32~320Kbps(MP3) 32 ~192 Kbps (WMA) 8/11/16/22/32/44/48KHz (optional) Aufnahmeformat WAV (ADPCM) Dynamikbereich >80 dB (1 KHz) MP3-Bitrate Musikformat MP3, WMA Frequenzgang 20 Hz bis 20 KHz Signal/ Rauschverhältnis Klirrfaktor >90 dB <0,05% (Referenzpegel:0 dBΰMP3α1 mW, 4mW –52 dB/-62 dB (Sprache, Referenzfrequenz:1 KHzα Abmessungen 77.5 x 36.5 x 17.
Entsorgung von gebrauchten elektrischen und elektronischen Geräten (Anzuwenden inden Ländern der Europäischen Union und anderen europäischen Ländern mit einem separaten Sammelsystem für diese Geräte) Das Symbol auf dem Produkt oder seiner Verpackung weist darauf hin, dass dieses Produkt nicht als normaler Haushaltsabfall zu behandeln ist, sondern bei einer Annahmestelle für das Recycling von elektrischen und elektronischen Geräten abgegeben werden muss.
Wenn ein Problem nicht mit den beschriebenen Maßnahmen behoben werden kann, wenden Sie sich bitte an unsere Servicehotline unter: 01805 - 22 17 84 ( € 0,14 / Min. Nur in Deutschland) Falls das defekte Produkt in unser Servicecenter eingeschickt werden muß, so verwenden Sie bitte den beigefügten Retourenaufkleber. Sollte dieser Retourenaufkleber fehlen, wenden Sie sich bitte an unsere Servicehotline.
Table of Contents Precautions..................................................................................................................................................................... 1 Product Features ............................................................................................................................................................ 3 System Requirement ........................................................................................................................
MIC. Record ................................................................................................................................................................. 21 LCD Display...................................................................................................................................................... 21 Operation Procedure ........................................................................................................................................ 21 Utility...
Precautions In order to safely use this player, please follow the precautions depicted in this manual. Before using this player, please thoroughly read and keep it for future reference. Never use the player during driving or operating other vehicles to avoid traffic accident, which also be written in the law in some districts. Even in walking especially crossing the street. Please also do not listen in extremely high volume to avoid any dangerous.
Attention: Because of the different memory calculating method and the player software (firmware) is stored in the device flash memory and, it will cause the difference between flash memory marked capacity and real capacity. The real flash memory capacity is lesser than the marked memory capacity of this device is normal. Due to different firmware size, it will have the different free flash memory capacity. Please refer the table as below for more details.
Product Features Support formats MP3 WMA WAV This player supports playback of music files which type is MP3, WMA or WAV. DRM 9 playback This player supports WMA DRM 9 digital authorized music playback. Voice recording function A built-in microphone inside the player enables easy voice recording. Pedometer/Stopwatch This player provides pedometer and stopwatch functions. Color OLED screen There is a build-in 128*64 double color OLED screen.
High Playback quality Sound quality is higher than 90dB SNR. Lyrics synchronization This player supports lyrics synchronization. Plug and play portable storage Allows data transfer to and from a PC with USB 1.1 / 2.0 full-speed interface. The player is also a portable storage device that supports Mass Storage Class without the need to install additional driver, except for Win98SE. Easy and quick battery charging The player’s battery can be charged via USB port from a computer or an USB interface adapter.
System Requirement System requirement of this player: 1. Microsoft® Windows 98SE/2000/Me/XP 2. Pentium 200MHz CPU or higher level CPU 3. USB port 4. 120MB hard disk free space 5.
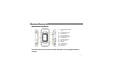
Basic Operation Controls and Functions 1 2 7 8 9 3 4 5 6 10 11 12 (1) (2) (3) (4) (5) (6) (7) (8) (9) (10) (11) (12) Play/Pause Button ( !) Forward Button (") Display Area Reset Hole Rewind Button (#) Menu Button (M) Earphone Jack Volume Up Button (+) Microphone USB Port Volume Down Button (-) REC Button Reset: Reset the player (accessed by a pointed object, such as an unbent paperclip).
Key instruction: Function Action Power On/Off Long press the Play/Pause/Power [ A-B Replay Function Press [REC] button 1st: Select starting point A !] button Press [REC] button 2nd: Select ending point B and replay AB section.
Connecting to PC Install Device Driver for Windows 98SE 1. Execute setup.exe in driver CD and complete the driver installation. 2. Reboot the PC. 3. Connect the MP3 player to the USB port of PC Operation Procedure To upgrade firmware or copy music to the player, please first to power the player off and connect the player to the PC by using a USB cable. After connecting to a PC, the system will create a removable drive in “My Computer” and from which the data stored on the player becomes accessible.
Removing Hardware Use the left button on the mouse to double-click on the icon for removing hardware that is located on the lower right corner of the screen. Please refer to the right picture: When the following screen appears, click “Stop” and then “OK” button to remove the hardware safely.
Battery Charging Be sure to charge the player before initial use for at least 2 hours. This product adopts build-in rechargeable Li-Ion battery. Connect this player to a PC. Please refer to “Connecting to a PC” on previous section for instructions. The battery indicator on the right top of the display shows the battery level. When the battery is charging, the icon will be changing from an empty battery to a full one to indicate the process.
WMA (Support WMA-DRM) Download operation of WMA music with DRM9 (PD-DRM) On Windows 98SE / Windows ME / Windows 2000 / Windows XP, music with DRM should be transferred by Windows Media Player version 9.0 or 10.0 (version 10.0 is for Windows XP only) to MP3 player. Other download operation probably will cause the MP3 player can not read the music files with DRM protection.
On Windows Media Player version 10.0 (Windows XP only) A. B. Connect player to PC. Choose the desired WMA music with DRM. C. Click right button of the mouse and choose “Add to Sync list”. D. On the open window, choose “Sync” option.
E. On “Sync” window, choose the desired WMA music with DRM as step B and choose “Removable Disk”. F. Click “Start Sync” to transfer the WMA music with DRM to the player.
Copy Music Files to the Player If the connection is successful, a removable drive icon will appear in “My Computer”. First, find out your favorite MP3 or WMA audio files in “My Computer”. Second, use the mouse to select those audio files and click those files with the right button of the mouse to select “Copy”. Third, find Removable Drive in “My Computer” and enter it, then right click on the mouse to paste those files to the Removable Drive.
Start-up/down Procedure To power on the player, press the Long press the ! button while the player is off. ! button to power off the player while the player is on to ensure the settings are saved. (The setting will only be saved if the player is power off properly by the user or time up regarding to timer setting). Main Menu When press and hold Menu button, the main menu will be shown on the LCD display. To select the main function, pressing " or # button then press ! button to confirm the selection.
Activate and Deactivate Key Lock Activate Key Lock In Music and Recordings mode, activate key lock under sub menu of Music and Recordings. Key lock is immediately activated by pressing ! button to confirm the selection. Deactivate Key Lock To deactivate the key lock, hold down the ! button until the displayed lock opens and is then hidden from the display as the pictures below (approx. 3 seconds).
Music LCD Display Play mode Playback status Volume Current function Battery level Key lock ID3 tag File type/Bit rate Current track / Total track EQ Elapse time/ Total duration Operation procedure 1. Select “Music” Music function is a default function when power on the player. You also can open the music function by select the Music in the main menu. 2. Play and Pause Music playback stops first when power on or switching to Music playback function from other function.
3. Go to previous Press the " button to replay the current track. If the current track has been played less than five seconds, press the Previous button will skip to the previous track in the current play list. 4. Go to next Press the # button to skip to the next track, if the current track is the final track it will wrap around to the first track in the current play list. 5. Fast rewind Press and hold " button will cause the time code to seek backward quickly 6.
Recordings LCD Display Play mode Playback status Volume Current function Battery level Key lock File name File type/Bit rate Current track / Total track Elapse time/ Total duration Operation Procedure Select “Recordings” Function Select Recordings in main menu to enter Recordings mode and press ! button to start playing. Please refer to the Music mode for the recordings playback and operation. Please note that there is no Shuffle and Shuffle repeat in play mode in the Recordings mode.
Function of the Recordings Play recorded files from Mic. Record. Support recorded files in WAV (ADPCM) format that stored in Recordings directory of the player. Sub Menu of Recordings During Recordings mode, you can press the Menu button to enter the sub menu of “Recordings”. Press the " or # button to navigate in the sub menu, which includes Key lock, Play mode, Navigation, Record settings, Recordings, and Exit. Press the ! button to enter the appointed mode.
MIC. Record LCD Display Sample rate Playback status Key lock Current function Battery level File name Elapse time/ Total duration Operation Procedure 1. Start MIC. Record Press and hold REC button to start MIC. Record from the microphone from whatever function. When the recording icon is flashing, the recording begins. 2. Pause Recording Press the REC button to pause recording and press it again to resume recording. 3.
4. Recorded Files The recorded file is defined automatically as V###.WAV in Recordings directory of the player, ### is a figure composed of three numbers starting with 001 for the first file and 002 for the second one. The format of recorded file is WAV (ADPCM). 5. Sampling rate (Record settings) Sampling rate of recorded file can be set under the sub menu of “Recordings”. The higher the sampling rate, the better recording quality will gain but will produce larger recorded file size.
Utility Select and enter the Utility mode. It includes Pedometer, Stopwatch and exit. Press ! button to enter. Select Exit to return to the upper menu. Pedometer Select and enter the Pedometer option, a dialog box of pedometer settings appears, you can press the " or # button to switch between the ”stride ” and “sex” option and press the + or - button to adjust. After setting is set up, press the ! button to begin counting.
Delete From the main menu, press the " or # button to select the Delete mode. It includes Delete one, Delete all and Exit. Press ! button to enter. The music will be stop after you enter this mode. Select the Exit or press the M button to return to the upper setting. Delete One Under the Delete mode, select and enter the Delete one function from the submenu, select the file you want to delete and press the ! button to eject out a dialog box, choose “yes” to confirm deleting or “No” to exit.
Settings Select and enter the Settings mode. It includes Language, Contrast, Timer settings, Music resume, Load defaults, Memory/FW, and Exit. Press the ! button to enter the appointed submenu. Language Here includes English, French, Spanish, Italian, German and Hungary. After selecting your desired language, press the ! button to save. Select the Exit to return to the upper setting. Contrast Press the " or # button to adjust the brightness, and then press the ! button to save.
3. Backlight Press the " or # button to select the backlight time after which the player will shut down the backlight and press the ! button to save. Music resume Select YES to use this function. Select NO to exit. If you select YES, The player will play the track from the point stopped at last time. Or select NO to start playing from the beginning of the track. Load defaults Select YES return to the default setting. Select NO to exit.
References Lyric Synchronization The player only supports the Lyric Synchronous Display that the file shares the same name as LRC file of MP3 format, e.g., music file is named as “Angel.mp3”, the LRC file must be named as “Angel.Irc”, what's more, they have to be in the same directory. Reset Function If the player can’t use normally as some reasons (It seldom likes this at normal operation), please use the small plastic stick or dielectric to reset the player.
Trouble Shooting If you have problems in operating your player, please check the trouble shooting guide below before sending it to service. Problem: No sound from the earphone Check Items: 1. Check if the earphone is completely inserted into the jack. 2. Check if the music file format is supported by the player.
Technical Specifications 32~320Kbps (Mp3) Music 32~192Kbps (WMA) format 8/11/16/22/32/44/48kHz Frequency (optional) response Record format WAV (ADPCM) SNR >90db Dynamic range >80db (1KHZ) Distortion: <0.05% MP3 bit rate Sampling rate MP3, WMA 20Hz~20KHz (REFERENCE LEVEL:0dBΰMP3α1 mW, 4mW -52dB/-62dBΰVOICE, REFERENCE REQUENCY:1KHZα Dimension 77.5*36.5*17.
Disposal of Used Electrical & Electronic Equipment The meaning of the symbol on the product, its accessory or packaging indicates that this product shall not be treated as household waste. Please, dispose of this equipment at your applicable collection point for the recycling of electrical & electronic equipments waste. In the European Union and Other European countries which there are separate collection systems for used electrical and electronic product.
If the troubleshooting fails to solve your problem, please contact our service & support hotline at: 01805 - 22 17 84 ( € 0,14 / Min. Germany only) In case your product needs to be sent to our service centre, please use the provided return sticker. If the return sticker is missing, please contact the service & support hotline.