Radio Micro System JGC-MS-203 Bedienungsanleitung User Manual JGC-MS-203-01.
deutsch inhaltsverzeichnis inhaltsverzeichnis............................................................................................................................. 2 wichtige sicherheitsanweisungen................................................................................................... 3-4 BEDIENELEMENTE.................................................................................................................................. 5-7 VORBEREITUNG..........................................
VORSICHT Gefahr eines elektrischen Schlages Nicht öffnen ! Warnung: Um die Gefahr eines elektrischen Schlages zu reduzieren, Gehäuse nicht entfernen. Keine für den Anwender brauchbaren Teile im Innern. Reparatur qualifiziertem Servicepersonal überlassen.
deutsch wichtige sicherheitsanweisungen • Stellen Sie das Gerät nicht auf Heizkörper, Öfen oder andere Wärme erzeugenden Geräte, einschließlich Verstärker. • Um das Risiko von Feuer und elektrischem Schlag zu reduzieren, setzen Sie das Gerät weder Feuer (Kamin, Grill, Kerzen, Zigaretten, usw.) noch Wasser aus (Tropfwasser, Spritzwasser, Vasen, Wannen, Teiche, usw.). Netzanschluss • Prüfen Sie vor dem Gebrauch, ob die technischen Daten (Spannung in Volt) den Daten Ihres Stromnetzes entspricht.
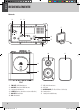
deutsch BEDIENELEMENTE Vorderseite 1 2 3 4 5 6 7 8 9 10 11 12 20 1 2 3 4 5 MEMORY CARD USB IN STOP PLAY/PAUSE 6 7 IR STANDBY 8 STANDBY/ON 9 TIMER 10 FUNCTION 19 18 17 16 SD/MMC Speicherkartensteckplatz USB-Steckplatz 15 14 11 BAND 12 ID3/FM MONO/ ST. LCD-Display 13 Stopp-Taste 14 EQ Wiedergabe, Pause 15 SKIP/TUNE SEARCH Infrarotsensor (Fernbedienung) 16 VOLUME STANDBY-Anzeige 17 SKIP/TUNE SEARCH STANDBY/ON-Taste 18 MEM/C-ADJ. (Standby-Modus / Ein) TIMER-Taste (autom.
deutsch BEDIENELEMENTE Rückseite 21 22 23 27 24 25 26 30 31 28 29 21 22 23 24 25 26 FM ANT. UKW-Wurfantenne AM ANT. Anschluss MW-Antenne Lautsprecherklemmen LINE IN Buchse (Anschluss externer Quellen) ON OFF Netzschalter AC~ Netzkabel 27 28 29 30 31 MW-Schleifenantenne CD-Fach OPEN/CLOSE (CD-Fach öffnen / schließen) Lautsprecher Lautsprecherabdeckung 6 JGC-MS-203-01.
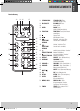
deutsch BEDIENELEMENTE Fernbedienung 32 33 34 35 32 STANDBY/ON 33 ID3/MO./ST. 34 35 BAND 36 FUNCTION 53 36 37 38 52 37 38 39 SKIP/TUNE SEARCH 40 39 SKIP/TUNE SEARCH 51 40 50 41 42 42 49 43 44 43 44 48 45 46 47 41 45 46 47 48 STANDBY/ON-Taste (Standby-Modus / Ein) ID3/MO./ST.
deutsch VORBEREITUNG Bestimmungsgemäßer Gebrauch Der bestimmungsgemäße Gebrauch dieses Hi-Fi Systems umfasst das Abspielen von Audio- und MP3/WMA-CDs, Radio, USB Speichergeräten, Speicherkarten (SD/MMC) mit MP3/WMA Dateien und externen Quellen. Das Gerät ist nur für den häuslichen Privatgebrauch bestimmt. Benutzen Sie das Gerät niemals im Freien! Auspacken und Kontrolle • Entfernen Sie das Verpackungsmaterial und untersuchen Sie das Gerät auf Transportschäden.
deutsch GRUNDFUNKTIONEN Hinweise zur Fernbedienung • Achten Sie darauf, dass sich keine Gegenstände zwischen der Infrarot-LED (34) der Fernbedienung und dem Infrarotsensor (6) am Gerät befinden. • Beachten Sie, dass direktes Sonnenlicht oder Raumbeleuchtung die korrekte Funktion der Fernbedienung beeinflussen kann. Wenn die Fernbedienung nicht richtig funktioniert, versuchen Sie den Raum abzudunkeln oder den Abstand zwischen Gerät und Fernbedienung zu reduzieren.
deutsch GRUNDFUNKTIONEN Automatisches Ausschalten • Das Gerät hat eine automatische Abschalt-Funktion. Sie können eine Abschaltzeit von 90 bis 10 Minuten einstellen. • Drücken Sie während des Betriebes mehrfach die SLEEP-Taste (51), um die Abschaltzeit in 10 MinutenSchritten zu verringern. Wählen Sie damit die verbleibende Zeit bis zum Ausschalten aus.
deutsch GRUNDFUNKTIONEN Weckzeit einstellen • Sie können eine Einschalt- und eine Ausschalt-Uhrzeit einstellen, zu der sich das Radio, der CD-Spieler oder eine andere Audioquelle (USB-Speichergerät oder SD/MMC-Karte) einschaltet bzw. ausschaltet. • Sie können die Einschalt/Ausschalt-Uhrzeit einstellen, wenn das Gerät eingeschaltet ist oder im StandbyModus. • Drücken Sie die TIMER-Taste (53), um die Einschalt-Uhrzeit einzustellen. Im Display (3) erscheint ON und 00:00 (Abb. 2).
deutsch AUDIOEINSTELLUNGEN, ANSCHLÜSSE Lautstärke • Stellen Sie die gewünschte Lautstärke mit den Tasten VOLUME+ (45) und VOLUME– (46) ein. Sie können die Lautstärke auch durch Drehen des Lautstärkereglers (16) am Gerät einstellen. • Die Lautstärke wird auf dem LCD-Display (3) angezeigt, z.B. VOL 11. Kleinere Zahlen stehen für niedrige Lautstärke, höhere für größere Lautstärke. Zusätzlich sehen Sie im Display unten immer VOLUME mit Lautstärkebalken. • Das Gerät speichert die Lautstärke im Standby-Modus.
deutsch RADIOBETRIEB • Drücken Sie die FUNCTION-Taste (36) so oft, bis im LCD-Display (3) TUNER anzeigt wird. Das Gerät ist nun im Radiobetrieb. • Drücken Sie die BAND-Taste (35), um zwischen UKW (Ultrakurzwelle) und MW (Mittelwelle) umzuschalten. Im Display wird UKW als FM (Frequenzmodulation) und MW als AM (Amplitudenmodulation) angezeigt. • Mit der ID3/MO./ST.-Taste (33) schalten Sie zwischen Mono und Stereo-Empfang um. Nur UKW-Sender werden in Stereo ausgestrahlt.
deutsch CD-SPIELER • Eine CD kann sowohl eine im Handel erworbene Audio-CD sein, als auch eine Daten CD (CD-R, CD-RW) mit MP3/WMA-Dateien. Während auf einer Audio-CD bis zu 80 Minuten Spielzeit untergebracht ist, kann eine MP3/WMA-CD 12 Stunden und mehr enthalten. • Dieses Gerät unterstützt die CD-Formate Audio-CD, beschreibbare CD-R und CD-RW mit MP3/WMADateien. • Das Gerät unterstützt das Abspielen von beschreibbaren CDs.
deutsch CD-SPIELER Titelsuche, Vor- und Rücklauf • Drücken Sie auf (40), um zum Titelanfang des nächsten Titels zu springen. • Drücken Sie auf (39), um zum Titelanfang des laufenden Titels zurück zu springen. Durch zweifaches Drücken springen Sie auf den Anfang des vorherigen Titels zurück. • Wenn Sie diese Tasten länger gedrückt halten, erhöht sich die Abspielgeschwindigkeit. Sobald Sie die Taste loslassen, wird die Wiedergabe in normaler Geschwindigkeit wird fortgesetzt.
deutsch CD-SPIELER Hinweise: • Die Wiederholungs-Funktion kann mit dem Abspielen eines Programms kombiniert werden. Lesen Sie dazu den Abschnitt Wiederholungs-Funktion. • Wenn Sie 10 Sekunden lang keine Taste drücken, wird die Titelprogrammierung abgebrochen. MP3/WMA-CD abspielen • Im folgenden Abschnitt werden die Unterschiede beim Abspielen eine MP3/WMA-CD beschrieben.
deutsch CD-SPIELER Titelwiedergabe programmieren • Sie können den CD-Spieler programmieren, eine beliebige Abfolge von bis zu 64 Titeln (für MP3/WMADateien) zu spielen. Drücken Sie die Stopp-Taste (37), bevor Sie mit der Programmierung beginnen. • Drücken Sie die MEM/C-ADJ.-Taste (52), um in den Programmier-Modus zu wechseln. Im Display werden MEMORY und die Programmplatznummer P-- 01 angezeigt. Die Ordnernummer 00 blinkt (Abb. 9). Abb.
deutsch USB-SPEICHER UND SD/MMC-KARTEN • Achten Sie darauf, dass das Gerät im Standby-Modus ist. Stecken Sie den USB-Speicher vorsichtig in den USB-Steckplatz (2), und die SD/MMC-Karte in deren Kartensteckplatz (1). • Schalten Sie das Gerät mit dem STANDBY/ON-Taste (8) ein. • Wählen Sie mit der FUNCTION-Taste (36) die Betriebsart USB für USB-Speicher oder CARD für Speicherkarten aus. • Die Funktionen für MP3/WMA-CDs gelten auch für USB-Speicher und Speicherkarten.
deutsch REINIGUNG UND PFLEGE Compact Disc • Wischen Sie Fingerabdrücke und Staub sorgfältig mit einem weichen Tuch ab. Wischen Sie vom Zentrum zum Rand (nicht kreisförmig). • Reinigen Sie die Disc in regelmäßigen Abständen mit einem weichen, fusselfreien, trockenen Tuch. Verwenden Sie auf keinen Fall Lösungs- oder Scheuermittel. • Schreiben Sie nicht auf CDs. Bringen Sie auch keine Aufkleber darauf an. • Schützen Sie CDs vor Staub und Kratzern.
deutsch PROBLEMLÖSUNG Wenn ein Fehler auftritt, überprüfen Sie zuerst unten stehende Tabelle, bevor Sie sich an Ihren Händler wenden oder das Gerät einschicken. Die Adresse und Hotlinenummer finden Sie auf der Garantiekarte. Öffnen Sie das Gerät nicht und versuchen Sie nicht, es selbst zu reparieren. Sie verlieren die Garantieansprüche und es besteht Unfallgefahr! Beachten Sie die Garantiebedingungen auf den folgenden Seiten. Problem Ursache Lösung Kein Ton. Lautstärke ist zu niedrig eingestellt.
Stromversorgung Netzspannung 230-240 V~, 50Hz Fernbedienung CR2032 Batterie (im Lieferumfang enthalten) Leistungsaufnahme 15,6 W Lasertyp Klasse 1 Lautsprecher 2 x 8 W Lautsprecher deutsch TECHNISCHE DATEN Abmessungen Gerät 180 (B) x 105 (H) x 220 (T) mm Lautsprecher 100 (B) x 183(H) x 182 (T) mm Radio UKW-Bereich 87,5 - 108MHz MW-Bereich 522 - 1620 kHz Laufwerk für 8 cm und 12 cm Durchmesser; nur kreisförmig, keine Sonderformen CD-Formate CD Audio, CD-R, CD-RW Speicherformate USB T
deutsch garantie Kunden Info Herstellergarantie 3 Jahren ab Kaufdatum zu den nachfolgenden Bedingungen: Diese Garantie lässt Ihre gesetzlichen Gewährleistungsansprüche als Verbraucher gegenüber dem Verkäufer des Gerätes unberührt. Diese Rechte werden durch die von uns gewährte Herstellergarantie nicht eingeschränkt. Die von uns gewährte Garantie hat nur Gültigkeit für den privaten Gebrauch des Gerätes und beschränkt sich auf das Gebiet der Bundesrepublik Deutschland.
deutsch garantie Zur Durchführung einer Garantiereparatur benötigt unser Servicepartner unbedingt den Kaufnachweis, entweder als Originalrechnung oder den vom Händler maschinengedruckten Kassenbeleg. Weiterhin muss die Seriennummer am Gerät lesbar sein. Ohne Kaufnachweis können wir leider keine kostenlosen Garantieleistungen erbringen. Wir empfehlen Ihnen, die Originalverpackung aufzubewahren, um im Garantiefall einen sicheren Transport des Gerätes zu gewährleisten.
ENGLISH TABLE OF CONTENTS TABLE OF CONTENTS............................................................................................................................. 24 IMPORTANT SAFETY INSTRUCTIONS........................................................................................................ 25-26 CONTROL ELEMENTS............................................................................................................................. 27-29 PREPARATION........................................
CAUTION RISK OF ELECTRIC SHOCK DO NOT OPEN Warning: To reduce the risk of electric shock. Do not remove cover. No user serviceable parts inside. Refer servicing to qualified service personnel. ENGLISH IMPORTANT SAFETY INSTRUCTIONS The lightning flash with arrowhead symbol, with in an equilateral triangle, is intended to alert user to the presence of uninsulated “dangerous voltage” within the product enclosure that may be of sufficient magnitude to constitute a risk of electric shock to persons.
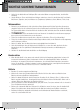
ENGLISH IMPORTANT SAFETY INSTRUCTIONS Power supply • Before using the appliance, check that your mains supply is suitable for the rated voltage of your appliance. Review the technical specification in these instructions and on the rating label located on the rear and the bottom of the appliance. Only the power plug can disconnect the appliance from the mains completely. • The STANDBY/ON button does not disconnect the appliance from the mains power supply.
ENGLISH CONTROL ELEMENTS Front side 1 2 3 4 5 6 7 8 9 10 11 12 20 1 2 MEMORY CARD USB IN 3 4 5 STOP 19 18 17 16 IR 7 STANDBY 11 BAND USB jack 12 ID3/FM MONO/ ST. 13 14 EQ 15 SKIP/TUNE SEARCH 16 VOLUME LCD display stop button playback, pause infrared sensor (remote control) STANDBY indicator 8 STANDBY/ON STANDBY/ON button (standby mode / on) 9 TIMER TIMER button (autom.
ENGLISH CONTROL ELEMENTS Back side 21 22 23 27 24 25 26 30 31 28 29 21 22 23 24 25 26 FM ANT. FM wire aerial AM ANT. AM loop antenna jack loudspeaker terminals LINE IN jack (connect external devices) ON OFF power switch AC~ power chord 27 28 29 30 31 MW loop antenna CD compartment OPEN/CLOSE (open / close CD compartment) loudspeaker loudspeaker cover 28 JGC-MS-203-01.
ENGLISH CONTROL ELEMENTS Remote Control 32 33 34 35 32 STANDBY/ON 33 ID3/MO./ST. 34 35 BAND 36 FUNCTION 53 36 37 38 52 39 51 40 50 41 42 49 43 44 48 45 46 37 38 39 SKIP/TUNE SEARCH 40 SKIP/TUNE SEARCH 41 42 43 44 45 46 47 48 47 STANDBY/ON button (standby mode / on) ID3/MO./ST.
ENGLISH PREPARATION Intended use • The intended use of this HiFi system includes the playback of Audio- and MP3/WMA-CDs, radio, USB flash devices, memory cards (SD/MMC) with MP3/WMA files and external sources. The appliance is only intended for domestic and private use. Never use the appliance outdoors! Unpacking and checking • • • • • Remove all packaging and check the appliance for transport damage. Do not use the appliance if it is damaged in any way. Bring it back to the dealer immediately.
ENGLISH BASIC FUNCTIONS Notes for remote control • Make sure that there are no objects between the remote control infrared LED (34) and the infrared sensor (6) on the appliance. • Please note that bright sunlight or room lighting may interfere with the remote control operation. If the remote is not operating properly try reducing the brightness of the room or moving closer to the main appliance. If this does not solve the problem, replace the remote control battery.
ENGLISH BASIC FUNCTIONS Automatic switch off • This system provides a timer function. You can set the appliance to switch off automatically after a period of 90 to 10 minutes. • During operation press repeatedly the SLEEP button (51) to reduce the time in 10 minutes increments. Adjust the remaining time to switch-off.
ENGLISH BASIC FUNCTIONS Set timer • You can set a time at which the appliance will switch on or off and playback radio, CD or another audio source (USB flash memory, SD/MMC card). • The switch-on/off time can be set while the appliance is switched on or in standby mode. • Press the TIMER button (53) to set the switch-on time. The display (3) shows ON and 00:00 (Fig. 2). • Adjust the hour digits with (39) or (40) and confirm with the TIMER button.
ENGLISH AUDIO SETTINGS, CONNECTIONS Volume • Adjust the desired volume with the buttons VOLUME+ (45) or VOLUME– (46). You can also adjust the volume by turning the volume control (16) on the appliance. • The volume level is shown on the LCD display (3), e.g. VOL 11. Small numbers represent a low volume, large numbers represent a higher volume. Moreover VOLUME is displayed together with the volume level indicator. • The appliance stores the set volume in standby mode.
ENGLISH RADIO • Press the FUNCTION button (36) until TUNER appears on the LCD display (3). The appliance is set to radio operation. • Press the BAND button (35) to switch between FM and AM bands. • Switch between Mono and Stereo reception by pressing the ID3/MO./ST. button (33). Only FM stations are broadcasted in Stereo. The display shows a symbol to indicate an FM stereo signal. • If the FM Stereo reception is noisy or weak switch to Mono reception to increase the quality of the radio reception.
ENGLISH CD Player • You can use a normal audio CD or a data CD (CD-R, CD-RW) with MP3/WMA files. While an audio CD contains up to 80 minutes music, a MP3/WMA CD can contain 12 hours and more. • This appliance supports the CD formats of audio CD, writable CD-R and CD-RW with MP3/WMA files. • The appliance supports the playback of writable CDs. The playback quality may depend on the recording quality and on the quality of the disc. Playback cannot be guaranteed in all situations. This is not a malfunction.
ENGLISH CD Player Track search, fast forward and fast backward • Press (40) to go to the beginning of the next track. • Press (39) to go to the beginning of the currently played track. Press button twice to go to the beginning of the previous track. • If you press and hold these buttons the playback speed will increase. As soon as you release these buttons the playback will resume to normal speed. Random playback • Press the RANDOM button (44) to playback all tracks in random order.
ENGLISH CD Player Notes: • The repeat function can be combined with playing a programme. Refer to paragraph Repeat function. • If no button is pressed within 10 seconds, the track programming ends. Playback MP3/WMA-CD • The following paragraph describes the differences in MP3/WMA-CD playback. • As MP3/WMA CDs contain more tracks than normal CDs this CD player will take longer to read the table of contents information. The LCD display (3) shows the number of directories (album) and the number of tracks.
ENGLISH CD Player Programming CD tracks • Programme the CD player to play a user-defined playlist of up to 64 tracks (for MP3/WMA files). Press the stop button (37) before starting to programme tracks. • Press the MEM/C-ADJ. button (52) to switch to programme mode. The display shows MEMORY and the storage place number P--01. The track number 00 flashes (Fig. 9). • Choose the folder with (41) or (42) and confirm your Fig. 9 selection with the MEM/C-ADJ. button.
ENGLISH USB Flash Memory and SD/MMC Memory Card • Ensure that the appliance is set to standby mode. Insert the USB flash memory carefully into the USB jack (2), and the SD/MMC memory card into the memory card slot (1). • Switch on the appliance by pressing the STANDBY/ON button (8). • Press the FUNCTION button (36) to select the operation mode USB for USB flash memory or CARD for memory cards. • The functions for MP3/WMA-CD also apply to USB flash memory and memory cards.
ENGLISH CLEANING AND CARE Compact Disc • Fingerprints and dust should be carefully wiped off the disc’s recorded surface with a soft cloth. Wipe in a straight line from the centre to the outside of the disc (never circular). • Clean the disc periodically with a soft, lint-free, dry cloth. Never use detergents or abrasive cleaners to clean the disc. • Never write on or affix labels to the surface of CDs. • Protect CDs from dust and scratches. Always store them in their cases when they are not in use.
ENGLISH TROUBLESHOOTING If a fault occurs, first check the points listed below before taking the appliance for repair or sending it to the service centre. The address and phone number are shown on the warranty card. Do not open the casing as there is a risk of electric shock. Under no circumstances should you try to repair the set yourself, as this will invalidate the warranty. Pay attention to the warranty Problem Possible cause Solution No sound. Volume is set too low. Set the volume higher.
Power supply 230-240 V~, 50 Hz Remote control CR2032 battery (battery included) Power consumption 15.6 W Laser type Class 1 Loudspeaker 2 x 8W loudspeaker ENGLISH TECHNICAL DATA Dimensions Appliance 180 (B) x 105 (H) x 220 (T) mm Loudspeaker 100 (B) x 183(H) x 182 (T) mm Radio FM 87.5 - 108 MHz AM 522 - 1620 kHz Disc drive for 8cm and 12cm diameter; only circular, no special forms Disc compatibility CD Audio, CD-R, CD-RW Memory compatibility USB 1.1, USB 2.
ENGLISH WARRANTY Customer Info Manufacturer‘s Warranty 3 Years from the date of purchase to the following conditions: This warranty declaration does not limit your statutory warranty rights as a consumer against the seller of the device. Our warranty is only valid for the private use of the device and is limited to the territory of the Federal Republic of Germany. The warranty period is 3 years from date of purchase.
ENGLISH WARRANTY To effect a warranty repair our service partner needs Proof of purchase, either as an original invoice from the dealer or the cash-register printed document. Furthermore, the serial number must be legible on the appliance. Without Proof of purchase unfortunately, we can not guarantee free services. We recommend that you keep the original packaging in order to ensure a safe transportation of the equipment.