
Use and Care Guide

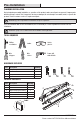
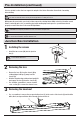
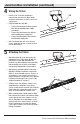
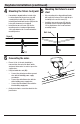
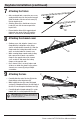
Table Of Contents
- WHAT IS COVERED
- Table of Contents
- Safety Information
- Warranty
- Pre-Installation
- Pre-Installation (continued)
- Junction Box Installation
- Junction Box Installation (continued)
- Keyhole Installation
- Keyhole Installation (continued)
- Keyhole Installation (continued)
- Battery Replacement and Specifications
- Lighting Control Switch
- Test Switch
- Care and Cleaning
- Troubleshooting

8
Keyhole Installation (continued)
4
Mounting the fixture to drywall
□ If mounting to drywall without a stud, at the
locations marked in the previous step, drill
a small pilot hole with 1/8in. drill bit (not
included) and install wall anchors (DD) into the
holes with a hammer (not included).
□ Install the two wood screws (CC) into the
mounting surface, leaving an approximate
3/8in.gap between the screw head and the
mounting surface.
Drywall
DD
CC
5
Mounting the fixture to a wall
stud
□ If the mounting holes align with wall studs,
drill a pilot hole using a 5/32 in. drill bit (not
included) for the wood screws (CC).
□ Install the two wood screws (CC) into the
mounting surface leaving an approximate
3/8in.gap between the screw head and
mounting surface.
Wall stud
CC
6
Connecting the wires
□ Ensure 3/8 in. of the wire sheathing is
removed from the end of the black, white,
and green xture wires in order to expose the
copper wires.
□ Using included wire nuts (BB):
□ Connect the yellow/green xture ground
wire with the building power supply
ground wire.
□ Connect the white xture wire with the
white building power supply wire.
□ Connect the black xture wires with the
black building supply wire.
□ Gently tuck all wire connections back into the
junction box.
A
BB