
Use and Care Guide

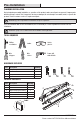
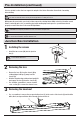
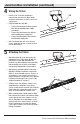
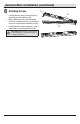
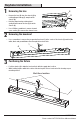
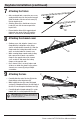
Table Of Contents
- WHAT IS COVERED
- Table of Contents
- Safety Information
- Warranty
- Pre-Installation
- Pre-Installation (continued)
- Junction Box Installation
- Junction Box Installation (continued)
- Keyhole Installation
- Keyhole Installation (continued)
- Keyhole Installation (continued)
- Battery Replacement and Specifications
- Lighting Control Switch
- Test Switch
- Care and Cleaning
- Troubleshooting

9 HOMEDEPOT.com
Please contact 1-877-527-0313 for further assistance.
Keyhole Installation (continued)
7
Attaching the fixture
□ After ensuring all wire connections are secure,
gently tuck the wires into the junction box and
guide the heads of the two wood screws (CC)
into the keyhole slots.
□ Slide the xture (A) so that the wood screw
heads (CC) rest over the narrow part of the
keyhole slot.
□ Ensure that the xture (A) is supported and
tighten the two wood screws (CC) until the
xture is secured to the mounting surface.
CC
8
Attaching the channel cover
□ Starting on one side, align the channel cover
ange with the locking tabs on the xture
chassis as indicated in schematic (1). Slide the
ange under the locking tabs and be sure all
wires are tucked under the channel cover.
□ While ensuring ange remains under locking
tabs, squeeze the channel cover until the
ange on the opposite side of the channel
cover are able to slide under the locking
anges on the opposite side.
□ Once channel cover is securely in place and
all wires are inside the channel cover, replace
channel cover screws (E) using a Phillips
screwdriver.
E
A1
9
Attaching the lens
□ Carefully slide the end of the lens (B) into the
xed endcap on the xture base (A).
□ While holding the lens (B), rotate the hinged
endcap (C) outward and ensure the full length of
the lens is now at against the xture base (A).
□ Carefully allow the hinged endcap (C) to rotate
inward until it is resting against the lens (B).
IMPORTANT: Hinged endcap (C) is spring loaded. To
avoid possible damage, do not allow hinged endcap (C)
to snap back against the lens.
A
B
C