
User Manual

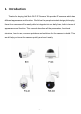

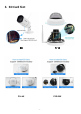
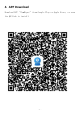
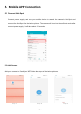
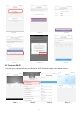
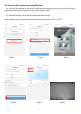
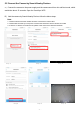
Table Of Contents
- Wi-Fi IP CAMERA
- 1.Introduction
- 2.Installation
- 3.SD Card Slot
- 5.Mobile APP Connection
- 5.1 Connect Hot-Spot
- Connect power supply and use your mobile device to
- 5.2 Add Camera
- Add your camera to ‘CamHipro’ APP follow the steps
- 5.6.1 Video playback and download
- 5.6.2 Local files, device list and add other new c
- 5.6.3 Pre-set point and auto cruise (For PTZ)
- 5.6.4 Change password
- Click “Change Password” to modify the password. Ol
- 5.6.5 Alarm management and notification
- 5.6.9 Video setting and audio setting
- 5.6.10 SD card plan recording
- 5.6.11 SD card setting
- 5.6.12 Device time setting
- 5.6.13 Default setting
- 6.Computer Browsing Access
- 7.Video Management Software (P2P Client)
- Service Guarantee

- 8 -
5.5 Connect the Camera by Search Nearby Devices
A
)
Connect the camera to the power supply and the camera would turn into self-test mode, which
would take about 15 seconds. Open the ‘CamHipro’ APP.
B) Add the camera by Search Nearby Devices follow the below steps.
Note:
1. Please make sure that the camera has been connected to router’s Wi-Fi.
2. Please make sure that your cell phone connects the same Wi-Fi as the camera connected.
3. If there is no camera on the device list, please come close to the camera and refresh.
Step 1 Step 2 Step 3
Step 4 Step 5 Step 6