
User Manual


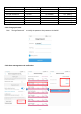
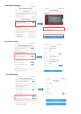
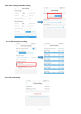


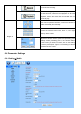
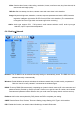

Table Of Contents
- Wi-Fi IP CAMERA
- 1.Introduction
- 2.Installation
- 3.SD Card Slot
- 5.Mobile APP Connection
- 5.1 Connect Hot-Spot
- Connect power supply and use your mobile device to
- 5.2 Add Camera
- Add your camera to ‘CamHipro’ APP follow the steps
- 5.6.1 Video playback and download
- 5.6.2 Local files, device list and add other new c
- 5.6.3 Pre-set point and auto cruise (For PTZ)
- 5.6.4 Change password
- Click “Change Password” to modify the password. Ol
- 5.6.5 Alarm management and notification
- 5.6.9 Video setting and audio setting
- 5.6.10 SD card plan recording
- 5.6.11 SD card setting
- 5.6.12 Device time setting
- 5.6.13 Default setting
- 6.Computer Browsing Access
- 7.Video Management Software (P2P Client)
- Service Guarantee

- 10 -
5.6.2 Local files, device list and add other new camera
Click to view the local file of different cameras.;click to change the camera device
list;click to add a new camera.
5.6.3 Pre-set point and auto cruise (For PTZ)
Click the camera into real-time monitor -- turn to next page -- preset position
Number 1-8 means 8 points you want to set up
Adjust the camera rotation to the first point you want to monitor on the app; input "1" and Setting;
Adjust the camera rotation to the second point you want to monitor on the app; input "2" and Setting;
……until set up 8 points……
After you set up 8 points, input "41" and transfer. The camera will auto cruise.
Input "41" and Setting, auto cruise will stop.
There are 8 cruise lines can be set.