Worldwide Leader in Steaming Equipment Since 1940 Esteam® and J-Series OWNER’S MANUAL © Copyright 2014 Printed on Post-Consumer Recycled Paper PRINTED IN THE USA FORM #5500B - REVISION 17
Congratulations and Thank You! Thank you for purchasing your Jiffy® Steamer from the world’s leading manufacturer of steaming equipment since 1940. We strive to engineer and manufacture the very best steamer available backed by superior customer service. With proper maintenance and cleaning, your Jiffy® Steamer will last through years of demanding use. Thank you again and we sincerely appreciate your business.
Important Jiffy® Steamer Safety Instructions When using your Jiffy® Steamer, basic precautions should always be followed, including the following: 1. WARNING! Read all instructions prior to usage. 2. To reduce the risk of contact with hot water emitting from steam vents, check appliance before each use by holding it away from body and operating. 3. Use appliance only for its intended use. Steam only in an up and down vertical motion.
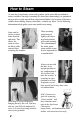
How to Steam As your dry cleaner knows, steam is the gentlest, safest, most efficient method to remove wrinkles. Not only is steaming five times faster than ironing, it is guaranteed not to scorch even the most delicate materials and fabrics. Our steamers will remove wrinkles from clothing, drapery, tablecloths...virtually any fabric. Use the following information to help guide you to more proficient steaming. Some articles can be steamed better from the underside.
Esteam® Features and Directions.
Esteam® Parts Diagram 6
Should you ever need replacement parts for your Jiffy® Steamer, you may purchase them separately. Use this handy diagram and parts list to identify any part you may need. Please include model and serial number when ordering. Key# 1 1a. Jiffy Steamer Part # 0653 0655 1b. 1c.
Esteam® Cleaning Instructions Once you begin to see calcium scale collect in the bottom of your ESTEAM® hand steamer, it is time to use the Jiffy® Steamer Liquid Cleaner. It is important that you use our cleaner as it was specially formulated for our products. Using another cleaner could void the warranty. Please follow these instructions: 1. Pour 4 ounces of water in your ESTEAM® hand steamer. 2. Plug in the unit and bring to full steam. 3. Unplug the unit and allow to cool for 2 minutes. 4.
ITEM # 0890 Now you can take your Jiffy Steamer everywhere you go with our innovative Jiffy Steamer Travel Case. This case can be used with any model Jiffy Steamer and is ideal for transporting your steamer to trade shows, work sites, trunk shows, conferences and conventions. Never be without your Jiffy Steamer again! The Jiffy Steamer Travel Case is constructed with the finest materials to insure the protection of your steamer.
Jiffy® J-1 and J-2 Model Steamer FEATURES • Cast aluminum housing for durability (Models J-1 and J-2) • Lightweight, flexible hose - Models J-2 (J-1 series utilizes a brass hat nozzle) • Shatterproof water bottle • Safety wiring feature temporarily turns the unit off if it accidentally runs dry • Comfortable, easy-to-grip handle • Removes wrinkles up to five times faster than conventional ironing • Easy-roll casters for mobility (casters not included with J-1 series) • Numerous steam head attachments avai
Jiffy ® J-1 and J-2 Model Steamer Directions 1. For J-2 models, attach hose firmly with included assembly wrench, which is magnetized and located on the bottom of the unit (figure #1). Assemble and attach hose hanger rod set. For J-1 models, the brass hat nozzle should already be attached. There is no rod set or hose attachment for J-1 models. Every Jiffy® Steamer has been factory tested and it is not uncommon for small amounts of water to be in the unit. Figure 2 3.
Jiffy ® J-1 and J-2 Parts Diagram 8 1 3 2 4 11 5 9 10 16 6 12 7 14 13 19 15 21 23 22 18 24 20 28 27 26 25 Should you ever need replacement parts for your Jiffy® Steamer, you may purchase them separately. Use this handy diagram and parts list to identify any part you may need. Please include model and serial number when ordering.
Key# 5 6 7 8 9 10 11 12 13 14 15 16 17 Jiffy Steamer Part # Part Description 0036 1033 0037 0043 0039 0253 0251 0280 0003B 0003C 0023 0027 0026A 0025 0027A 0027B 0004 0122 0127 0128 1125 1126 0132 0146B 0028 0147 0148 0596 0177A 0597 18 19 20 21 0597A 0161A 0162A 0030 1130 0591 1191 0187 0160 0195 0151 0009 0011 0010 22 23 24 25 26 27 ACCESSORIES 28 1026 1050 0274 0254 0256 0269 0262 1062 1063 0899 Middle Section of Rod Set Bottom Section of Rod Set (with Nut Attached) Bottom Section of Rod Set (
Jiffy®J-1 and J-2 Wiring Diagram Caution: Orange White 5 Yellow 6 2 Insure that the power cord is unplugged from the electrical outlet before attempting to repair your Jiffy® Steamer.
Jiffy® J-1 and J-2 Wiring Instructions Before attempting any repair on a Jiffy Steamer product, make sure that it is unplugged from the outlet. If you have any questions, please contact our repair department at 1-800-525-4339 between 7:30 AM - 4:00 PM Central Standard Time. Please note switch terminal 2, 3, 5 and 6 indicated on the enlarged switch diagram are marked on the actual switch. Jiffy® Steamers manufactured before May 2000 are not marked with the terminal switch numbers.
Jiffy® J-2000 Model Steamer FEATURES • • • • • • • • • • Polymer outer housing unit for durability Lightweight, flexible hose Shatterproof water caddy Safety wiring feature temporarily turns the unit off should it accidentally run dry Comfortable, easy-to-grip handle Removes wrinkles up to five times faster than conventional ironing Easy-roll casters for mobility Numerous steam head attachments available 120 volt or 230 volt units available Backed by Jiffy®’s renowned Customer Service--should your steam
Jiffy® J-2000 Directions 1. Attach hose firmly with included assembly wrench, which is magnetized and located on the bottom of the unit. Assemble and attach hose hanger rod set. Every Jiffy® Steamer has been factory tested and it is not uncommon for small amounts of water to be in the unit. Figure 1 3. For easy operation, mount optional Jiffy® Steamboard to door or wall to hold clothing while steaming (figure #2).
Jiffy® J-2000 Parts Diagram 3 2 11 1 4 6 7 10 8.2 8.1 8 13 15 14 27 25 26 18 20 22 21 17 5 19 16 24 Should you ever need replacement parts for your Jiffy® Steamer, you may purchase them separately. Use this handy diagram and parts list to identify any part you may need. Please include model and serial number when ordering.
1 2 3 4 Jiffy Steamer Part # 5 6 7 8 8.1 8.
Jiffy® J-2000 Wiring Diagram Orange White 5 6 2 Caution: Insure that the power cord is unplugged from the electrical outlet before attempting to repair your Jiffy® Steamer.
Jiffy® J-2000 Wiring Instructions Before attempting any repair on a Jiffy Steamer product, make sure that it is unplugged from the outlet. If you have any questions, please contact our repair department at 1-800-525-4339 between 7:30 AM - 4:00 PM Central Standard Time. Please note switch terminal 2, 3, 5 and 6 indicated on the enlarged switch diagram are marked on the actual switch. Jiffy® Steamers manufactured before May 2000 are not marked with the terminal switch numbers.
Jiffy® J-4000 Pro-Line Model Steamer FEATURES • Built-in, easy-to-read sight gauge which indicates water level and sediment build-up. • Cast aluminum housing unit for durability • Corrosion-proof stainless steel boiler tank--no water lines to become clogged with hard water deposits • Dual thermostats for preheat and steam settings.
1. Attach hose firmly with included assembly wrench, which is magnetized and located on the bottom of the unit (figure #1). Assemble and attach hose hanger rod set (figure #2). For “H” series models, there will be no hose attachment or rod set to attach. 2. Using supplied funnel, add a maximum of four quarts of warm (fresh tap or distilled) water (cold water takes longer to preheat). Do not overfill.
Jiffy® J-4000 Parts Diagram * For models manufactured after March 2005. 3 1 2 10 4 9 8 7 15 13 14 5 11 18 19 21 12 20 17 16 22 25 23 28 29 27 26 24 Should you ever need replacement parts for your Jiffy® Steamer, you may purchase them separately. Use this handy diagram and parts list to identify any part you may need. Please include model and serial number when ordering.
Jiffy Steamer Part # Part Description 5 6 7 8 9 10 11 12 13 14 15 16 17 18 19 20 21 22 23 24 25 26 27 28 ACCESSORIES 29 0036 1033 0037 0038 0043 0039 0253 0251 0280 1302 1303 0006 0004 0049P 0053 0054 0199 0201 1310 1311 0133 0146C 0050 1353 1354 0074A 0074C 1370 0071 0061 0062 0075 0063 0064 0203 0204 0155 0158 1320 0017 0018 1026 1027 1050 0259 0257 0252 0255 0254 0256 0269 0262 0274 1062 1063 0899 Middle Section of Rod Set (with Barrel Stud and Cap Screw) Bottom Section of Rod Set (with Nut Att
Jiffy® J-4000 Wiring Diagram Caution: Insure that the power cord is unplugged from the electrical outlet before attempting to repair your Jiffy® Steamer.
Jiffy® J-4000 Wiring Instructions Please note, the switch terminal numbers and the switch terminal letters are marked on the actual switch. 1. Positive black (1) (brown for 230 volt units) to A on switch. 2. Neutral white to (2) brown fuse wire (4) (blue for 230 volt units). 3. Green ground wire (3) to grounding mount on housing. 4. Brown fuse (4) wire to B on switch. 5. Blue wire (5) from top of preheat thermostat (L170) to #1 on switch. 6. White wire (6) from left side of element to #4 on switch. 7.
Jiffy® J-1, J-2 and J-2000 Cleaning Instructions. The cleaning procedure below is recommended as a regular maintenance measure to help your steamer maintain its maximum steaming performance. This maintenance should be performed on a basis of every 3-6 months depending on your water supply. In most cases, a steamer that is severely clogged will require disassembly to properly clean and prolong the life span of the unit.
Jiffy® J-4000 Cleaning Instructions The cleaning procedure below is recommended as a regular maintenance measure to help your steamer maintain its maximum steaming performance. This maintenance should be performed on a basis of every 3-6 months depending on your water supply. In most cases, a steamer that is severely clogged will require disassembly to properly clean and prolong the life span of the unit. An authorized repair center or a Jiffy® Steamer service technician best performs this disassembly. 1.
Jiffy® Steamer Maintenance Clean and rinse your steamer regularly: All steamers need to be cleaned and rinsed on occasion to remove mineral deposits. We recommend our Jiffy® Steamer Liquid Cleaner for cleaning internal parts. Never use additives: Additives such as salt, vinegar, bleach, perfumes and dyes should never be added to your steamer water. These substances will corrode or clog internal parts.
Other Jiffy® Steamer Accessories Esteam® Converter & Adapter Plugs Take your Esteam® worldwide and use it at 100% power. Our converter contains a 25 amp triac semiconductor for stable power output, large aluminum heat-sink to dissipate heat and a UL listed, flame retarding, non-conductive material used in the outer housing. Available for 120 volt units only. The Jiffy® Steamboard The Jiffy® Steamboard provides a convenient work space for quickly setting pleats and creases.
Jiffy® Steamer Head Configurations Optional Steam Head Configurations Configuration #1 Standard Plastic Steam Head Available on the J-2®, J-2000®, J-4000® and J-4000D® Model steamers. Configuration #2 Metal Steam Head with Wooden Handle Available on the J-2M®, J-2000M®, J4000A®, J-4000DM® and J-4000M® Model steamers. Configuration #3 Carpet Installation and Wallpaper Removal Steam Head Available on the J-4000C® Model steamer.
Jiffy® Steamer Head and Plug Configurations Configuration #6 Hat Steam Nozzle Available on the J-1®, J-2000H®, and J-4000H® Model steamers. Configuration #7 Steam Cleaning Brush Head Available on the J-2B®, J-2000B®, and J-4000B® Model steamers. Configuration #8 Jiffy® Steamer “I” Kit with Four Interchangable Steam Head Attachments 5.5ʼ - “I” Hose Available on all J-Series Units. 7.5ʼ - “I” Hose Only Available on J-4000 Series.
Jiffy® Steamer Troubleshooting Esteam® PROBLEM POSSIBLE CAUSE Steamer works poorly or cycles ON and OFF while steaming. The unit has sediment build-up and needs a thorough cleaning. The red indicator light illuminates but the unit never heats or steams. The fuse wire, heating element or thermostat may be bad. The unit spits water from steam cap. The unit is being over-filled. Possible thermostat trouble. The unit needs to be cleaned out inside tank and cap.
Jiffy® Steamer Troubleshooting J-4000 Model PROBLEM The red indicator light remains ON for over 20 minutes, but no steam is produced from the unit at the STEAM setting. The red indicator light does not illuminate when the switch is turned to the PREHEAT or STEAM setting. POSSIBLE CAUSE The heating element may be bad. Thermostat may be bad. Replace the heating element and reseal the tank assembly with high temperature silicone. Replace thermostat. The fuse wire is bad.
Jiffy® Steamer Matrix Chart INDEX Matrix Chart A = upholstery B = steam brush C = carpet D = drapery DM = metal steam head for drapery H = hat I = interchangeable steam head M = metal steam head with wooden handle J-1 W = wig 4 6" Metal Attachment Head Brush Attachment (fits onto the 9" Aluminum Bent Pipe Attachment Head) 3 5 2 9" Aluminum Bent Pipe Attachment Head J-2 J-2B 12" Carpet Attachment Head M 1 Hose with Wooden Handle and Brass Connection Fitting I J-2I Commercial Automotive Furnit
Use this helpful matrix chart to help you find the right Jiffy® Steamer for your needs! Use this helpful matrix chart to help you find the right Jiffy® Steamer for your needs! 4 6" Metal Attachment Head Brush Attachment (fits onto the 9" Aluminum Bent Pipe Attachment Head) 3 5 d 12" Carpet Attachment Head 2 M B w J-2M • • • • • • • • J-2W • • • • • • J-2000 • • • • • • • • • • • BEST • • • BEST J-2000B • • • • • 9" Aluminum Bent Pipe Attachment Head 1 Hose with Wooden Handle and B
Jiffy® Steamer Matrix Chart INDEX Matrix Chart Commercial Automotive Furniture Hat Manufacturers Industrial Supply Floral Applications Hospitality Industry Retail • Clothing • Mass Channel Steam Cleaning Photography Movie Production Interior Designers • Drapes • Carpets • Wallpaper Cosmetics • Beauty Salons • Hair Replacement Rental Stores Supply Houses A = upholstery B = steam brush C = carpet D = drapery DM = metal steam head for drapery H = hat I = interchangeable steam head M = metal steam head with w
Use this helpful matrix chart to help you find the right Jiffy® Steamer for your needs! 4 6" Metal Attachment Head Brush Attachment (fits onto the 9" Aluminum Bent Pipe Attachment Head) 3 5 12" Carpet Attachment Head 2 9" Aluminum Bent Pipe Attachment Head 1 Hose with Wooden Handle and Brass Connection Fitting I J-4000C J-4000D J-4000H J-4000I J-4000M J-4000W Pro-Line Pro-Line Pro-Line Pro-Line Pro-Line Pro-Line BEST BEST BEST BEST BEST BEST BEST BEST BEST BEST BEST BEST BEST • •
Jiffy® Steamer PRODUCT SPECIFICATIONS Worldwide Leader in Steaming Equipment Since 1940 UL CSA, CE, TUV, UL CSA, CE, TUV, UL CSA, CE, TUV, UL CSA, CE, TUV, UL CSA, CE, TUV, UL CSA, CE, TUV, NOM, ANCE NOM, ANCE NOM, ANCE NOM, ANCE NOM, ANCE NOM, ANCE 40
Jiffy® Steamer Warranty 3 YEAR LIMITED PRODUCT WARRANTY As the global leader of steaming equipment since 1940, we feel that our warranty should properly stand behind every product we craft. The Jiffy® Steamer is precision built, tested and inspected before leaving our factory located in Union City, Tennessee. It is guaranteed against defects in material or workmanship for three (3) years from date of purchase. Cords are excluded.
Jiffy® Steamer Contact Information Contact Us Jiffy® Steamer Company, LLC looks forward to serving your needs. If you have questions regarding our products, please do not hesitate to contact us. Jiffy® Steamer Corporate Headquarters Information: Shipping Address: Mailing Address: 4462 Ken-Tenn Highway P.O.
Información para contactar a los Vaporizadores Jiffy® Contáctenos Jiffy® Steamer Company, LLC espera poder servir a sus necesidades. Si tiene preguntas acerca de nuestros productos, por favor no dude en llamarnos. Información acerca de las Oficinas Centrales de Jiffy® Steamer: Dirección de envíos: 4462 Ken-Tenn Highway Union City, Tennessee 38261 EE.UU. Correo: P.O. Box 869 Union City, Tennessee 38281 EE.UU. Línea gratuita: 1-800-525-4339 (en Norteamérica.
Garantía de Jiffy® Steamer GARANTÍA LIMITADA DE PRODUCTO POR 3 AÑOS Como líder mundial en equipos de vaporizado desde 1940, sentimos que nuestra garantía debería respaldar apropiadamente cada producto que manufacturamos. La vaporizadora Jiffy® es fabricada a precisión, probada e inspeccionada antes de dejar nuestra fábrica en Union City, Tennessee. Está garantizada contra defectos en material o mano de obra por tres (3) años, desde la fecha de compra. No incluye cables.
ESPECIFICACIONES DE PRODUCTO Vaporizadores Jiffy® 40 Líder mundial en equipos de vapor desde ¿Comentarios? ¿Preguntas? Llame a la línea de asistencia de Jiffy® Steamer Company al 1-800-525-4339
¡Utilice esta tabla de aplicaciones para ayudarle a encontrar el vaporizador Jiffy® adecuado para sus necesidades! Disponible con boquilla de vapor metálica (J-4000DM) Con manguera de 7.
38 Tabla de aplicaciones de los vaporizadores Jiffy® Tabla de aplicaciones ÍNDICE A = tapicería B = cepillo de vapor C = alfombra D = cortinas DM = boquilla de vapor metálica para cortinas H = sombrero I = boquilla de vapor intercambiable M = boquilla de vapor metálica con mango de madera W= peluca Comercial J-4000 Línea Profesíonal Automotriz Muebles Fabricantes de sombreros Insumos industriales Aplicaciones de floristería Industria de hospitalidad Comercio al por menor - Ropa - Canales en masa Limp
M ¡Utilice esta tabla de aplicaciones para ayudarle a encontrar el vaporizador p Jiffyy® adecuado para sus necesidades! Use this helpful matrix chart to help you find the right Jiffy® Steamer for your needs! w B I J-2M • • • • • • • • J-2W • • • • J-2000 • • • • • • • • • • • • MEJOR • • • • J-2000B • • • • • MEJOR J-2000I J-2000M • • • • • • • • • • • • • • • • • • • • • • • • • • • • MEJOR Esteam® • • • • • • • • Steamboard • • • • • • • • • • • MEJOR P Box 869 - Union
Tabla de aplicaciones de los vaporizadores Jiffy® Tabla de aplicaciones ÍNDICE A = tapicería B = cepillo de vapor C = alfombra D = cortinas DM = boquilla de vapor metálica para cortinas H = sombrero I = boquilla de vapor intercambiable M = boquilla de vapor metálica con mango de madera W= peluca J-1 J-2 J-2B M I J-2I Comercial Automotriz Muebles Fabricantes de sombreros Insumos industriales Aplicaciones de floristería Industria de hospitalidad Comercio al por menor - Ropa - Canales en masa Limpieza
Solución de problemas de los vaporizadores Jiffy® Modelo J-4000 PROBLEMA La luz indicadora roja del vaporizador permanece iluminada por más de 20 minutos, pero la unidad no produce vapor cuando el interruptor se coloca en la posición de vapor (STEAM). La luz indicadora roja no se ilumina cuando el interruptor se coloca en la posición de precalentamiento (PREHEAT) o de vapor (STEAM). La luz indicadora roja funciona ya sea en la posición de precalentamiento (PREHEAT) o de vapor (STEAM) pero no en ambas.
Solución de problemas de los vaporizadores Jiffy® Esteam® PROBLEMA El vaporizador no funciona bien o se ENCIENDE y se APAGA cuando está trabajando La luz indicadora roja se ilumina pero la unidad nunca se calienta ni saca vapor La unidad salpica agua desde la tapa de vapor POSIBLE CAUSA SOLUCIÓN Cambie el hilo del fusible de enlace ó cambie el elemento de la unidad. Esto lo puede hacer usted mismo, un centro de reparación autorizado o un técnico de la compañía Jiffy® Steamer.
Configuraciones de cables eléctricos y boquilla de vapor para los vaporizadores Jiffy® Configuración #6 Boquilla de vapor para sombreros Disponible en los vaporizadores modelos J-1®, J-2000H® y J-4000H®. Configuración #7 2 1/2” (6,35 centímetros) Boquilla de cepillo para limpiar a vapor Disponible en los vaporizadores modelos J-2B® , J-2000B® y J-4000B®. Configuración #8 Juego “I” para vaporizadores Jiffy® con cuatro aditamentos para la boquilla de vapor Manguera “I” de 5.
Configuraciones de las boquillas de vapor para los vaporizadores Jiffy® Configuraciones opcionales de las boquillas para aplicar vapor Configuración #1 Boquilla de vapor estándar de plástico Disponible en los vaporizadores modelos J-2®, J-2000®, J-4000® y J-4000D®. 6” (15,24 centímetros) Configuración #2 Boquilla de vapor de metal con mango de madera Disponible en los vaporizadores modelos J-2M®,J-2000M®, J-4000A®, J-4000DM®, y J-4000M®.
Otros accesorios para los vaporizadores Jiffy® Convertidores y adaptadores de enchufes para ESTEAM® Lleve su ESTEAM® por todo el mundo y úselo al 100%. Nuestro convertidor tiene un semiconductor triac de 25 amperios para una potencia de salida estable, un disipador de calor grande de aluminio con código UL, una cubierta exterior de material no conductor e ignífugo. Disponible para 120 voltios.
Mantenimiento del vaporizador Jiffy® Limpie y enjuague el vaporizador con frecuencia Todos los vaporizadores deben limpiarse y enjuagarse de vez en cuando para retirar los depósitos de minerales. Para limpiar las partes internas recomendamos nuestro Limpiador líquido Jiffy®. Nunca utilice aditivos: Nunca agregue aditivos al agua del vaporizador tales como sal, vinagre, lejía, perfumes y tintes. Estas sustancias corroen o tapan las partes internas.
Instrucciones de limpieza para los vaporizadores Jiffy® modelo J-4000 Se recomienda realizar el siguiente procedimiento de limpieza como medida de mantenimiento para ayudar a que su vaporizador mantenga su máximo rendimiento. El mantenimiento se debe realizar cada 3 a 6 meses, dependiendo del tipo de agua que utilice. En la mayoría de los casos, una unidad seriamente obstruida se debe desarmar para limpiarse adecuadamente y prolongar así su vida útil.
Instrucciones de limpieza para los vaporizadores Jiffy® modelos J-1, J-2 y J-2000 Se recomienda realizar el siguiente procedimiento de limpieza como medida de mantenimiento para ayudar a que su vaporizador mantenga su máximo rendimiento. El mantenimiento se debe realizar cada 3 a 6 meses, dependiendo del tipo de agua que utilice. En la mayoría de los casos, una unidad seriamente obstruida se debe desarmar para limpiarse adecuadamente y prolongar así su vida útil.
Instrucciones de cableado para los vaporizadores Jiffy® modelo J-4000 Por favor fíjese que los números y letras de los bornes del interruptor están marcados en el interruptor en si. 1. El cable negro positivo (1) (café para las unidades de 230 voltios) se conecta en la letra “A” del interruptor. 2. El cable blanco neutro (2) se conecta al hilo fusible café (4) (azul para las unidades de 230 voltios). 3. El cable de tierra (3) se conecta en el soporte de tierra en la cubierta del vaporizador. 4.
Diagrama de conexiones eléctricas para los vaporizadores Jiffy®modelo J-4000 Precaución: Asegúrese que el cable de corriente esté desconectado de la toma de corriente antes de intentar reparar su vaporizador Jiffy®.
Listado de repuestos de los vaporízadores Jiffy® J-4000 3 4 Código # 5 6 7 8 9 10 11 12 13 14 15 16 17 18 19 20 21 22 23 24 # de repuesto del vaporizador Jiffy 0036 1033 0037 0038 0043 0039 0253 0251 0280 1302 1303 0006 0004 0049P 0053 0054 0199 0201 1310 1311 0133 0146C 0050 1353 1354 0074A 0074C 1370 0071 0061 0062 0075 0063 0064 25 26 27 28 ACCESORIOS 0203 0204 0155 0158 1320 0017 0018 1026 1027 29 1050 0259 0257 0252 0255 0254 0256 0269 0262 0274 1062 1063 0899 Sección media del juego de t
Diagrama de partes de los vaporizadores Jiffy® J-4000 *Para modelos fabricados después de marzo de 2005. 3 1 2 4 10 9 8 7 15 5 6 11 13 14 21 18 19 12 17 20 16 23 22 25 26 28 29 27 24 En caso que usted llegara a necesitar repuestos para su vaporizador Jiffy®, los puede pedir por separado. Guíese por este práctico diagrama y listado de repuestos para identificar cualquier parte que pudiera necesitar. Por favor indique el modelo y el número de serie cuando haga su pedido.
Instrucciones de uso para los vaporizadores Jiffy® modelo J-4000 1. Conecte la manguera firmemente usando la llave de montaje magnética localizada en la tapa inferior del aparato (figura #1).Ensamble y monte el tubo para colgar la manguera (figura #2). Para los modelos de serie “H”, no habrá ningún accesorio de manguera ni tubo para conectar. 2.
Vaporizadores Jiffy® Pro-Line modelo J-4000 CARACTERÍSTICAS • • • • • • • • Medidor integrado de fácil lectura que indica el nivel de agua y la acumulación de sedimentos Cubierta exterior de aluminio fundido para mayor durabilidad Tanque de calentamiento de acero inoxidable a prueba de corrosión-sin conductos de agua que se tapen por depósitos de agua dura.
Instrucciones de cableado para los vaporizadores Jiffy® modelo J-2000 Por favor fíjese que los números en el borne de interruptores 2, 3, 5 y 6 indicadas en la ampliación del diagrama de interruptores están marcados en el interruptor en sí. Los vaporizadores Jiffy® fabricados antes de Mayo del año 2000 no tienen marcados los números en el borne de interruptores. Los números entre paréntesis se refieren al diagrama en la página 14. 1. 2. 3. 4. 5. 6. 7. 8. 9.
Diagrama de conexiones eléctrícas para los vaporizadores Jiffy® modelo J-2000 Naranja Blanco 5 6 2 Amarillo Precaución: Asegúrese que el cable de corriente esté desconectado de la toma de corriente antes intentar reparar su vaporizador Jiffy®.
1 2 3 4 Listado de repuestos de los vaporizadores Jiffy® J-2000 Código # # de repuesto del vaporizador Jiffy 1030 0035 0036 1033 0043 0039 1102 0253 0251 0280 1107B 1107C 1107PB 1107PC 1110 1111 1140 1141 0027A 0564 0027B 1125 1126 0132 0146B 0148 0597 5 6 7 8 8.1 8.
Diagrama de partes de los vaporizadores Jiffy® J-2000 2 3 11 4 1 6 7 10 8.2 8.1 8 13 22 20 15 21 17 18 14 27 5 23 19 16 25 24 26 En caso que usted llegara a necesitar repuestos para su vaporizador Jiffy®, los puede pedir por separado. Guíese por este práctico diagrama y listado de repuestos para identificar cualquier parte que pudiera necesitar. Por favor indique el modelo y el número de serie cuando haga su pedido.
Instrucciones de uso para los vaporizadores Jiffy® modelo J-2000 1. Conecte la manguera firmemente utilizando la llave de montaje magnética localizada en la parte inferior del aparato. Ensamble y sujete el juego de tubos para colgar la manguera. Todos los vaporizadores Jiffy® se han probado en fábrica y por esto puede haber pequeñas cantidades de agua en la unidad.
Vaporizadores Jiffy® modelo J-2000 CARACTERÍSTICAS • Cubierta de polímero para mayor durabilidad • Manguera Ligera y flexible • Tanque de agua resistente al impacto • Cableado de seguridad que apaga automáticamente el aparato en caso de que accidentalmente se quede sin agua • Mango cómodo y fácil de sostener • Elimina las arrugas hasta cinco veces más rápido que el planchado convencional • Cuenta con ruedas para movilidad • Viene con varios accesorios para las boquillas de vapor • Respaldado por e
Instrucciones de cableado para los vaporizadores Jiffy® modelos J-1 y J-2 Por favor fíjese que los números en el borne de interruptores 2, 3, 5 y 6 indicadas en la ampliación del diagrama de interruptores están marcados en cada interruptor. Los vaporizadores Jiffy® fabricados antes de Mayo del año 2000 no tienen marcados los números en el borne de interruptores. Los números entre paréntesis se refieren al diagrama en la página 14. 1. 2. 3. 4. 5. 6. 7. 8. 9.
Diagrama de conexiones eléctricas para los vaporizadores Jiffy® modelos J-1 y J-2 Naranja Blanco 5 6 2 Amarillo Precaución: Asegúrese que el cable de corriente esté desconectado de la toma de corriente antes intentar reparar su vaporizador Jiffy®.
Listado de repuestos de los vaporizadores Jiffy® J-1 y J-2 # de repuesto del vaporizador Jiffy 3 0036 Sección media del juego de tubos 4 1033 Sección inferior del juego de tubos (con tuerca) 0037 Sección inferior del juego de tubos (sin tuerca) 0043 Tornillo de cabeza de metal para el juego de tubos 0039 Perno de metal roscado para las secciones del tubo 5 0253 Juego de repuesto del mango/boquilla de vapor de plástico Mango/boquilla de vapor de plástico con aditamento de manguera completo 6 0251 0280 Mangu
Diagrama de partes de los vaporizadores Jiffy® J-1 y J-2 11 8 2 3 1 4 5 9 10 16 6 12 7 14 13 19 21 15 22 23 18 24 20 28 27 17 25 26 En caso que usted llegara a necesitar repuestos para su vaporizador Jiffy®, los puede pedir por separado. Guíese por este práctico diagrama y listado de repuestos para identificar cualquier parte que pudiera necesitar. Por favor indique el modelo y el número de serie cuando haga su pedido.
Instrucciones de uso para los vaporizadores Jiffy® modelos J-1 y J-2 1. Para los modelos J-2, conecte la manguera firmemente utilizando la llave de montaje magnética localizada en la parte inferior del aparato (figura #1). Ensamble y sujete el juego de tubos para colgar la manguera. En los modelos J-1, la boquilla de bronce para sombreros deberá de estar ya instalada. Los modelos J-1 no vienen con el juego de tubos ni el accesorio para la manguera.
Vaporizadores Jiffy® modelos J-1 y J-2 CARACTERÍSTICAS • • • • • • • • • • Cubierta de aluminio fundido para mayor durabilidad (Modelos J-1 y J-2) Manguera ligera y flexible - Modelos J-2 (la serie J-1 utiliza una boquilla de bronce para sombreros) Botella de agua inastillable Cableado de seguridad que apaga automóticamente el aparato en caso de que accidentalmente se quede sin agua Mango cómodo y fácil de sostener Elimina las arrugas hasta cinco veces más rápido que el planchado convencional Cuenta con r
Accesorios del vaporizador Jiffy® Estuche de viajes Jiffy ARTÍCULO # 0890 Ahora puede llevar su vaporizador Jiffy a donde vaya con nuestro innovador Estuche de viajes Jiffy Steamer. El estuche se puede usar con cualquier modelo de los vaporizadores Jiffy y es ideal para transportar su vaporizador a ferias de muestras, sitios de trabajo, desfiles de modas, conferencias y congresos.
Instrucciones de limpieza del Esteam® Cuando empiece a notar acumulaciones de calcio en la parte inferior del vaporizador portátil ESTEAM®, será hora de utilizar el Limpiador líquido de Jiffy® Steamer. Es importante que usted utilice nuestro limpiador, ya que fue formulado especialmente para nuestros productos. Utilizar otor limpiador puede invalidar la garantia. Por favor siga estas instrucciones: 1. Agregue 4 onzas (1,18 decilitros) de agua al vaporizador portátil ESTEAM®. 2.
Listado de repuestos del Esteam® En caso que usted llegara a necesitar repuestos para su vaporizador Jiffy®, las puede pedir por separado. Guíese por este práctico diagrama y listado de repuestos para identificar cualquier parte que pudiera necesitar. Por favor indique el modelo y el número de serie cuando haga su pedido. # de repuesto del Código # vaporizador Jiffy 1 0653 0655 1a. 1b. 1c.
Diagrama de partes del Esteam® 6
Características e instrucciones de Esteam® Características Incluye: • 3 veces más poderoso que cualquier otro vaporizador portátil en el mercado. • El recipiente de agua más grande del mercado. • Tanque de agua de boca ancha, fácil de llenar. • Elemento de calentamiento de 600 vatios; apagado automático de seguridad que desactiva la unidad temporalmente cuando empieza a secarse.
Cómo aplicar vapor Como lo saben en las tintorerías, el vapor es el método más suave, seguro y eficiente para eliminar las arrugas. No solo es cinco veces más rápido que el planchado, sino que le garantiza no quemar hasta las telas más delicadas. Nuestros vaporizadores eliminan las arrugas en la ropa, las cortinas, los manteles… prácticamente cualquier tela. Use la siguiente información como guía para aplicar el vapor con mayor destreza. Algunas prendas se vaporizan mejor por dentro.
Instrucciones importantes de seguridad de los vaporizadores Jiffy® Cuando utilice su vaporizador Jiffy®, siempre siga estas precauciones básicas: 1. ¡ADVIRTIENCO! Lea todas las instrucciones antes de usarlo. 2. Para reducir el riesgo de contacto con el agua caliente despedida por los agujeros de vapor, revise el aparato antes de cada uso sosteniéndolo alejado de su cuerpo y accionándolo. 3. Use el aparato únicamente para lo que está diseñado.
¡Felicitaciones y gracias! Gracias por su compra del Vaporizador Jiffy® con el fabricante número uno de equipos de vapor desde 1940. Nos esforzamos por diseñar y fabricar el mejor vaporizador disponible en el mercado, respaldado por nuestro servicio al cliente de primera calidad. Con una limpieza y mantenimiento adecuado, su vaporizador Jiffy® durará a través de años de uso intensivo y exigente. De nuevo, gracias, realmente agradecemos la oportunidad para servirle.
Líder mundial en equipos de vapor desde 1940 Esteam® y Serie J MANUAL DEL PROPIETARIO © Copyright 2014 IMPRESO EN LOS EE.UU. FORMA #5500B - REVISIóN 17 Impreso en papel reciclado de correspondencia con clients.