
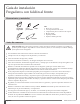
Installation Guide


4
WWW.BOCCHIUSA.COM
4. Undercounter/Solid Surface Preparation
NOTE: Instructions in this section are for both undercounter and solid surface installation. Any differences are noted
in the text.
NOTE: Use shims to level the sink if needed.
Verifythatthesinkwilltinthecabinetopening.Ifnecessary,adjusttheopeningbysandingtheopeningor
addingwoodllerstrips.
For solid surface installation, install the faucet to the sink according to the manufacturer’s instructions.
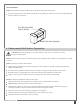
Install the strainer or garbage disposal to the sink according to the manufacturer’s instructions.
Apply a 1" (2.5 cm) spot of sealant at each corner of the frame where it will contact the sink.
NOTE: If using shims additional sealant will be needed.
Carefully position the sink within the frame, making sure to center the sink in the cabinet.
Optional: Apply sealant between the cabinet and the apron.
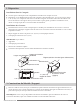
Verifythatthesinkislevel.Thetopofthesinkshouldbeushwiththetopofthecabinettoallowproper
countertop installation. Adjust or shim between the sink and support if needed.
Due to the various cutout sizes possible, a template is not supplied.
Carefully measure the countertop to determine the exact location of the cutout.
Carefully mark the cutout location on the countertop.
CAUTION: Risk of personal injury or product damage. Large sinks are very heavy. Get help
lifting the sink into place.
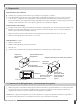
Wood Filler Strip (Optional)
Sink Rim Flush With
Top of Cabinet
All Installations
NOTE: Ensure that the securing hardware will not penetrate through the cabinet walls.
Secure the support frame to the cabinet. Position the securing hardware to allow for easy removal should the sink
need to be removed or replaced.
WWW.BODELAIR.COM