
Owner's manual


JKS2944
JKS Shock Extensions Installation
2 Page
Installation
1. REMOVE SHOCK ABSORBERS
Remove the nut and bolt that secures rear shock
absorber to axle. Retain hardware for re-installa-
tion.
Remove shock absorber from lower mount and
move it out of the way.
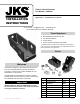
2. INSTALL EXTENSION BRACKET
Slide narrow end of Shock Extension (A) into fac-
tory lower shock mount on axle.
Align small hole in bracket with small hole on fac-
tory shock mount and insert a 5/16” x 7/8” Bolt (C)
with 5/16” Flat Washer (D).
HINT: Insert bolt from bracket side so that
threaded end points forward.
Install a 5/16” Nylock Nut (E) with another 5/16”
Flat Washer (D) onto bolt, but do not tighten yet.
Slide the supplied Steel Sleeve (B) into Extension
Bracket (A) and align with original shock mounting
holes.
Insert 1/2” x 2-1/2” Bolt (F) with 1/2” Flat Washer
(G) into the original shock mounting hole and
through Extension Bracket (A) and Steel Sleeve
(B). H I NT: Sleeve prevents bracket from collapsing
when 1/2” bolt is tightened.
Secure bolt to shock mount by installing a 1/2”
Ovalok Nut (H) with 1/2” Flat Washer (G) on other
end.
Using a torque wrench, tighten the 1/2” Bolt (F)
to 65 ft-lbs. Then tighten the 5/16” Bolt (C) to 35
ft-lbs.
3. RE-INSTALL SHOCK ABSORBERS
Slide the shock absorber into wide end of Exten-
sion Bracket (A) and secure with the original shock
mounting hardware.
Using a torque wrench, tighten original shock
mounting bolt to 65 ft-lbs.
©2013 JKS Manufacturing, Inc & Aftermarketing, LLC
Revision Date 10/11/2013