Installation Instructions for all PS-SWMCP swivel fixtures for round pipes PIPE MOUNTING FIXTURES (SWIVEL) FOR PS650-VEX™ ENCLOSED SPEAKER SYSTEMS
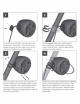
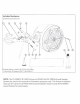
.. ' ---·Loosen the pre-installed M4 x 4 mm Set Screw in tht> damp receiver. Slide an M6 x 16 mm Machine Screw through the center bolt> of the damp receiver, into the center hole in the fixture base, and hand tighten. Place the supplied plastic strip around the pipe to prt>venl scratching. Push tht> damps over the pipe (remove the plastic strip). Align the clamps with the damp receiver on the enclosure.
Apply Loctite· red thread-locking compound to two M6 x 16 mm Machine Screws. slide them through the slots in the damp receiver. into the appropriate holes in the fixture base, and fully tighten. Remove the center M6 x 16 mm Machine Screw from the damp receiver, apply Loctite" red thread-locking compound, reinstall, and fully tighten. Realign the damps with the damp receiver on the endosure, and secure them to the damp receiver using a pair of M6 x 45 mm .
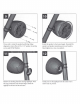
Ifyou wish to rotate the speaker's grille/logo badge alignment, remove the sLx #8 x 1-1/4" speaker mounting screws and #8 Flat Washers. Rotate the speaker to the desired angle. Reinstall the speaker and speaker mounting screws and washers. Hand-tighten in a criss-cross pattern. Remove the backing from the rear logo applique. With the logo positioned at the desired angle, attach the applique to the bad< of the enclosure. Gently press on the appliquc from the center out to remove any air pockets.
. I ·s ~ :. ··•··· '• •· ·· Clean the inside of the aluminum cap with acetone (not included) prior to attaching it to the enclosure. Apply a circular bead of silicone adhesive to the inside of the aluminum lo o ca , 1/2-inch (13 mm) from the outer ed e. q~Blue V o Q Yellow ______ Align the aluminum logo cap to the desired angle of rotation, and press it onto the back of the enclosure. Apply masking tape (not included) to hold the cap in >lace until the silicone cures (at least 24 hours . Example.
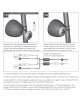
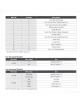
Included Hardware: (hardware pictured for one) ---······························, l (.. Mounting Fixture is made in the USA by Axia Alloys Protected by US Patents #8.136,771 & it8,398,035 :.~ : .....•.•J>•.~. .•. ·' NOTE: The PS-SWMCP-8-2.000 Fixture and PS650-VeX-SG-TMB Enclosed Speaker System are used in this manual for illustrative purposes only. The fixture installation steps are the same for all PS650-VeX Enclosed Speaker Systems and all PS-SWMCP sw ivel fixtures for round pipes.
BOM ID : Quantity · Description Axia Alloys Strap Clamp - - ---·- -- • Included with VeX"" speaker enclosures. For Standard Models: Wire Size 1' . :· . . 16 AWG Wire Label . : :;:·-l-,·..:..·............ ..... · f =..;: ;. · · ' Use ~~.~.~........_..:..-;/..l·············································~·~~~~r.~.~~~~~~~.~::}.............................................j NIA · Speaker Negative (- ) \ ........................
LIMITED WARRANTY · MARINE PRODUCTS (USA) IL AU D10 warrants ll11s produtt lO be free of JcfctlS in malcnals ,md workmam,h1p for a period of lwn (2) ye,1rs from the ongmal Jate of pun.ha,c. This warranty 1s not transferable and applies only to the ongmal pun:haser from an authorized IL AUDI() dealer. ShoulJ ,erv1u· be ncte,sary under lh1s warrant}' for ,1ny reason due to manufatltmng defect or malfuntl1on, JLAU DIO w1ll (al 1ls Jistretwn). repair or replatc the Jefcc.livc prndu<.