Photo Display 15" Instruction Manual ��������������������������������������
1. Introduction Congratulations on your purchase of the JOBO Photo Display PDJ 151! Before operating the unit, please read this manual thoroughly and retain it for future reference. This manual will help you to learn many of the exciting and useful features of your new Photo Display PDJ 151 and make viewing more enjoyable. The Photo Display PDJ 151 lets you view digital pictures directly from your camera's memory cards.
- Always use the eject buttons on the memory storage cards slots to remove the memory storage cards. - Do not open the case of the JOBO Photo Display PDJ 151. There is a risk of electric shock and there are no user serviceable parts inside. Opening the case will void your warranty. - Do not use the Photo Display PDJ 151 if conditions could allow condensation to occur, or damage may result. 1.3. Cleaning the LCD Screen Treat the screen gently.
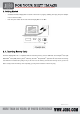
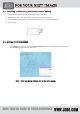
2. Getting Started - Assemble the Photo Display PDJ 151 stand on the back for propping stability, then plug the power adapter into an electrical outlet. - Push the power switch at the end of Photo Display PDJ 151 to “ON”. 2. 1.
Bo ttom Sid e Rig ht S id e Not e :The Photo Display PDJ 151 will ONLY recognize digital pictures stored in JPEG format. Digital pictures stored in other formats will be ignored by the device. You will see the following screen if you insert the memory card correctly. Make sure you have at least one picture stored on the memory card. The frame will not function properly without a stored picture. Please select the memory card, press the button from the unit or remote control to enter the following screen.
2.3. In stall ing and Replacing th e Remote Control Bat tery 1. Place the Remote Control with the control buttons facing downward. 2. While pressing down on the ridged area of the battery cover pull the tray out. 3. Place a “CR2025” lithium battery on the tray with the positive “+” end facing toward you. 4. Close the tray. + 2.4. Display CLOCK&CALENDAR - Press [CLOCK] key on remote control into COLCK&CALENDAR interface, see following screen cut picture: Press [CLOCK] key again return to main menu.
3. Question & Answers This chapter will introduce some solutions to deal with the potential problems you may experience. Please consult this section first to correct the problem. If you also cannot solve the problem, please contact the local dealer to ask for help. Please don't try to take apart the machine by yourself at any time.
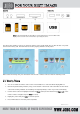
3 .2 . I n c lu de d A cc e s s orie s - AC Power Adapter Stand Remote control USB Cable Manual 4. Warranty and Ser vice 4.1. Warranty conditions This product is subject to the legal warranty periods relating to manufacturing faults and defects. S u b s t a n c e o f t he w a rr a n t y : 1. In the event of malfunctioning caused by manufacturing defects JOBO AG will repair or replace the defective product at its own discretion. 2.