
Operation Manual


Bedienungsanleitung ( 86 548) Stand: 28.07.05 Seite: 6 von 15
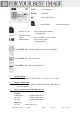
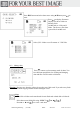
Recording function
- switch on GIGA mini Ф Button
- select REC menu / ► or ◄
- start REC
- change settings MENU Button
- Mikro/Line In connect
- start recording
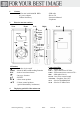
12. Connection to Computer
Important Notice!
Before use of GIGA mini please test connection to computer first.
- Never connect the GIGA mini via USB HUB.
Always use a direct USB connection to Computer to avoid malfunctions.
USB A
When GIGA is connected via USB A to PC/Mac, the shown symbol is
displayed. All buttons are now inactiv.
*USB B
Connection USB B supports OTG function, this means you can connect directly to
camera, if your camera supports OTG.
12.1 WIN XP-SP1 / ME / 2000-SP3
- GIGA mini installs itself on PC (plug & play).
- close and save all running programs first
- USB connection between GIGA mini and PC with USB cable should be installed.
- Switch on GIGA mini via ON/OFF button.
- WIN XP will install drivers automatically for GIGA mini.
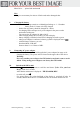
12.2 Managing GIGA mini from PC
- Open My Computer.
- 4 different disk drives will be displayed on the desktop.
- The 1. disk drive is the external hard drive of GIGA mini.
- The other disk drives with successive letters are the flash card slots of GIGA mini,
from which you can read/write directly on/from the flash cards like a reader/writer.
Important notice
Never disconnect USB connection between GIGA mini and computer while
not having selected the disconnection function on the computer.
Disconnecting while processing can cause failure of data.
12.3 WIN 98-SE
Please install drivers as described in the following steps.
- Please insert driver CD into the drive of computer and select folder „WIN“.
- Select „setup.exe“ in the next folder.
- Press „enter“ to continue.
- Confirm next step with „OK“ – drivers are completly installed.