SCP003 Scanning Photo Display User Guide JOBO AG Kölner Strasse 58 D-51645 Gummersbach E-Mail: info@jobo.com Website: www.jobo.
Safety section Thanks for purchasing this product. With this digital photo frame, you can display your images, video and music files by using light-emitting touchpad on the front panel of the photo frame. Besides, this device provides an easy way to scan your favorite photos and save it to this device. Please read the following instructions for more details. Important safety precautions 1. Do not use this apparatus near water. 2. Clean only with a damp cloth. 3.
Content Package content........................................................................4 Product overview......................................................................5 Front panel................................................................................5 Rear panel.................................................................................5 Remote control..........................................................................6 Remote control operation range.....................
Package content 8” Scanning Photo Frame Calibration and Clean paper Photo Protective Sleeve Instruction Manual Quick Start Guide Remote Control (Including 3V Lithium Battery type: CR2025) Note: Remove the insulating mylar strip from the battery if the battery is used for the first time. Power Adapter Note: 2-pin adapter for EU market; 3-pin adapter for UK market.
Product overview Front panel Rear panel 1 2 4 6 9 14 3 5 10 7 11 12 13 8 1 42 15 Remote control sensor: Receive the signals from supplied remote control. Setup: Press to access the setup menu directly. 3 Up: Moves up in the menus. 4 Press to make selections in the menus or setting modes. 5 Down: Moves down in the menus. 6 Return to the previous menu or stop the playback under the Music mode. Press to scan a photo. For more details, please refer to page 9.
Remote control 1 2 8 3 9 4 5 10 6 7 11 1 Setup: Press to access the setup menu directly. 2 Mode: Press to return to the MAIN MENU. 3 / Moves left/right in the menus in all modes except Video modes where these buttons works as fast backward/fast forward during video playback. 4 Play: Press to playback the selected file. Pause: Press to pause the current playback file. OK: Press to make the selection in the menu or setting modes.
Remote control 2. Press and hold the battery release tab in the direction of arrow 1 . Remote control operation range • Point the remote control unit no more than 3 meters from the remote control sensor and within 60° of the front of the unit. The operating distance may vary according to the brightness of the room. 3. Pull out the battery holder completely in the direction of arrow 2 as shown on the below. CR2025 2 + 1 O SH C R PU + 20 25 PE N 4. Remove the old battery.
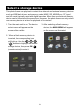
Select a storage device This photo frame can play back content from internal and external memory devices such as USB flash drives, and memory cards (MMC, SD, MS/MS pro, CF type I, and xD cards) typically used with digital cameras. More than one external memory device can be inserted at the same time. However, the photo frame can only select one memory device at a time for playback of its content. 1. Turn the main unit to on. The device select menu will appear on the screen after a while. 3.
Scan a photo 1. Power on the photo frame. Note : • This scanner supports photo sizes from 1.5” x 2” to 4” x 6”. DO NOT insert photos smaller than 1.5” x 2” or larger than 4” x 6”. • Do not press any button while the scanning is in process. Wait until the process is completed. 2. Press the < SCAN > button to enable the scan function.
Scanner menu Once the scan process is completed, Cancel/Scan a New Photo a scanner menu will appear on the screen. Please press or To scan a new photo, press to or to highlight Cancel/Scan a new select your desired item. photo, then press . The previous scanned photo will be erased, and Rotate the unit will be ready to scan the next Save this image Cancel/ Scan a new photo photo.
Photo Supported photo format: JPEG Photo thumbnail mode settings Note: Not all photo formats of digital cameras are supported by this photo frame. This unit is designed to show photos in standard JPEG format. For unreadable JPEG format, please use PC applications (not supplied) to convert such images into standard JPEG format. Settings Copy to Delete Mark System Setup Thumbnail mode 1. During the thumbnail mode, select a photo then press 1.
Photo * Mark : Select Mark Several if you want to select multiple photos. It will bring you back to the thumbnail screen for photo selection. Use the / / / buttons and to make your selection, then press to return to Settings menu to continue Copy to, or Delete function. Note: By default, the photo will be display by its original size. Please refer to Display Image Size in Settings menu on page 14. Manual rotate Photos can be manually rotated by pressing the in full screen mode.
Photo Photo browse mode settings Menu Descriptions options Settings Copy to Copy to Delete Print Adjust LCD Color System Setup This option allows you to copy the selected photo from the current memory device to other available memory device(s). Delete To delete the selected photo, select Yes. Otherwise choose 1. During the browse mode, press to bring up the Settings menu. No to cancel. Print Select Yes to print the current photo. Otherwise choose No to 2.
Photo Photo slideshow mode Supported photo and audio format: JPEG and MP3. Menu options Descriptions Display Image Size • Select “Normal” to display photos in their original aspect ratio. Black bars may appear on the left/right or top/bottom sides of the screen, depends on whether the photos are taken in landscape or portrait format. 1. Press under any mode to begin a slideshow. 2. Press to exit slideshow mode. • Select “Full Screen” to display 4:3 by full screen.
Scanned image Supported storage format: JPEG Transfer the scanned images to a computer 1. By default, photos that you have scanned are stored in the Scanned Image folder in the internal memory. To browse the scanned photos, select the Scanned Image ( ) from the MAIN MENU and press to enter. 1. To copy the scanned images to a computer from internal memory, please connect this unit to a computer via the mini USB cable (supplied). For more connection details, refer to page 19. 2.
Music Supported audio format: MP3. Audio Settings Press menu. Selected audio Current page/ Current mode Total pages Play back status : playing : being paused ■: being stopped Volume bar Audio elapsed time/ Audio total time 1. Use the / / / buttons to select the Music ( ) under the MAIN MENU, then press to enter. All the available music files in the selected memory device will be listed on the screen. 2. Press or to highlight the desired music file, then press to playback.
Video Supported video format: MPEG-1 and MPEG-4 Video Settings Press Selected video Current page/ Current mode Total pages to access the Settings menu. Menu options Descriptions Copy to This option allows you to copy the selected video from the current memory device to other available memory device(s). Delete To delete the selected video, select Yes. Otherwise choose No to cancel. System Setup Bring up the System Setup menu. Volume bar 1.
Calendar and Clock Use the / / / select the Calendar ( MAIN MENU, then press Calendar Settings buttons to to access the Settings menu. When finished, press to exit. Press ) under the to enter. Menu options Descriptions Set Clock Set the system time for the unit. Press and to switch between the HOUR, MINUTE and 12/24 fields. Press and to change the value. When to confirm.
Setup 1. Use the / / buttons to select the Setup ( / MAIN MENU, then press 2. Press / / / ) under the to enter. buttons to select or cycle through available options. Option Description Language Choose from available On Screen Display languages. Sleep Timer The unit will be turned off automatically after a specific period of time. USB Link to Select PC if connecting to a PC or select Printer if printing a photo. Scanner Quality Select your desired scan quality.
Direct printing Print a photo Connect to a printer 1. Select a photo and display it in photo browse mode (page 12). Power adaptor 2. Press menu. 3. Use the / / / select Print, then press 1. Press POWER button to turn on this device. buttons, . 4. A confirmation message appears. Select Yes and press to confirm. The photo will then be printed from your printer. 2. Press to bring up the System Setup menu under MAIN MENU. Press or to select USB or Link to, then press (page 19). 3.
Copy files from and to a PC When connecting to a PC, the photo frame allows you to transfer music, video and photo files between the photo frame’s internal memory, a memory card inserted and PC. Warning: Do not connect a USB device to the USB A-type connector and the unit to PC via mini USB port at the same time, it may cause conflict and may not work properly. Please restart the unit if happens.
Copy files from and to a PC 7. When finished copying pictures, disconnect the computer by doubleclicking on the Safely Remove Hardware icon in the lower right on the screen of Windows. This will display the menu as illustrated below. 8. Highlight the USB Mass Storage Device drive and then click on the Stop button. After notification, unplug the mini USB cable from the computer and the photo frame.
Troubleshooting SYMPTOM (COMMON) REMEDY How far away can I use the remote control? Around 3m within an angle of 30 degrees at both left and right. My remote control doesn’t work? You may need to change the battery. Please use a lithium 3V-model number CR2025 only. Why can’t I display some of my Photos? Some photo/image file formats are not supported. Please refer to the specifications. Why can’t I play some of my music tracks? Some music file formats are not supported.
Specifications Panel Specification Size Aspect ratio Resolution Power External AC Power Adapter Audio Speakers Connectivity USB Ports Storage/Media Internal memory Supported Memory cards Memory cards slot 1 Memory cards slot 2 Scanner Scanning Module Type, Size Scan photo size Resolution Storage Format Supported Printer Printer standard Media Files Supported Video file formats Photo file formats Audio file formats System requirement Operation system Hardware 8” 4:3 800 x 600 pixels +12V/ 0.83A 1Wx2 USB 2.