
Operation Manual


10
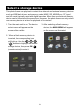
Scanner menu
Once the scan process is completed,
a scanner menu will appear on the
screen. Please press or to
select your desired item.
Rotate
Save this image
Cancel/ Scan a new photo
Exit Scan Mode
Rotate
To rotate the scanned photo, press
or
to highlight Rotate, then
press . The scanned photo will be
rotated. Each time the
is pressed,
the photo will rotate by 90° clockwise.
Save this Image
Press or to highlight Save
this image, then press
to save.
A status message will appear on the
screen to indicate when the photo is
saved.
25%
Photo is being saved
Cancel/Scan a New Photo
To scan a new photo, press or
to highlight Cancel/Scan a new
photo, then press . The previous
scanned photo will be erased, and
the unit will be ready to scan the next
photo.
Exit Scan Mode
Press or to highlight Exit
Scan mode, then press
to exit
and return to the Scanned image
mode. The scanned photo will not be
saved in the internal memory.
Note : By default, the folder of
Scanned Image has been created
in the internal memory. All scanned
pictures will be saved in the Scanned
Image folder. The saved file will be
named in 4-digit number with a Scan
as a prefix which runs from 0001 to
9999, for example, scan_0001.jpg.
When the counter reaches 9999 it
simply starts over from 0001 again.
Restoring the unit to factory default
does not reset this counter(page 19).