
Product Manual

CROSSOVER INSTALLATION INSTRUCTIONS INNERSIDE BOX INSTALLATION INSTRUCTIONS
A. Determine location of box on truck rail. Drill 9/32˝ diameter holes through box
and truck rail at front and rear. Fasten at front and rear using 1/4˝ flat washer,
1/4˝ lock nut and 1/4˝ x 1˝ bolt. Install the flat washers inside the box. NOTE:
Position box so that the screw holes drilled in the truck bed in Step C will not
interfere with truck frame members, electrical wiring, hydraulic lines, etc. (See
Diagram A). Be sure the box is level before drilling any further holes.
B. Position the mounting leg against box at each end. Make certain that you allow
at least 48˝ between the mounting legs on each side to permit stacking of
construction material between the wheel wells. (See Diagram A). Drill 9/32˝
diameter holes through the box and fasten the legs to the box using 1/4˝ x 1/2˝
bolt, 1/4˝ flat washer and 1/4˝ lock nut.
C. Drill 9/32˝ diameter holes
through the bottom of the truck
bed and fasten the legs to the
truck bed using 1/4˝ flat washer,
1/4˝ lock nut and 1/4˝ x 1˝ bolt.
Install the flat washer on the top
side of the mounting leg,
bottom flanges and the nuts on
the underside of the truck bed.
TOPSIDE INSTALLATION INSTRUCTIONS
Installation instructions are provided in the leg mounting kit in side topside unit. Be
sure to read all instructions and warnings before installing product.
CHEST INSTALLATION INSTRUCTIONS
A Crossover can be installed by drilling holes in tops of side walls for
bolts or using J-Bolts which do not require holes in side walls.
To obtain a set of J-Bolts, call our Customer Service at 800-643-0084
between 8:30 AM and 4:30 PM Central Time.
Place the Crossover in the desired location with the lid fully open to
insure proper clearance between the lid, back wall and cab. Be sure the
fully open lid will not hit the rear window. Mark the locations of the two
slots on each end on the top of the bed side walls. Remove the
Crossover.
If you are using J-Bolts, follow Steps A – D. If you are bolting it on the
side walls, follow Steps E – H.
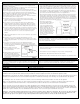
A. Determine if J-Bolts can be hooked under side wall tops and line up
with the locations marked. See Figure 1. If so, proceed to Step C.
B. If J-Bolts can not be aligned with the locations marked, determine
where J-Bolts can be located on the side walls. Carefully measure
locations. Drill 5/16” holes in Crossover to match locations of J-Bolts.
C. Insert J-Bolt threaded ends up through the holes from the bottom.
(See Figure 1). Place nylon retaining washer on J-Bolts to hold them
in place. Put the Crossover in the desired location. Hook the curved
ends of J-Bolts under tops of side walls.
D. Use a flat washer and lock nut on J-Bolts to hold Crossover in place.
E. Determine if 3/8” dia. holes drilled in locations marked will damage
wiring under tops of side walls. If not, drill holes and proceed to
Step I.
F. If holes cannot be drilled in the locations marked, determine where
holes can be drilled and measure these carefully. Drill holes in ends
of the Crossover to match the new locations.
G. Place mounting pads under
Crossover where it sits on
side walls.
H. Position Crossover so holes
match. Put 5/16˝x 1˝ hex
head bolts with flat washers
in holes from top and
tighten with nuts on bottom.
A. Position tool box against front of the truck bed.
B. Note location of mounting holes and check beneath bed for any possible
interference.
C. Drill through the mounting holes with a 3/16" drill.
D. Secure tool box to truck bed with sheet metal screws.
E. Plug holes in bottom of box with 1" plugs provided.
UNDERBED BOX INSTALLATION INSTRUCTIONS TRAILER TONGUE BOX INSTALLATION INSTRUCTIONS
We recommend using our heavy-duty Underbed Box Mounting Brackets.
Sold in pairs, the brackets support the box from bottom, sides and back.
When bolting a Trailer Tongue Box to a trailer, drill the holes for bolts in the
reinforcing bar in the front and rear bottom of the box.
LIMITED WARRANTY
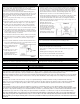
Delta & Delta Champion
One-Year Limited Warranty
Delta PRO
Three-Year Limited Warranty
JOBOX
Five-Year Limited Warranty
This warranty is made by Delta Consolidated Industries, Inc. (DCI) to only the original purchaser of this product and it is valid as indicated in
table above from date of purchase, upon presentation of the original sales receipt at the time the warranty claim is made.
DCI warrants that this product is free from defects in materials and workmanship at the time of the sale. This warranty does not cover damage
caused by accident or unreasonable or unintended use of the product. Modification, disassembly and/or reassembly of the product will void
this warranty.
Damage to the contents of the box, vehicle, or any consequential damages of whatever kind are hereby excluded from this warranty.
In the case of a nonconforming product, you should return the product to the place where it was purchased. The seller will consult with DCI
and then either repair or replace the product, at DCI’s sole option, if it is determined that the product is defective in either material or
workmanship.
If you feel that you have not been offered a satisfactory resolution to your warranty claim, you may submit a written request for further
consideration to the Warranty Department, Delta Consolidated Industries, Inc., P.O. Box 1846, Jonesboro, AR 72403-1846. Explain in writing
the nature of the problem and why you are dissatisfied with the resolution of your warranty claim. You must include the Model Number of the
product and a copy of the sales receipt, with your request for further consideration.. You will receive a response from DCI within 30 days.
Note: This warranty applies solely to domestic sales and shipments made within the continental USA. It gives you specific legal rights in the
USA, and you may have other rights afforded you by one or more states in the USA. If this product was purchased outside of the USA, this
warranty will be governed by the warranty laws in effect in the jurisdiction in which the product was purchased, on the date that such purchase
occurred.