DS00386ATW_LSO-5_6_7_8.
DS00386ATW_LSO-5_6_7_8.qxp 11/18/04 7:22 PM Page b LSO-5/6/7/8 INDOOR/OUTDOOR LOUDSPEAKER TABLE OF CONTENTS Features............................................................................................................................1 Product Overview...........................................................................................................2 Package Contents ..........................................................................................................
DS00386ATW_LSO-5_6_7_8.
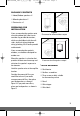
DS00386ATW_LSO-5_6_7_8.qxp 11/18/04 7:22 PM Page 2 PRODUCT OVERVIEW The LSO series of Indoor/Outdoor speakers give you the freedom to listen to music anywhere! You can use them indoors and outdoors (even on a boat). The cabinet is shaped to fit neatly into corners or eaves. It is supplied with a swiveling mounting bracket for easy installation anywhere. a e b c d b d f g h e i Figure 1 Parts Guide j 2 a. Bracket f. Grille b. Nail Hole g. Cabinet c. Wire Hole h. Baffle d. Screw Hole i.
DS00386ATW_LSO-5_6_7_8.qxp 11/18/04 7:22 PM Page 3 PACKAGE CONTENTS ■ Indoor/Outdoor speakers x 2 ■ Mounting brackets x 2 ■ Paint masks x 2 PREPARING FOR INSTALLATION If you are mounting the speakers onto an existing indoor wall, take time to consider any possible obstructions, which may be hidden inside the wall: studs, electrical wiring, telephone wiring, plumbing, AC or heating conduit and ductwork.
DS00386ATW_LSO-5_6_7_8.qxp 11/18/04 INDOOR INSTALLATION 1. LSO speakers can be mounted either horizontally or vertically. 2. Use the stud locator to identify the location of the studs in the proposed mounting locations of the speaker. 3. Mark the stud edges, using masking tape. 4. Repeat this process for the other speaker. 5. You may decide to adjust the speaker mounting locations based on how symmetrical the studs are located in the wall space. 6.
DS00386ATW_LSO-5_6_7_8.qxp 11/18/04 7:22 PM Page 5 4. Drill pilot holes into the mounting surface. 10. Remove the bracket knobs from the speaker. 5. If the mounting holes line up with a stud, use galvanized screws to secure the bracket to the wall. 11. Slide the speaker into the mounting bracket. 6. If the mounting holes do not line up with a stud, secure the bracket to the wall using anchors designed to support the weight of the speaker. 7. Strip 1/4" of insulation from the end of each wire. 12.
DS00386ATW_LSO-5_6_7_8.qxp 11/18/04 Page 6 PAINTING THE SPEAKERS PAINTING THE GRILLES 1. Separate the parts of the speaker by removing the brackets and the bracket knobs. Remove the grille by hooking it with a bent paper clip or the tip of a corkscrew and pulling it away from the cabinet. The grilles should be painted before they are installed on the speakers. The best results will be obtained by using a spray gun or airless sprayer. Thin the paint, and then apply several light coats.
DS00386ATW_LSO-5_6_7_8.
DS00386ATW_LSO-5_6_7_8.qxp 11/18/04 7:22 PM Page 8 LIMITED WARRANTY JobSite Systems (“JOBSITE”), a Niles Audio Corporation company, warrants its passive products (those not requiring AC or battery power) to the original purchaser to be free of manufacturing defects in material and workmanship for a period of ten years from date of purchase. serial number of your unit, and a brief description of the problem.
DS00386ATW_LSO-5_6_7_8.
DS00386ATW_LSO-5_6_7_8.qxp 11/18/04 7:22 PM Page 10 JOBSITE SYSTEMS 12331 S.W. 130 STREET, MIAMI, FLORIDA 33186 TEL (866) 4JB-SITE (866-452-7483) – FAX (305) 238-0185 WWW.JOBSITESYSTEMS.COM JobSite Systems, a Niles Audio Corporation company, 12331 S.W. 130 Street, Miami, Fl 33186. ©2004 Niles Audio Corporation. JobSite, Pure Custom and Niles are registered trademarks of Niles Audio Corporation and the JobSite Logo is a trademark of Niles Audio Corporation.