
Operating Guide
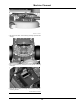
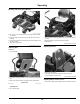
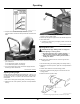
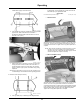
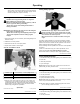
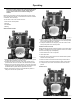
Table Of Contents
- Introduction
- Contents
- Product Identification
- Safety Labels with Text
- Safety Labels without Text
- Safety Label Location
- Understanding the Machine Safety Labels without Text
- Avoid Injury from Loaded Spring
- Avoid Injury from Rotating Blades
- Avoid Injury from Getting Caught in Belts
- Read Operator’s Manual
- Keep Children Away from Mower
- Avoid Injury from Thrown Objects
- Avoid Injury From Tipping
- Avoid Injury From Thrown Objects
- Avoid Injury from Equipment Fires
- Safety
- Machine Cleanout
- Operating Controls
- Operating
- Daily Operating Checklist
- Avoid Damage to Plastic and Painted Surfaces
- Mounting and Dismounting Machine
- Adjusting Seat
- Adjusting Armrests
- Adjusting Motion Control Levers
- Adjusting Cutting Height
- Adjusting Mower Level
- Adjusting Mower Wheels
- Testing Safety Systems
- Testing Park Brake Switch
- Testing Park Brake
- Testing Mower Engagement (PTO) Switch
- Testing Seat Switch
- Testing Motion Control Lever Switch
- Using Park Brake
- Using Key Switch
- Using Low Fuel Indicator Light
- Using Mower Engagement Switch
- Using the Hour Meter
- Using the Motion Control Levers
- Starting the Engine
- Engaging Mower
- Using MulchControl (If Equipped)
- Unplugging Mower
- Stopping the Engine
- Moving Machine by Hand
- Unplugging Mower, Bagger, or Material Collection System
- Using Wash Port to Clean Mower Deck
- Transporting Machine on Trailer
- Transporting Material Collection System (If Equipped)
- Towing Loads
- Mowing Tips
- Blade Choices
- Service Intervals
- Service Lubrication
- Service Engine
- Emissions Service Information
- Avoid Fumes
- Gasoline Engine Oil
- Checking Engine Oil Level
- Changing Conventional Engine Oil and Filter
- Changing John Deere Easy Change™ 30-Second Oil Change System (If Equipped)
- Cleaning Air Intake Screen and Engine Fins
- Cleaning Engine Shroud
- Checking and Cleaning Air Cleaner Element
- Checking Spark Plug
- Replacing Fuel Filter
- Cleaning Engine Screen Guard
- Spark Arrestor Maintenance (If Equipped)
- Cleaning Spark Arrestor
- Service Transmission
- Service Mower
- Mower Deck Identification
- Removing and Installing Mower Deck Foot Plate
- Removing Mower Deck (42A)
- Removing Mower Deck (48A and 54A Mower Decks)
- Installing Mower Deck (42A)
- Installing Mower Deck (48A and 54A Mower Decks)
- Replacing Mower Drive Belt (42A Mower)
- Replacing Mower Drive Belt (48A and 54A Mower Decks)
- Installing MulchControl Discharge Plate (If Equipped)
- Installing MulchControl Deflector (If Equipped)
- Installing MulchControl Handle (If Equipped)
- Removing and Storing MulchControl Deck (If Equipped)
- Installing Mulch Blades
- Checking for Bent Mower Blades
- Servicing Mower Blades
- Service Electrical
- Service Miscellaneous
- Troubleshooting
- Storage
- Specifications
- Warranty
- John Deere Quality Statement
- Service Record
- Slope Gauge
- Index

a. Position mower blades as follows and measure from each
outside blade tip (B) to the level surface.
MXAL42798—UN—09APR13
b. Turn left blade (C) as shown. Hold belt and turn the right blade
(D) as shown. Take measurement for both blades.
The dierence between blade measurements must not be
more than 3 mm (1/8 in).
GXT003029—UN—29JUN16
c. Adjust mower level, if necessary, by turning rear nuts using
tool (E) clockwise to raise the side of the mower deck, or
counterclockwise to lower the mower deck. Use a backup
wrench to hold the upper portion of threaded rod (F) during
adjustment.
NOTE: Ensure that bottom of the lock nut is fully engaged on the
threaded tting to avoid hardware loosening during operation.
6. Measure mower level (front-to-rear).
MXAL42800—UN—09APR13
a. Turn right blade (D) so a blade tip points straight forward.
b. Measure from the blade tip to the surface. Take measurement
for both blades. The front blade tips must be lower than the
rear blade tips by the specication listed.
Specication
Front-to-Rear Blade Tip Variation—Height. . . . . . . . . . . . . . . . . . . . 3––6 mm (1/8––1/4 in)
c. 42A Mower Deck
GXT001458—UN—02JUN15
Adjust the mower front-to-rear level by loosening rear nut (G) on the
front lift rod. Turn front nut (H) clockwise to raise front of mower or
counterclockwise to lower it. Tighten rear nut (G) after adjustment is
complete.
NOTE: Verify that the deck latches in transport position. If it does
not latch, turn both rear adjusting nuts counterclockwise
equally to lower rear of deck until deck latch engages. Check
front lift rod adjustment, adjust if necessary.
d. 48A and 54A Mower Decks
GXT002898—UN—28MAR16
Adjust the mower front-to-rear level by loosening rear nuts (G) on front
lift rods. Turn front nuts (H) clockwise to raise front of mower or
counterclockwise to lower it. If the lift rod is not tight against both deck
hooks, tighten loose side until both sides are tight against deck hooks.
Shake the deck slightly to ensure that it has settled into position.
Tighten rear nuts (G) after adjustment is complete.
Operating
17