
Operating Guide

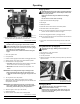
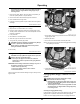
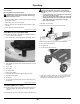
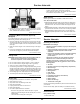
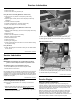
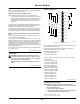
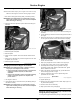
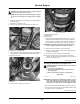
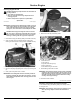
Table Of Contents
- Introduction
- Contents
- Product Identification
- Safety Labels with Text
- Safety Labels without Text
- Safety Label Location
- Understanding the Machine Safety Labels without Text
- Avoid Injury from Loaded Spring
- Avoid Injury from Rotating Blades
- Avoid Injury from Getting Caught in Belts
- Read Operator’s Manual
- Keep Children Away from Mower
- Avoid Injury from Thrown Objects
- Avoid Injury From Tipping
- Avoid Injury From Thrown Objects
- Avoid Injury from Equipment Fires
- Safety
- Machine Cleanout
- Operating Controls
- Operating
- Daily Operating Checklist
- Avoid Damage to Plastic and Painted Surfaces
- Mounting and Dismounting Machine
- Adjusting Seat
- Adjusting Armrests
- Adjusting Motion Control Levers
- Adjusting Cutting Height
- Adjusting Mower Level
- Adjusting Mower Wheels
- Testing Safety Systems
- Testing Park Brake Switch
- Testing Park Brake
- Testing Mower Engagement (PTO) Switch
- Testing Seat Switch
- Testing Motion Control Lever Switch
- Using Park Brake
- Using Key Switch
- Using Low Fuel Indicator Light
- Using Mower Engagement Switch
- Using the Hour Meter
- Using the Motion Control Levers
- Starting the Engine
- Engaging Mower
- Using MulchControl (If Equipped)
- Unplugging Mower
- Stopping the Engine
- Moving Machine by Hand
- Unplugging Mower, Bagger, or Material Collection System
- Using Wash Port to Clean Mower Deck
- Transporting Machine on Trailer
- Transporting Material Collection System (If Equipped)
- Towing Loads
- Mowing Tips
- Blade Choices
- Service Intervals
- Service Lubrication
- Service Engine
- Emissions Service Information
- Avoid Fumes
- Gasoline Engine Oil
- Checking Engine Oil Level
- Changing Conventional Engine Oil and Filter
- Changing John Deere Easy Change™ 30-Second Oil Change System (If Equipped)
- Cleaning Air Intake Screen and Engine Fins
- Cleaning Engine Shroud
- Checking and Cleaning Air Cleaner Element
- Checking Spark Plug
- Replacing Fuel Filter
- Cleaning Engine Screen Guard
- Spark Arrestor Maintenance (If Equipped)
- Cleaning Spark Arrestor
- Service Transmission
- Service Mower
- Mower Deck Identification
- Removing and Installing Mower Deck Foot Plate
- Removing Mower Deck (42A)
- Removing Mower Deck (48A and 54A Mower Decks)
- Installing Mower Deck (42A)
- Installing Mower Deck (48A and 54A Mower Decks)
- Replacing Mower Drive Belt (42A Mower)
- Replacing Mower Drive Belt (48A and 54A Mower Decks)
- Installing MulchControl Discharge Plate (If Equipped)
- Installing MulchControl Deflector (If Equipped)
- Installing MulchControl Handle (If Equipped)
- Removing and Storing MulchControl Deck (If Equipped)
- Installing Mulch Blades
- Checking for Bent Mower Blades
- Servicing Mower Blades
- Service Electrical
- Service Miscellaneous
- Troubleshooting
- Storage
- Specifications
- Warranty
- John Deere Quality Statement
- Service Record
- Slope Gauge
- Index

side, check for plugged chute, full collector bags, or problems with
blower assembly.
Removing Debris from Inspection Points:
CAUTION: Avoid injury! Do not use hands or feet to clear
plugged mower deck or blower assembly. Stored energy
can cause blades to rotate.
1. Park machine safely. Wait for all moving parts to stop before getting
o to inspect machine.
2. Open hopper cover. Check chute outlet.
3. Remove chute from the mower deck or blower assembly. Check
chute inlet.
4. Check under the mower deck for debris.
MP47322,00F4646-19-10JUL20
Using Wash Port to Clean Mower Deck
NOTE: Follow this procedure after each use to prevent buildup and
remove corrosive lawn chemicals.
1. Park machine safely. (See Parking Safely in the Safety section).
MX101450—UN—29APR20
2. Attach quick-coupler to the garden hose.
3. Attach garden hose with the quick-coupler to wash port (A) on the
mower deck.
4. Turn on water.
5. Start engine.
6. Run at full throttle.
7. Engage mower blades.
8. Flush water under the deck for approximately one minute.
9. Disengage mower blades.
10. Stop engine.
11. Turn o water and remove garden hose and quick-coupler from
the wash port.
SB31882,000040A-19-06MAY20
Transporting Machine on Trailer
NOTE: Trailer capacity must exceed combined machine weight and
attachment weight. (See Specications section in operator’s
manual).
Be sure trailer has all the necessary lights and signs required by law.
CAUTION: Avoid injury! Use extra care when loading or
unloading the machine onto a trailer or truck. Machine
wheels can go o the ramp or trailer, causing the machine to
tip over.
● To load, back slowly and in a straight line. Keep wheels
away from drop-os and edges.
● Do not use two separate loading ramps. Use a full width
loading ramp at least 30 cm (12 in) wider than machine to
keep caster wheels from going o the ramp edge.
● Use a trailer with sides.
1. Park trailer on level surface.
2. Raise mower deck before driving machine onto trailer.
MXAL42817—UN—09APR13
3. Back machine onto heavy-duty trailer with full-width ramp.
4. Lower mower deck completely.
5. Lock park brake.
6. Turn o machine and remove key.
GXT002963—UN—18APR16
7. Fasten front of machine at both sides of the frame at point (A) to
trailer with heavy-duty straps, chains, or cables. Straps must be
directed down, forward and outward from machine.
Operating
24