
Operating Guide
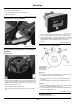
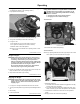


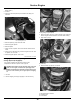
Table Of Contents
- Introduction
- Contents
- Product Identification
- Safety Labels with Text
- Safety Labels without Text
- Safety Label Location
- Understanding the Machine Safety Labels without Text
- Read Operator’s Manual
- Keep Children Away from Mower
- Avoid Serious Injury or Death from Tipping
- Avoid Injury from Getting Caught in Belts
- Avoid Injury from Equipment Fires
- Avoid Injury from Rotating Blades
- Avoid Injury from Hot Surfaces
- Avoid Injury from Rotating Blades and Thrown Objects
- Safety
- Machine Cleanout
- Operating Controls
- Operating
- Daily Operating Checklist
- Adjusting Seat
- Adjusting Cutting Height
- Checking and Adjusting Mower Deck Level
- Adjusting Mower Deck Wheels
- Testing Safety Systems
- Testing Park Brake Switch
- Testing Park Brake
- Testing Attachment Engagement Switch or Lever
- Testing Seat Switch
- Testing Reverse Implement Option (RIO)
- Using the Park Brake
- Checking Fuel Level (If Equipped)
- Using Hourmeter and MowerPlus™ Fuel Gauge (If Equipped)
- Using Key Switch and Headlights
- Starting the Engine
- Idling the Engine
- Stopping the Engine
- Using Travel Controls on Hydrostatic Transmission
- Using The Reverse Implement Option (RIO)
- Using Cruise Control (If Equipped)
- Engaging and Disengaging Mower
- Using Wash Port to Clean Mower Deck
- Unplugging Mower, Bagger, or Material Collection System
- Moving Machine by Hand
- Transporting Machine on Trailer
- Transporting Material Collection System (If Equipped)
- Using Weights
- Using Tire Chains
- Using Accessories
- Choosing Mower Blades
- Mowing Tips
- Towing Loads
- Service Intervals
- Service Lubrication
- Service Engine
- Emissions Service Information
- Avoid Fumes
- Engine Oil
- Checking Engine Oil Level
- Changing John Deere Easy Change™ 30-Second Oil Change System (If Equipped)
- Changing Engine Oil and Filter on models not equipped with the John Deere Easy Change™ 30-Second Oil Change System
- Cleaning Air Intake Screen and Engine Fins
- Checking and Cleaning Air Cleaner Elements (S100 and S110)
- Checking and Cleaning Air Cleaner Elements (S120, S130, and S140)
- Checking and Cleaning Air Cleaner Elements (S160, S170, and S180)
- Checking and Cleaning Emission Filter (If Equipped)
- Checking Spark Plug
- Replacing Fuel Filter
- Spark Arrestor Maintenance (If Equipped)
- Service Transmission
- Service Mower
- Removing or Installing Mower Drive Belt at Engine Drive Sheave (42 in, 48 in, and 54 in Mower Deck)
- Removing Mower Deck (42 in Mower Deck)
- Removing Mower Deck (48 in and 54 in Mower Decks)
- Installing Mower Deck (42 in Mower Deck)
- Installing Mower Deck (48 in and 54 in Mower Decks)
- Replacing Mower Drive Belt (42 in Mower Deck)
- Replacing Mower Drive Belt (48 in and 54 in Mower Decks)
- Checking for Bent Mower Blades
- Servicing Mower Blades
- Sharpening Blades
- Balancing Blades
- Service Electrical
- Service Miscellaneous
- Using Proper Fuel and Stabilizer
- Filling Fuel Tank
- Lifting Machine
- Checking Tire Pressure
- Removing and Installing Hood
- Cleaning Plastic Surfaces
- Cleaning and Repairing Metal Surfaces
- Avoid Damage to Plastic and Painted Surfaces
- Removing and Installing Front Wheel Assembly
- Removing and Installing Rear Wheel Assembly
- Troubleshooting
- Storage
- Specifications
- Warranty
- John Deere Quality Statement
- Service Record
- Slope Gauge
- Index

1. Park machine safely on level surface. (See Parking Safely in the
Safety section.)
2. Lift hood.
3. Clean area around dipstick to prevent debris from falling into
crankcase.
APY36165—UN—10JUL20
Twin Cylinder Engine Shown
4. Remove dipstick (A). Wipe with clean cloth.
5. Install and tighten dipstick.
6. Remove dipstick.
7. Check oil level on dipstick. Oil must be between ADD and FULL
marks.
8. If oil level is low, add oil to bring oil level no higher than FULL mark
on dipstick. Do not overll.
9. Install and tighten dipstick. Lower hood.
MG39705,00004AD-19-15JUL20
Changing John Deere Easy Change™ 30-Second Oil
Change System (If Equipped)
● For engines equipped with the Easy Change system.
● Replaces the lter and a portion of the engine oil.
CAUTION: Avoid Injury! Park the machine safely using park
brake, turn o engine, and disconnect spark plug wires.
IMPORTANT: Avoid Damage! Oil should be changed when engine
is cool. It is not necessary to run engine prior to changing
oil.
1. Lift hood.
2. Remove shipping tie strap (if equipped) on rst service only.
APY08908—UN—29MAY18
A— Easy Change Oil System (ECOS)
3. Remove old easy change oil system (ECOS) (A) by rotating the
lter 90 degrees counterclockwise. Push down while rotating.
4. Wipe clean any drips.
PY44545—UN—03AUG17
B— Rubber Cap
5. Remove rubber cap (B) from new ECOS.
APY08907—UN—29MAY18
Shown in Locked Position
C— Alignment Pointer on the ECOS
D— Unlocked Pointer
E— Locked Pointer
Service Engine
30