
- Frontier Equipment Grinder User's Manual
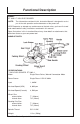


12 7-Inch Disc Grinder Operator's Manual
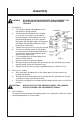
WARNING: BE SURE TO SWITCH POWER OFF AND DISCONNECT THE
PLUG FROM THE RECEPTACLE TO AVOID SERIOUS
TROUBLE.
1. Assembling:
a. Turn the disc grinder upsidedown so that
the spindle is facing upward.
b. To mount the wheel guard on the grinder
first, slip the set ring (A) over the guard
mounting flange, so locating pin fits in the
guard locating groove, then twist guard in
the groove into a proper angle, so the guard
will protect the operator's body from injury
by a broken wheel piece.
c. Tighten the screw in the set ring (A) of guard.
d. To mount a grinding wheel on the grinder,
first align the oval-shaped indentation of the
wheel washer with the notched part of the
spindle, then attach them.
e. Fit the protuberance of the grinding wheel
onto the wheel washer.
f. Screw the wheel nut onto the spindle.
g. While pushing the lock button with one hand, lock the spindle by turning the
grinding wheel slowly with the other hand.
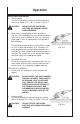
h. Tighten the wheel nut by using the supplied wrench as shown in Fig. 2.
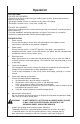
2. For use as a sander:
a. After placing the Sanding disc on the rubber pad, insert the washer nut
through the spindle.
b. While pushing the lock button with one hand, lock the spindle by turning the
sanding disc slowly with the other hand.
c. Secure the sanding disc and rubber pad by tightening the washer nut with the
wrench.
CAUTION: MAKE SURE THAT THE GRINDING WHEEL, THE SANDING
DISC OR RUBBER PAD ARE MOUNTED FIRMLY.
3. Disassembling:
To remove the wheel guard, the grinding wheel, the sanding disc, follow the above-
mentioned procedure in reverse order.
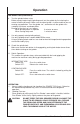
Assembly
ASSEMBLY:
(Fig. 2)