JLFFW1811 JLSS1814 JLFFW2012 JLSS2015 JLFFW2013 Fridge-Freezer Instruction manual
Safety information It is most important that this instruction book should be retained with the appliance for future reference. Should the appliance be sold or transferred to another owner, or should you move house and leave the appliance, always ensure that the book is supplied with the appliance in order that the new owner can get to know the functioning of the appliance and the relevant warnings. These warnings have been provided in the interest of safety.
. Make sure that you can come to the mains plug of the appliance. 4. Do not pull the mains cable. 5. If the power plug socket is loose, do not insert the power plug. There is a risk of electric shock or fire. 6. You must not operate the appliance without the lamp cover of interior lighting. • This appliance is heavy. Care should be taken when moving it. • Do not remove nor touch items from the freezer compartment if your hands are damp/wet, as this could cause skin abrasions or frost/freezer burns.
• The appliance must not be located close to radiators or cookers. • Make sure that the mains plug is accessible after the installation of the appliance. • Ice lollies can cause frost burns if consumed straight from the appliance. Care and cleaning • Before maintenance, switch off the appliance and disconnect the mains plug from the mains socket. • Do not clean the appliance with metal objects. • Do not use sharp objects to remove frost from the appliance. Use a plastic scraper.
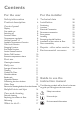
Contents For the user For the installer Safety information 2 Technical data 20 Product description 6 Installation Positioning Location Electrical Connection Permanent connection Rear spacers Levelling Removing the shelf holders Installation of the carbon air filter Door reversibility 20 20 20 21 22 22 22 22 23 23 Repairs - after sales service 26 Environmental concerns 27 Control panel Display First switch on Switching off Functions Menu Temperature regulation Holiday Function "H" Ambient Tempe
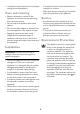
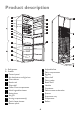
Product description 1 2 14 3 4 15 22 16 5 17 6 18 7 20 8 19 9 21 10 11 12 23 24 13 25 A - Refrigerator B - Freezer 1 Control panel 2 Air distribution and light box 3 Glass shelves 4 Bottle rack 5 Glass shelf 6 Chiller Zone compartment 7 Salad/vegetable drawer 8 Rating plate 9 Air grid 10 Storing compartment(s) 11 Quick freeze drawer 12 Bottom plinth 13 14 15 16 17 18 19 20 21 22 23 24 25 6 Adjustable feet Dairy compartment Egg tray Door shelf Door gasket Bottle shelf Handles Condenser De
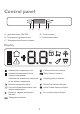
Control panel A B C D E A - Appliance button ON/OFF D - Function button B - Temperature regulation button E - Confirmation button C - Temperature and function indicator Display Indicates the compartment is on. Child Lock function indicator. Indicates the temperature of the relevant compartment. Timer function indicator. If it flashes the operations corresponds to the relative compartment. Shopping function indicator. Excessive temperature alarm. Drinks Chill function indicator.
The following functions are indicated: Select/Switch off/Switch on fridge compartment Select/Switch off/Switch on freezer compartment Ambient Temperature Child Lock function Shopping function Eco Mode function Action Freeze function Drinks Chill function First switch on After plugging the plug into the power outlet, if the display is not illuminated, press key (A), appliance on. As soon as the appliance is turned on, it is in alarm condition, the temperature flashes and you will hear a buzzer.
It is possible to de-activate the function at any time by pressing key (D) until the corresponding icon will flash and then key (E). This function allows you to keep the refrigerator shut and empty during a long holiday period ( e. g. the summer holidays) without the formation of a bad smell. To turn on the holiday function operate as per modift the selected temperature. The temperature indicator can modify the displayed temperature up to + 8 °C, 1 °at a tim. + 2 °C will be followed by the letter "H ".
At the end of the selected time there are the following indications: • on the indicator the symbol flashing • the icon flashing • the icon flashing • sounding of an acoustic alarm until key (E) is pressed At this point bear in mind to remove the drinks contained in the freezer compartment. It is possible to deactivate the function at any time by pressing key (D) until the corresponding icon will flash and then key (E). The maximum quantity of foods to freeze in 24 hours is shown on the rating plate.
First use Cleaning the interior Important! Do not use detergents or abrasive powders, as these will damage the finish. Before using the appliance for the first time, wash the interior and all internal accessories with lukewarm water and some neutral soap so as to remove the typical smell of a brandnew product, then dry thoroughly.
There is a separator inside the drawer that can be placed in different positions to allow for the subdivision best suited to personal needs. There is a grille (if foreseen) on the bottom of the drawer to separate the fruit and vegetables from any humidity that may form on the bottom surface. All parts inside the drawer can be removed for cleaning purposes 1 Bottle rack 2 Place the bottles (with the opening facing front) in the pre-positioned shelf.
5 6 Chiller Zone 2 The Chiller Zone compartment is suitable for storing fresh food like fish, meat, seafood, because the temperature is lower here than in the rest of the fridge. It is placed in the lower part of the refrigerator, directly above of the vegetable drawer. If you wish to remove the Chiller Zone compartment, do these steps: 3 1. Open the door of the refrigerator as wide as possible.
Removal of freezing baskets from the freezer The freezing baskets have a limit stop to prevent their accidental removal or falling out. At the time of its removal from the freezer, pull the basket towards yourself and, upon reaching the end point, remove the basket by tilting its front upwards. At the time of putting it back, slightly lift the front of the basket to insert it into the freezer. Once you are over the end points, push the baskets back in their position.
Milk bottles: these should have a cap and should be stored in the bottle rack on the door. Bananas, potatoes, onions and garlic, if not packed, must not be kept in the refrigerator. Hints for energy saving • Do not open the door frequently or leave it open longer than absolutely necessary. • If the ambient temperature is high and the Temperature Regulator is set to low temperature and the appliance is fully loaded, the compressor may run continuously, causing frost or ice on the evaporator.
• not open the door frequently or leave it open longer than absolutely necessary. • Once defrosted, food deteriorates rapidly and cannot be refrozen. • Do not exceed the storage period indicated by the food manufacturer.
The absence of frost is due to the continuous circulation of cold air inside the compartment, driven by an automatically controlled fan. Defrosting Your appliance is frost free. This means that there is no build up of frost when it is in operation, neither on the internal walls nor on the foods. What to do if… Caution! Before troubleshooting, disconnect the power supply. Only a qualified electrician or competent person must complete any repairs to the appliance.
Problem Possible cause Solution Water flows on the ground. The melting water outlet does not Attach the melting water outlet to flow in the evaporative tray above the evaporative tray. the compressor. There is too much frost and ice. Products are not wrapped correctly.. Please refer to the "Hints for refrigeration" and "Hints for freezing" instructions in this guide. The door is not closed correctly. Refer to "Closing the door". The Temperature regulator may be set incorrectly.
1 2 Closing the door 1. Clean the door gaskets. 2. If necessary, adjust the door. Refer to "Installation". 3. If necessary, replace the defective door gaskets. Contact the Service Force Center.
Technical data JLFFW1811 JLSS1814 JLFFW2013 JLSS2015 JLFFW2012 1850 mm 2010 mm 2010 mm Dimension Height Width 595 mm 595 mm 595 mm Depth 632 mm 632 mm 632 mm 16 h 16 h 16 h Rising Time The technical information are situated in the rating plate on the internal left side of the appliance and in the energy label. Installation Location Read the "Safety Information" carefully for your safety and correct operation of the appliance before installing the appliance.
100 mm min 1 B 20 mm A 2 5 3 4 Warning! It must be possible to disconnect the appliance from the mains power supply; the plug must therefore be easily accessible after installation. 1 Green and Yellow: Earth 3 Brown: Live 5 Blue: Neutral As the colours of the wires in the mains lead of this appliance may not correspond with the coloured markings identifying the terminals in your plug, proceed as follows: 1.
The appliance is supplied with a 13 amp plug fitted 2 . In the event of having to change the fuse in the plug supplied, a 13 amp ASTA approved (BS 1362) fuse must be used. Levelling When placing the appliance ensure that it stands level. This can be achieved by two adjustable feet at the bottom in front. Warning! A cut off plug inserted into a 13 amp socket is a serious safety (shock) hazard. Ensure that it is disposed of safely.
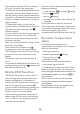
A 2 B 1 C Important! During operation, always keep the air ventilation flap closed. The filter should be handled carefully so fragments do not loosen from the surface. Installation of the carbon Door reversibility air filter The carbon air filter is an active carbon filter which absorbs bad odours and permits to maintain the best flavour and aroma for all foodstuffs without risk of odour cross contamination. On delivery the carbon filter is in a plastic bag to maintain it’s duration and characteristics.
t1 t1 d1 t1 t2 t3 d7 6. 2. 3. Remove the little plastic cover from the door plastic trim and refit on the opposite side (t3). Remove the panel (t4). If it is necessary use a screwdriver very carefully. Unscrew the screw on the other side. Remove the upper door mount (t5) . Place them in an empty plastic bag. Unscrew the middle hinge (m2). Remove the plastic spacer (m1). m1 m5 m3 m2 m6 m4 t4 t5 7. 4. 5. Remove the spacer (m6) and move to the other side of the hinge pivot (m5). 8.
16. Fit the pin of the middle hinge (m5) into the left-hand hole of the lower door. 17. Re-insert the lower door on the pivot pin (b2). 18. Re-screw the middle hinge (m1) on the opposite side . Do not forget the plastic spacer (m2) inserted under the middle hinge. 19. Re-insert the upper door on the middle hinge (m5). Make sure that the edges of the doors run parallel to the side edge of the appliance. 20.
• All screws are tightened. • The magnetic seal adheres to the cabinet. • The door opens and closes correctly. If the ambient temperature is cold (i.e. in Winter), the gasket may not fit perfectly to the cabinet. In that case, wait for the natural fitting of the gasket. In case you do not want to carry out the above mentioned operations, contact the nearest After Sales Service Force. The After Sales Service specialist will carry out the reversibility of the doors at your cost.
malfunctioning. Contact your local John Lewis branch. Environmental concerns The symbol on the product or on its packaging indicates that this product may not be treated as household waste. Instead it should be taken to the appropriate collection point for the recycling of electrical and electronic equipment.
John Lewis Partnership 171 Victoria Street London SW1E 5NN www. johnlewis.