JLBICO2 Microwave Oven Instruction manual
Safety information It is most important that this instruction book should be retained with the appliance for future reference. Should the appliance be sold or transferred to another owner, or should you move house and leave the appliance, always ensure that the book is supplied with the appliance in order that the new owner can get to know the functioning of the appliance and the relevant warnings. These warnings have been provided in the interest of safety.
• Keep all packaging materials away from children. • Do not attempt to dry clothing or newspapers in the microwave oven. These items can ignite. • Do not use the cavity for storage purposes. Do not leave paper products, cooking utensils, or food in the cavity when not in use. • The temperature of accessible surfaces may be high when the appliance is operating. Utensil safety Microwave function For the microwave function, keep in mind that microwaves are reflected by metal surfaces.
• Important: aluminium foil cannot come into contact with the cavity walls since this may cause electrical arcing. Aluminium containers and foil Pre-cooked food in aluminium containers or in aluminium foil can be put in the microwave if the following aspects are respected: Lids We recommend you use glass or plastic lids or cling film since: 1. This will stop excessive evaporation (mainly during very long cooking times); 2. The cooking times are shorter; 3. The food does not become dry; 4.
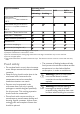
Type of ovenware Operating mode Microwave Defrosting Plastic dishes Grill Cooking Grill + Microwave Keep the manufacturer’s instructions in mind!)Heat resistant to 100°C Plastic dishes Keep the manufacturer’s resistant to 250°C instructions in mind!)Heat Plastic films 3)Plastic film for food Plastic films 3)Cellophane Paper, cardboard, parchment 4) Aluminium foil Aluminium wrappings 5) Accessories (rectangular rack) 1) Without any gold or silver leaf edging; no lead crystal.
Safety instructions when cooking with grill and combination modes Warning! When heating liquids, e.g. soups, sauces and beverages in your microwave oven, overheating the liquid beyond boiling point can occur without evidence of bubbling. This could result in a sudden boil over of the hot liquid. To prevent this possibility the following steps should be taken: 1. Avoid using straight-sided containers with narrow necks. 2. Do not overheat. 3.
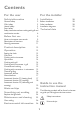
Contents For the user For the installer Safety information 2 General safety 2 Child safety 3 Utensil safety 3 Food safety 5 Safety instructions when cooking with grill and combination modes 6 Before first use How a microwave oven works Description of functions Altering parameters 9 9 10 11 Product description 12 Operation 13 13 14 14 14 14 15 15 15 16 16 17 17 18 Setting the clock Child lock Cooking with microwave Quick start Cooking with grill Cooking with microwave + grill Conventional cooking Coo
Repairs - after sales service Environmental information 27 8
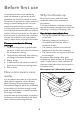
Before first use In conventional ovens, heat radiated by electrical elements or gas burners slowly penetrates the food from outside to inside. On account of this there is a major amount of energy is wasted heating the air, the oven components and the food containers. In a microwave oven, heat is generated by the food itself and the heat travels from inside to outside.
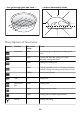
... but go through glass and china ... ... and are absorbed by foods. Description of functions Symbol Function Microwave power Foods Microwave 200W Slow defrosting for delicate foods; keeping food warm 400W Cooking with little heat; boiling rice. Rapid defrosting, heating baby food 600W Heating and cooking food 800W Cooking vegetables and food. Cooking and heating carefully.
Symbol Function Microwave power Foods Microwave + hot air 200 - 600W Quick meat, fish and poultry roasting. Baking cakes Grill +fan --- Grilling meat and fish --- Grilling poultry --- Potatoes – deep-frozen, defrosting and roasting You will then hear a beep and the time will appear on the display. Altering parameters The operating parameters (time, power, temperature) can be altered when the oven is operating or when the cooking process has been interrupted by proceeding as follows: 1.
Product description 9 12 11 6 10 5 4 7 8 3 1 2 1. 2. 3. 4. 5. 6. 7. Door window glass Catches Turntable support Turntable ring Turntable plate Drop-down grill Mica cover 8. Bulb 9. Control panel 10. Enammled Tray (do not use with microwave) 11. Rectangular rack 12.
1. Confirmation key 2. Start / Quick Start key 3. Parameter selection keys 4. Plus and Minus keys 5. Function selection keys 6. Cancel The display 1 2 3 4 5 6 7 8 9 10 11 12 13 16 15 14 9. 10. 11. 12. 13. 14. 15. 16. Symbol descriptions 1. F1 - Automatic function 2. F2 - Automatic function 3. F3 - Automatic function 4. Defrost by time 5. Defrost by weight 6. Thermal grill 7. Convection + microwave 8.
2. Select the Power Level with Parameter selection keys. The Power Level symbol and display start blinking. If you do not change the power level the microwave operates with the default power 800 W. 3. Set the power level with the '+' and '–' keys. 4. Press the Confirmation key to validate the power level. The display and symbol stop blinking. 5. Select the Duration with Parameter selection keys. The Duration symbol and display start blinking. 6. Set the duration with the '+' and '–' keys. 7.
1. Select the Convection function with the Function selection keys. 2. Select the Temperature with Parameter selection keys. The Temperature symbol and display start blinking. If you do not change the temperature the oven operates with the default temperature 160ºC. 3. Set the temperature with the '+' and '–' keys. 4. Press the Confirmation key to validate the temperature. The display and symbol stop blinking. 5. Select the Duration with Parameter selection keys.
6. Set the duration with the '+' and '–' keys. 7. Press the Confirmation key to validate the duration. The display and symbol stop blinking. 8. Start the cooking process by pressing the Start key. 5. Select the Power Level with Parameter selection keys. The Power Level symbol and display start blinking. If you do not change the power level the microwave operates with the default power 600 W. 6. Set the power level with the '+' and '–' keys. 7. Press the Confirmation key to validate the power level.
Programme Food Weight (g) Time (min) Standing time (min) Pr01 meat 100 - 2000 2 - 43 20 - 30 Pr02 Poultry 100 - 2500 2 - 58 20 - 30 Pr03 Fish 100 - 2000 2 - 40 20 - 30 Pr04 Fruit 100 - 500 2 - 13 10 - 20 Pr05 Bread 100 - 800 2 - 19 10 - 20 1. Select the Automatic function F1 with the Function selection keys. 2. Select the Program with Parameter selection keys. The Duration and Clock symbols and the display start blinking. 3.
Programme Food A 03 A 04 Weight (Kg) Time (min) Standing time (min) Pre-prepared 200 - 1500 dishes e.g. goulash 3 - 18 Turn 1-2 x, keep covered, 1-2 min. Vegetables 2,6 - 14 Turn 1-2 x, keep covered, 1-2 min. 200 - 1500 1. Select the Automatic function F2 with the Function selection keys. 2. Select the Program with Parameter selection keys. The Duration and Clock symbols and the display start blinking. 3. Set the program with the '+' and '–' keys (refer to the table below). 4.
Programme Food Weight (Kg) Time (min) Standing time (min) B 02 Vegetables 200 - 1000 4 - 15 Turn 1-2 x, keep covered, 1-2 min. B 03 Rice 200 - 500 13 - 20 One part rice, two parts water, keep covered B 04 Fish 200 - 1000 4 - 1000 Keep covered 1. Select the Automatic function F3 with the Function selection keys. 2. Select the Program with Parameter selection keys. The Duration and Clock symbols and the display start blinking. 3.
Programme Food Weight (Kg) Time (min) Standing time (min) C 01 Pizza 300 - 550 3-9 Preheat the baking pan C 02 Deep frozen food 400 - 1000 8 - 14 Turn 1-2 x, keep covered, 1-2 min. C 03 Frozen potato dishes 200 - 450 10 - 12 Turn 1x Important Notes: • Always use dishes for use in the microwave oven and a lid or cover to avoid loss of liquids. • Stir or mix the foods several times during heating, especially when the oven emits a beep and the display is flashing as follows .
2. The lower the temperature, the longer the cooking time. 3. Foods containing a lot of liquid heat up more quickly. 4. Cooking will be more uniform if the food is evenly distributed on the turntable. If you put dense foods on the outside part of the plate and less dense ones on the centre of the plate, you can heat up different types of food simultaneously. 5. You can open the oven door at any time. When you do this the oven switches off automatically.
5. 6. 7. 8. 9. 10. 11. 12. 13. Important points 1. When the microwave grill is used for the first time there will be some smoke and a smell coming from the oils used during oven manufacture. 2. The oven door window becomes very hot when the grill is working. Keep children away. 3. When the grill is operating, the cavity walls and the rectangular rack become very hot. You should use oven gloves. 4.
Before using a dish in the microwave oven make sure that it is suitable for microwave use. Only use dishes or containers that are suitable for microwave use. The dish to be used in the combined function must be suitable for microwave and grill use. See the section on types of ovenware! Keep in mind that the figures given are merely indicative and can vary as a function of the initial state, temperature, moisture and type of food.
Problem Possible sollution (Check if.........) The oven’s power is switched on. The door is completely closed. The door should close with an audible click. There are any foreign bodies between the door and the cavity front. When the oven is operating I can hear some strange noises! There is any electrical arcing inside the oven caused by foreign metallic objects. The ovenware is touching the oven walls. There are any loose items of cutlery or cooking tools inside the oven.
2 1 Maintenance and cleaning Use a glass cleaning product and a soft cloth that does not release any fibres or threads. Wipe from side to side without exerting any pressure on the surface. Immediately remove lime, fat, starch or egg white stains. Corrosion can occur under these stains. Do not let any water get inside the oven. Cleaning is the only maintenance normally required. Warning! Your microwave oven should be cleaned regularly, removing all food remains.
Do not use abrasive cleaning products or sharp objects. If the oven cavity is very dirty, put a glass of water on the turntable and switch on the microwave oven for 2 or 3 minutes at maximum power. The steam released will soften the dirt which can then be cleaned easily using a soft cloth. Unpleasant odours (e.g. after cooking fish) can be eliminated easily. Put a few drops of lemon juice in a cup with water. Put a spoonful of coffee in the cup to avoid the water boiling over.
product, please contact your local council, your household waste disposal service or the shop where you purchased the product. Repairs - after sales service If your oven is not performing satisfactorily; consult the fault finding guides within this instruction book (Something not working). If a fault occurs which you can not resolve through following the advice and information contained within this instruction manual, the next step is to contact our extended warranty administrators on • Mod...............
Installation Before installation Warning! after the oven is installed you must make sure you can access the plug. • Check that the input voltage indicated on the rating plate is the same as the voltage of the power outlet you are going to use. • Open the oven door and take out all the accessories and remove the packing material. • Do not remove the mica cover on the ceiling of the interior! This cover stops fat and pieces of food damaging the microwave generator.
Fit the Turntable support (1) in the centre of the oven cavity and put the Turntable ring (2) and the Turntable plate (3) on top, making sure they slot in. Whenever you use the microwave, the turntable plate and the respective accessories must be inside and correctly fitted. The turntable plate can rotate in both directions. 3 min. 550 100 448-452 542 560-568 455 2 446 1 595 450/520 22 Installation diagrams min. 550 1. Push oven completely into the cabinet and centre it. 2.
Technical data category Value Microwave output power 1000 W Microwave frequency 2450 MHz Exterior dimensions (WxHxD) 595 x 455 x 542 mm Interior dimensions (WxHxD) 420 x 210 x 390 mm Oven capacity.
John Lewis Partnership 171 Victoria Street London SW1E 5NN www. johnlewis.