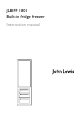
JLBIFF 1801 Built-in fridge freezer Instruction manual
Important Safety Information It is most important that this instruction book should be retained with the appliance for future reference. Should the appliance be sold or transferred to another owner, or should you move house and leave the appliance, always ensure that the book is supplied with the appliance in order that the new owner can get to know the functioning of the appliance and the relevant warnings. These warnings have been provided in the interest of safety.
Environmental Information • After installation, please dispose of the packaging with due regard to safety and the environment. • When disposing of an old appliance, make it unusable, by cutting off the cable. Remove any door catches, to prevent small children being trapped inside. • The symbol on the product or on its packaging indicates that this product may not be treated as household waste.
Contents For the Installer For the User Important Safety Information 2 Installation 6 Description of the appliance 5 Technical Specification 6 Control panel 12 Electrical Connection 6 When the Fridge Freezer is first installed 12 Positioning 7 Starting your appliance 12 Shelf holders 7 Temperature control 12 Building In 8 Using the freezer 13 Before using 13 Quick-freezing 13 Freezing fresh food 13 Frozen food storage 13 Thawing 13 Making ice cubes 13 Cold accumulator
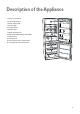
Description of the Appliance 1 Dairy compartments 2 Can storage shelves 3 Bottle storage shelf 4 Interior light 5 Storage shelves 6 Bottle holder 7 Water discharge hole 8 Glass shelf with Humidity control filter 9 Salad crispers 10 Control panel 11 Frozen food storage compartments 12 Freezing fresh food compartment 4 1 5 6 2 7 8 9 3 10 ² 11 11 12 5
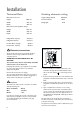
Installation Technical Data Heating elements rating Dimensions of recess Supply voltage (50 Hz) 220-240 V Connected load, 160 W Height 1780 mm Width 560 mm Depth 550 mm Fridge light 15 W Dimensions of the appliance cavity Height 1172 mm Width 540 mm Depth 547 mm Fridge Gross capacity 214 litres Fridge Net capacity 210 litres Freezer Gross capacity 68 litres Freezer Net capacity 55 litres Electrical connections GREEN & YELLOW 13 AMP Any electrical work required to install this
Shelf holders Your appliance is equipped with shelf retainers that make it possible to secure the shelves during transportation. A To remove them proceed as follows: Raise the shelf from the back, push it in the direction of the arrow until it is freed and remove the retainers. B Warning IF YOU ARE DISCARDING AN OLD APPLIANCE THAT HAS A LOCK OR CATCH ON THE DOOR, YOU MUST ENSURE THAT IT IS MADE UNUSABLE TO PREVENT YOUNG CHILDREN BEING TRAPPED INSIDE.
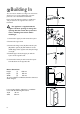
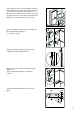
Building In The oven must be installed according to the instructions supplied on p. 6-11 and by qualified and competent personnel to the relevant National Standards. Please ensure that when the appliance is installed it is easily accessible for the engineer in the event of a breakdown. The appliance is supplied with the right or left door opening.To change the opening direction of the door proceed as in the following instructions before installing it. C B A 1.
Fit the appliance in the niche by making sure that it stands against the interior surface of the unit on the side where the door hinges of the appliances are fitted. Insert the appliance until the upper strip butts up against the unit (1) and make sure that the lower hinge is in line with the surface of the unit (2). 1 2 D023 Fasten the appliance with 4 screws provided in the kit included with the appliance.
Place guide (Ha) on the inside part of the furniture door, up and down as shown in the figure and mark the position of external holes.After having drilled holes, fix the guide with the screws supplied. ca. 50 mm 90° 21 m m 90° ca. 50 mm 21 m m Fix cover (Hc) on guide (Ha) until it clips into place Ha Hc PR33 8mm Open the appliance door and the furniture door at 90°. Insert the small square (Hb) into guide (Ha).
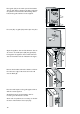
Fix cover (Hd) on guide (Hb) until it clips into place. Hb Hd PR167/1 If the appliance is fixed to the side of the kitchen unit, simply slacken the screws in fixing brackets (E), move the brackets as shown in the figure and retighten the screws. E E After completion of the door reversing operation, check that the door gasket adheres to the cabinet. If the ambient temperature is cold (i.e. in Winter), the gasket may not fit perfectly to the cabinet.
The Control Panel A B C D Push button A- ON/OFF light - Green B- Thermostat control knob C- Quick freeze light - Amber D- Quick freeze switch A. Pilot light Temperature control The operation light is illuminated continuously, to show that the appliance is on. The temperature within the freezer is controlled by the thermostat situated in the middle of the appliance. B.Thermostat control knob Turn the thermostat control knob clockwise to required setting.
Using the freezer Before use Remove all securing tapes.Wash inside the appliance with lukewarm water and bicarbonate of soda (5 ml to 0.5 litre of water). Do not use soap or detergent as the smell may linger. Dry thoroughly. Quick-freezing For quick-freezing, push the quick freeze switch (D). The quick freeze control light (C) will then light up. The quick-freezing function accelerates the freezing of fresh food and, at the same time, protects foodstuffs already stored from undesirable warming.
Using the refrigerator The thermostat is valid for both freezer and refrigerator compartments. Setting the temperature The temperature inside the refrigerator is regulated by the thermostat with 6 temperature positions and an “OFF” (O) position. Position 1 = minimum coldness Position 6 = maximum coldness Turn the thermostat dial to the required position. The intermediate position is usually the most suitable (3-4).
Movable shelves The walls of the refrigerator have runners so that the shelves can be positioned as desired . For better use of space, the front half-shelves can lie over the rear ones. Positioning the door shelves D338 To permit storage of food packages of various sizes, the door shelves can be adjusted in height.To make these adjustments proceed as follows: Gradually pull the shelf in the direction of the arrows until it comes off, then reposition as required.
Hints and Tips Food Storage • To obtain the best results from your appliance, neither hot foods nor liquids which may evaporate, should be placed in the larder compartment. • Keep the time between buying chilled food and placing it in your fridge as short as possible. • Do not push food together too much, try to allow air to circulate around each item. • Do not store food uncovered. • Remove suspect food from your refrigerator and clean, refer to ‘Maintenance and Cleaning’.
Maintenance and Cleaning Before any maintenance or cleaning work is carried out, DISCONNECT the appliance from the ELECTRICITY supply. Internal cleaning Clean the inside and accessories with warm water and bicarbonate of soda (5ml to 0.5 litre of water). Rinse and dry thoroughly. NEVER USE DETERGENTS, ABRASIVE POWDERS, HIGHLY PERFUMED CLEANING PRODUCTS OR WAX POLISHES,TO CLEAN THE INTERIOR AS THESE WILL DAMAGE THE SURFACE AND LEAVE A STRONG ODOUR.
Something not working If the appliance is not working correctly, please carry out the following checks, before contacting your local Service Force repair agent. IMPORTANT: If you call out an engineer to a fault listed below, or to repair a fault caused by incorrect use or installation, a charge will be made even if the appliance is under guarantee. SYMPTOM ! No power to the appliance SOLUTION ♦ Check there is power at the socket. ♦ Check there is not a power cut by checking the household lights.
Repairs - After Sales Service Under no circumstances should you attempt to repair the machine yourself. Repairs carried out by inexperienced persons may cause injury or serious malfunctioning. Refer to your local Service Force Centre and always insist on genuine spare parts. If your appliance is not performing satisfactorily; consult the fault finding guide within this instruction book (Something not working).
John Lewis Partnership 171 Victoria Street London SW1E 5NN www.johnlewis.