JLBIFF 1801 Instruction manual John Lewis partnership 171 Victoria Street London SW1E 5NN www.johnlewis.
IMPORTANT SAFETY INFORMATION It is most important that this instruction book should be retained with the appliance for future reference. Should the appliance be sold or transferred to another owner, or should you move house and leave the appliance, always ensure that the book is left with the appliance in order that the new owner can get to know the functioning of the appliance and the relevant safety information. This information has been provided in the interest of safety.
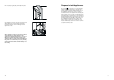
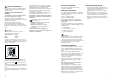
Disposal of old Appliances Fix cover (Hd) on guide (Hb) until it clips into place. The symbol on the product or on its packaging indicates that this product may not be treated as household waste. Instead it shall be handed over to the applicable collection point for the recycling of electrical and electronic equipment.
Place guide (Ha) on the inside part of the furniture door, up and down as shown in the figure and mark the position of external holes. After having drilled holes, fix the guide with the screws supplied.
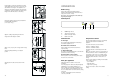
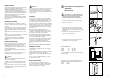
OPERATION Fit the appliance in the niche by making sure that it stands against the interior surface of the unit on the side where the door hinges of the appliances are fitted. Insert the appliance until the upper strip butts up against the unit (1) and make sure that the lower hinge is in line with the surface of the unit (2). 1 Before using Remove all securing tapes. Wash inside the appliance with lukewarm water and bicarbonate of soda (5 ml to 0.5 litre of water).
Quick-freezing For quick-freezing, push the quick freeze switch (D). The quick control light (C) will then light up. The quick-freezing function accelerates the freezing of fresh food and, at the same time, protects foodstuffs already stored from undesirable warming. If this function is not ended manually, the appliance switches off the quick-freezing function after 52 hours. The yellow light goes out. This function can be ended manually at any time by pressing the quick freeze switch again.
Electrical connections The plug moulded onto the lead incorporates a fuse. For replacement, use a 13amp BSI362 fuse. Only ASTA or BSI approved fuses should be used. Any electrical work required to install this appliance should be carried out by a qualified electrician or competent person. The plug must not be used if the fuse cover/carrier is lost. The cover/carrier is indicated by the coloured insert at the base of the plug. WARNING: THIS APPLIANCE MUST BE EARTHED.
INSTALLATION Movable shelves The walls of the refrigerator have runners so that the shelves can be positioned as desired . For better use of space, the front half-shelves can lie over the rear ones. Positioning the door shelves Important Warning D338 IF YOU ARE DISCARDING AN OLD APPLIANCE THAT HAS A LOCK OR CATCH ON THE DOOR, YOU MUST ENSURE THAT IT IS MADE UNUSABLE TO PREVENT YOUNG CHILDREN BEING TRAPPED INSIDE.
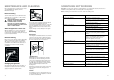
HINTS AND TIPS TECHNICAL SPECIFICATIONS POWER SUPPLY VOLTAGE AND FREQUENCY 220-240 V / 50 Hz TOTAL POWER ABSORBED 160 W AVERAGE DAILY UNITS ELECTRICITY * 0.86 kWh GROSS CAPACITY Fridge 214 l Freezer 68 l Fridge 210 l Freezer 55 l Food Storage In the Event of a Power Failure • To obtain the best results from your appliance, neither hot foods nor liquids which may evaporate, should be placed in the larder compartment.
MAINTENANCE AND CLEANING SOMETHING NOT WORKING Before any maintenance or cleaning work is carried out, DISCONNECT the appliance from the ELECTRICITY supply. Important: If you call out an engineer to a fault listed below, or to repair a fault caused by incorrect use or installation a charge will be made, even if the appliance is under guarantee.