Fridge-Freezer JLBIFF1805 User manual
Contents Safety instructions 3 Control panel 6 Switching on Switching off Temperature regulation Quick Freeze function Fan function Operation 6 6 6 6 6 7 Switching on Switching off Temperature regulation First use 7 7 7 8 Cleaning the interior Daily use 8 9 Freezing fresh food Storage of frozen food Thawing Cold accumulators Ice-cube production Movable shelves Positioning the door shelves Bottle rack Fan Helpful hints and tips 9 9 9 9 9 9 10 10 10 11 Normal Operating Sounds Care and Cleaning 1
Safety instructions In the interest of your safety and to ensure the correct use, before installing and first using the appliance, read this user manual carefully, including its hints and warnings. To avoid unnecessary mistakes and accidents, it is important to ensure that all people using the appliance are thoroughly familiar with its operation and safety features.
During transportation and installation of the appliance, be certain that none of the components of the refrigerant circuit become damaged. If the refrigerant circuit should become damaged: – avoid open flames and sources of ignition – thoroughly ventilate the room in which the appliance is situated • It is dangerous to alter the specifications or modify this product in any way. Any damage to the cord may cause a short-circuit, fire and/or electric shock.
Installation Important! For electrical connection carefully follow the instructions given in specific paragraphs. • Unpack the appliance and check if there are damages on it. Do not connect the appliance if it is damaged. Report possible damages immediately to the place you bought it. In that case retain packing. • It is advisable to wait at least four hours before connecting the appliance to allow the oil to flow back in the compressor.
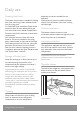
Control panel 1 1 On/Off Pilot Light 2 Temperature Regulator 3 Quick Freeze light 4 Quick Freeze switch 5 Fan light 6 Fan switch 2 3 4 5 6 However, the exact setting should be chosen keeping in mind that the temperature inside the appliance depends on: • room temperature • how often the door is opened • the quantity of food stored • the location of the appliance. Switching on Quick Freeze function Insert the plug into the wall socket. Turn the Temperature Regulator clockwise to a medium setting.
Operation Switching on Turn the Temperature regulator clockwise to a medium setting. Switching off To turn off the appliance, turn the Temperature regulator to the "O" position. Temperature regulation The temperature is automatically regulated. To operate the appliance, proceed as follows: • turn the Temperature regulator toward lower settings to obtain the minimum coldness. • turn the Temperature regulator toward higher settings to obtain the maximum coldness.
First use Cleaning the interior Before using the appliance for the first time, wash the interior and all internal accessories with lukewarm water and some neutral soap so as to remove the typical smell of a brand-new product, then dry thoroughly. Important! Do not use detergents or abrasive powders, as these will damage the finish.
Daily use Freezing fresh food The freezer compartment is suitable for freezing fresh food and storing frozen and deep-frozen food for a long time. To freeze fresh food activate the Quick freeze function at least 24 hours before placing the food to be frozen in the freezer compartment. Place the fresh food to be frozen in the bottom compartment. The maximum amount of food that can be frozen in 24 hours is specified on the rating plate, a label located on the inside of the fridge.
Do not move the glass shelf above the vegetable drawer to ensure correct air circulation. Positioning the door shelves To permit storage of food packages of various sizes, the door shelves can be placed at different heights. To make these adjustments proceed as follows: gradually pull the shelf in the direction of the arrows until it comes free, then reposition as required.
Helpful hints and tips Normal Operating Sounds Hints for refrigeration • You may hear a faint gurgling and a bubbling sound when the refrigerant is pumped through the coils or tubing. This is correct. • When the compressor is on, the refrigerant is being pumped around and you will hear a whirring sound and a pulsating noise from the compressor. This is correct. • The thermic dilatation might cause a sudden cracking noise. It is natural, not dangerous physical phenomenon. This is correct.
• do not allow fresh, unfrozen food to touch food which is already frozen, thus avoiding a rise in temperature of the latter; • lean foods store better and longer than fatty ones; salt reduces the storage life of food; • it is advisable to show the use by date on each individual pack to enable you to keep tab of the storage time. Warning! Lolly ices, if consumed immediately after removal from the freezer compartment can cause freezer burns.
Care and Cleaning Caution! Unplug the appliance before carrying out any maintenance operation. This appliance contains hydrocarbons in its cooling unit; maintenance and recharging must therefore only be carried out by authorized technicians. Periodic cleaning The equipment has to be cleaned regularly: • clean the inside and accessories with lukewarm water and some neutral soap. • regularly check the door seals and wipe clean to ensure they are clean and free from debris. • rinse and dry thoroughly.
It is important to periodically clean the defrost water drain hole in the middle of the refrigerator compartment channel to prevent the water overflowing and dripping onto the food inside. Use the special cleaner provided, which you will find already inserted into the drain hole.
What to do if… Warning! Before troubleshooting, disconnect the mains plug from the mains socket. Only a qualified electrician or competent person must do the troubleshooting that is not in this manual. Important! There are some sounds during normal use (compressor, refrigerant circulation). Problem Possible cause Solution The appliance does not operate. The lamp does not operate. The appliance is switched off. Switch on the appliance. The mains plug is not connected to the mains socket correctly.
Problem Possible cause Solution Water flows on the ground. The melting water outlet does not flow in the evaporative tray above the compressor. Attach the melting water outlet to the evaporative tray. The temperature in the appliance is too low. The temperature regulator is not set correctly. Set a higher temperature. The temperature in the appliance is too high. The temperature regulator is not set correctly. Set a lower temperature. Many products are stored at the same time.
Technical data Dimension of the recess Height 1780 mm Width 560 mm Depth 550 mm Rising Time 21 h Voltage 230-240 V Frequency 50 Hz The technical information are situated in the rating plate on the internal left side of the appliance and in the energy label.
Installation Read the "Safety Information" carefully for your safety and correct operation of the appliance before installing the appliance. In this case, the space behind the top cupboard must be at least 50 mm deep. Positioning Warning! If you are discarding an old appliance that has a lock or catch on the door, you must ensure that it is made unusable to prevent young children being trapped inside.
Warning! This appliance must be earthed. The manufacturer declines any liability should these safety measures not be observed. Important! The wires in the mains lead are coloured in accordance with the following code: GREEN & YELLOW 13 AMP. FUSE 4. Check that no cut, or stray strands of wire is present and the cord clamp 4 is secure over the outer sheath. 5. Make sure the electricity supply voltage is the same as that indicated on the appliance rating plate. 6. Switch on the appliance.
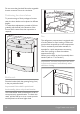
1. 1 If necessary cut the adhesive sealing strip and then apply it to the appliance as shown in figure. X 2 1 On the opposite side: 1. Install the lower pin. 2. Install the lower door. 3. Refit the pins (2) and the spacers (1) on the middle hinge on the opposite side. 4. Install the upper door. 5. Tighten the spacer and the upper pin. X 2. Drill the hinge cover 1, as shown in figure. Apply the covers 1 and 2 (in the accessories bag) in to the middle hinge. 1 3.
2 1 4mm 44 mm 4. Adjust the appliance in the niche. Make sure that the distance between the appliance and the cupboard front-edge is 44 mm. The lower hinge cover (in the accessories bag) makes sure that the distance between the appliance and the kitchen furniture is correct. Make sure that the clearance between the appliance and the cupboard is 4 mm. Open the door. Put the lower hinge cover in position. 5. I 6. Fridge-Freezer user manual Attach the appliance to the niche with 4 screws.
H H 7. Attach the covers (C, D) to the lugs and the hinge holes. Install the vent grille (B). Attach the hinge covers (E) to the hinge. 9. Disconnect the parts (Ha), (Hb), (Hc) and (Hd). Ha D Hb C E Hc Hd E 8. 22 B If the appliance must connect laterally to the kitchen furniture door: a) Slacken the screws in fixing brackets (H). b) Move the brackets (H). c) Retighten the screws. 10. Install the part (Ha) on the inner side of the kitchen furniture.
8 mm ca. 50 mm 90o 21 mm ca. 50 mm Ha 90o Hb 21 mm 11. Push the part (Hc) on the part (Ha). 13. Remove the brackets and mark a distance of 8 mm from the outer edge of the door where the nail must be fitted (K). 8 mm Ha Ha Hc K 12. Open the appliance door and the kitchen furniture door at an angle of 90°. Insert the small square (Hb) into guide (Ha). Put together the appliance door and the furniture door and mark the holes. Fridge-Freezer user manual 14.
Hb 15. Press the part (Hd) on the part (Hb). Hb Hd Do a final check to make sure that: • All screws are tightened. • The sealing strip is attached tightly to the cabinet. • The door opens and closes correctly.
Environmental concerns The symbol on the product or on its packaging indicates that this product may not be treated as household waste. Instead it should be taken to the appropriate collection point for the recycling of electrical and electronic equipment. By ensuring this product is disposed of correctly, you will help prevent potential negative consequences for the environment and human health, which could otherwise be caused by inappropriate waste handling of this product.
Repairs - after sales service Your appliance comes with a three year warranty. If it is not working correctly refer to "Something not working". If a fault occurs which you can not resolve through following the advice and information contained within this instruction manual, the next step is to contact John Lewis technical support on: 0844 871 7771 They will give you details for your local service engineer.
John Lewis, Oxford Street 020 7629 7711 John Lewis, Norwich 01603 660021 Peter Jones, Sloane Square 020 7730 3434 John Lewis, Nottingham 0115 941 8282 John Lewis, Brent Cross 020 8202 6535 John Lewis, Peterborough 01733 344644 John Lewis, Kingston 020 8547 3000 John Lewis at home, Poole 01202 756020 John Lewis, Aberdeen 01224 625000 John Lewis, Reading 0118 957 5955 John Lewis, Bluewater 01322 624123 John Lewis, Sheffield 0114 276 8511 John Lewis, Cambridge 01223 361292 John Lewis, Solihull 012
222320879-A-362012