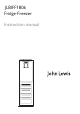
JLBIFF1806 Fridge-Freezer Instruction manual
Safety information It is most important that this instruction book should be retained with the appliance for future reference. Should the appliance be sold or transferred to another owner, or should you move house and leave the appliance, always ensure that the book is supplied with the appliance in order that the new owner can get to know the functioning of the appliance and the relevant warnings. These warnings have been provided in the interest of safety.
2. Keep ventilation openings, in the appliance enclosure or in the built-in structure, clear of obstruction. • The appliance is intended for keeping foodstuff and/or beverages in a normal household as explained in this instruction booklet. • Do not use a mechanical device or any artificial means to speed up the thawing process. • Do not use other electrical appliances (such as ice cream makers) inside of refrigerating appliances, unless they are approved for this purpose by the manufacturer.
• In order to prevent over heating there must be adequate circulation around the appliance. • Please refer to the correct positioning and location instructions that can be found in the Installation section of this user guide. • The appliance must not be located close to radiators or cookers. • Make sure that the mains plug is accessible after the installation of the appliance. • Store pre-packed frozen food in accordance with the frozen food manufacturer's instructions.
Contents For the user Safety information Control panel Display Switching on Switching off Switching off the fridge Switching on the fridge Temperature regulation Drinks Chill function Child Lock function Intensive Cooling function Holiday function Fast Freeze function High temperature alarm Door open alarm First use Cleaning the interior Daily use Freezing fresh food Storage of frozen food Thawing Cold accumulators Ice-cube production Movable shelves Positioning the door shelves Helpful hints and tips No
Replacing the lamp 17 6
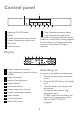
Control panel 1 2 8 7 6 1 Appliance ON/OFF button 2 Display 5 4 3 7 Fridge Temperature warmer button 8 Fridge Temperature colder button It is possible to change predefined sound of buttons to a loudly one by pressing together Functions button and Temperature colder button for some seconds. Change is reversible.
Temperature regulation 4. The temperature indicators show the set default temperature. To select a different set temperature refer to "Temperature regulation". The set temperature of the fridge and of the freezer may be adjusted by pressing the temperature buttons Set default temperature: • + 5°C for the fridge • -18°C for the freezer The temperature indicators show the set temperature. The set temperature will be reached within 24 hours. Switching off To switch off the appliance do these steps: 1.
To switch off the function before its automatic end: 1. Press the Functions button until the Intensive Cooling indicator flashes. 2. Press the OK button to confirm. 3. The Intensive Cooling indicator goes off. 1. Press the Functions button until the Drinks Chill indicator flashes. 2. Press the OK button to confirm. 3. The Drinks Chill indicator goes off.
1. 2. 3. Press any button. The buzzer switches off. The freezer temperature indicator shows the highest temperature reached for a few seconds. Then shows again the set temperature. 4. The alarm indicator continue to flash until the normal conditions are restored. When the alarm has returned the alarm indicator goes off. 2. Press the OK button to confirm. The Fast Freeze indicator is shown. This function stops automatically after 52 hours. To switch off the function before its automatic end: 1.
Daily use Freezing fresh food Important! In the event of accidental defrosting, for example due to a power failure, if the power has been off for longer than the value shown in the technical characteristics chart under "rising time", the defrosted food must be consumed quickly or cooked immediately and then refrozen (after cooling). The freezer compartment is suitable for freezing fresh food and storing frozen and deep-frozen food for a long time.
Positioning the door shelves For better use of space, the front halfshelves can lie over the rear ones. The model is equipped with a variable storage box which is fitted under a door shelf compartment and can be slide sideways. For more thorough cleaning, the top and bottom door shelves can be easily removed and refitted in position. Important! Do not move the glass shelf above the vegetable drawer to ensure correct air circulation.
Hints for freezing continuously, causing frost or ice on the evaporator. If this happens, set the Temperature Regulator towards a warmer setting to allow automatic defrosting and will therefore save in electricity consumption. To help you make the most of the freezing process, here are some important hints: • the maximum quantity of food which can be frozen in 24 hrs. is shown on the rating plate; • the freezing process takes 24 hours.
• do not exceed the storage period indicated by the food manufacturer. • be sure that frozen foodstuffs are transferred from the foodstore to the freezer in the shortest possible time; • once defrosted, food deteriorates rapidly and cannot be refrozen; Care and Cleaning Important! Take care of not to damage the cooling system. Caution! Unplug the appliance before carrying out any maintenance operation.
• defrost (if foreseen) and clean the appliance and all accessories • leave the door/doors ajar to prevent unpleasant smells. If the cabinet will be kept on, ask somebody to check it once in a while to prevent the food inside from spoiling in case of a power failure. at the back of the appliance, over the motor compressor, where it evaporates.
Problem Possible cause Solution The compressor operates continually. The temperature is not set correctly. Set a higher temperature. The door is not closed correctly. Refer to "Closing the door". The door has been opened too frequently. Do not keep the door open longer than necessary. The product temperature is too high. Let the product temperature decrease to room temperature before storage. The room temperature is too high. Decrease the room temperature.
Problem Possible cause Solution Upper or lower square is shown in the temperature Display. An error has occurred in measuring the temperature. Call your service representative (the cooling system will continue to keep food products cold, but temperature adjustment will not be possible.) dEMO appears on the Display. The appliance is in demonstration mode (dEMO). Keep pressed approximately 10 sec.
Technical data Dimension of the recess Height 1780 mm Width 560 mm Depth 560 mm Rising Time 25 h Voltage 230-240 V Frequency 50 Hz The technical information are situated in the rating plate on the internal left side of the appliance and in the energy label. Installation Read the "Safety Information" carefully for your safety and correct operation of the appliance before installing the appliance. 6 cm Location min. 200 cm2 min.
Positioning GREEN & YELLOW Warning! If you are discarding an old appliance that has a lock or catch on the door, you must ensure that it is made unusable to prevent young children being trapped inside. 13 AMP. FUSE Important! The appliance should have the plug accessible after installation.
The appliance is supplied with a 13 amp plug fitted 2 . In the event of having to change the fuse in the plug supplied, a 13 amp ASTA approved (BS 1362) fuse must be used. Warning! A cut off plug inserted into a 13 amp socket is a serious safety (shock) hazard. Ensure that it is disposed of safely. S Door reversibility The door of the appliance opens to the right. If you want to open the door to the left, do these steps before you install the appliance: 1. Loosen and remove the upper pin. 2.
1. Make sure that the distance between the appliance and the cupboard frontedge is 44 mm. The lower hinge cover (in the accessories bag) makes sure that the distance between the appliance and the kitchen furniture is correct. Make sure that the clearance between the appliance and the cupboard is 4 mm. Open the door. Put the lower hinge cover in position. If necessary cut the adhesive sealing strip and then apply it to the appliance as shown in figure. X X 2. Install the appliance in the niche.
D I C E E 5. Remove the correct part from the hinge cover (E). Make sure to remove the part DX, in the case of right hinge, SX in opposite case. 7. B Connect the appliance laterally to the kitchen furniture sidewall: a) Fit the bracket (E) and (F), adjust the distance. b) Fix using the screws (as in figure). c) Fix the cover (D). E F 6. Attach the covers (C, D) to the lugs and the hinge holes. Install the vent grille (B). Attach the hinge covers (E) to the hinge. D 8.
Ha Hb Ha Hc Hc Hd 9. Install the part (Ha) on the inner side of the kitchen furniture. 11. Open the appliance door and the kitchen furniture door at an angle of 90°. Insert the small square (Hb) into guide (Ha). Put together the appliance door and the furniture door and mark the holes. ca. 50 mm 90o 21 mm 8 mm ca. 50 mm 90o 21 mm Ha 10. Push the part (Hc) on the part (Ha). Hb 12. Remove the brackets and mark a distance of 8 mm from the outer edge of the door where the nail must be fitted (K).
14. Press the part (Hd) on the part (Hb). 8 mm Ha Hb K Hd Do a final check to make sure that: • All screws are tightened. • The sealing strip is attached tightly to the cabinet. • The door opens and closes correctly. 13. Align the kitchen furniture door and the appliance door by adjusting the part Hb. Hb Repairs-After Sales Service When you contact your local repair agent you will need to give the following details: 1. Your name, address and post code. 2. Your telephone number. 3.
Spare parts So that you always have these numbers at hand, we recommend that you make a note of them here: Mod. : . . . . . . . . . . . . . . . . . . . . . . . . . . . . . . . ... PNC : . . . . . . . . . . . . . . . . . . . . . . . . . . . . . . . ... S.No. : . . . . . . . . . . . . . . . . . . . . . . . . . . . . . . .... Your appliance is covered by a 3 year parts and labour guarantee (see separate details given at point of sale).
John Lewis Partnership 171 Victoria Street London SW1E 5NN www. johnlewis.