JLBIHD906 built-in cooker hood Instruction manual
Important Safety Information It is most important that this instruction manual should be retained with the appliance for future reference. Should the appliance be sold or transferred to another owner, or should you move house and leave the appliance, always ensure that the book is supplied with the appliance in order that the new owner can get to know the functioning of the appliance and the relevant warnings. These warnings ha ve been pr ovided in the inter est of saf ety .
Contents For the User Important Safety Information Description of the Appliance For the Installer 2 Electrical Connections 9 4 Electrical Requirements Electrical Connection 9 9 Using the cooker hood 10 Installing the Cooker Hood 5 Cooker Hood Controls To Operate Recirculation Extraction 10 10 10 10 Maintenance and Cleaning 12 External Cleaning Cleaning the Comfort panels Metal Grease Filters Charcoal Filters To Remove/Replace Charcoal Filter Changing the Halogen Spot Lamp 12 12 12 13 14 14
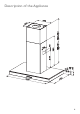
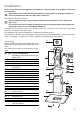
Description of the Appliance 4
Installation Please ensure that when the appliance is installed it is easily accessible to an engineer in the event of a breakdown. All installations must comply with the local authorities requirements for the discharge of exhaust air. Incorrect installation may affect the safety of this cooker hood. Installation Requirements Before installation check the wall to which the cooker hood is to be fitted for electric cables, water pipes or gas.
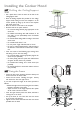
Installing the Cooker Hood Drilling the Ceiling/Support Shelf • Use a plumb line to mark the centre of the hob on the ceiling/support shelf. • Place the drilling template 21 provided on the ceiling/ support shelf, making sure that the template is in the correct position by lining up the axes of the template with those of the hob. • Mark the centres of the holes in the template. • Drill the holes at the points marked: • For concrete ceilings, drill for plugs appropriate to the screw size.
Before tightening the screws completely it is possible to adjust the frame by turning it. Make sure that the screws do not come out of their seats in the slotted holes. • The frame mountings must be secure to withstand the weight of the hood and any stresses caused by the occasional side thrust applied to the device. On completion, check that the base is stable, even if the frame is subjected to bending.
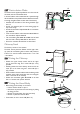
15 Recirculation Mode 14.1 The cooker hood is supplied specified for use in the recirculation mode, with the charcoal filter fitted. In the recirculation mode contaminated air is passed through the charcoal filter to be purified and recirculated into the kitchen through the grille outlets on either side of the chimney. • Assemble the two halves of the ducting extension pipe item 14. • Push-fit the extension pipe on to the ducting spigot on top of the canopy.
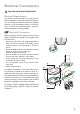
Electrical Connections THIS APPLIANCE MUST BE EARTHED Electrical Requirements Any permanent electrical installation must comply with the latest I.E.E. Regulations and local Electricity Board regulations. For your own safety this should be undertaken by a qualified electrician e.g. your local Electricity Board, or a contractor who is on the roll of the National Inspection Council for Electrical Installation Contracting (NICEIC).
Using the cooker hood The cooker hood is designed to extract unpleasant odours from the kitchen, it will not extract steam.The appliance can be installed to recirculate or extract contaminated air. To Operate Select the required fan speed and light if required. Recirculation In the recirculation mode the contaminated air enters the cooker hood through the grease filters.
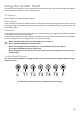
Touch control L T1 T2 T3 Basic functions Dual Function When briefly pressed it switches the lighting system on and off. T5 F Touch control unlit When pressed for 2 seconds it switches the electroluminescent lighting on Touch control unlit and off. This function is independent from the basic functions of the control unit. It is therefore possible to switch on Touch control lit simultaneously the hood lighting and the electroluminescent lighting.
Maintenance and Cleaning Before carrying out any maintenance or leaning isolate the cooker hood from the mains supply. The cooker hood must be kept clean, as a build up of grease or fat can be a fire hazard. External cleaning Wipe the cooker hood frequently with warm soapy water using a mild detergent. Never use scouring pads or abrasive cleaners. Never use excessive amounts of water when cleaning particularly around the control panel. Cleaning the Comfort Panels • Pull the Comfort Panel to open it.
Cleaning the filters • Pull the Comfort Panel to open it. • Remove the filters one by one pushing them towards the back side of the unit and simultaneously pulling downwards. • The metal grease filters should be washed, by hand, in mild soapy water or in a dishwasher. Allow to dry completely before replacing. Any kind of bending of the filters has to be avoided when washing them.
To Remove/Replace the Charcoal Filters • First remove the metal grease filters. • Remove the saturated activated charcoal filter by releasing the fixing hooks as illustrated. • Position the new charcoal filter in the position marked and while holding the filter replace the fixing hooks as illustrated Reset the alarm signal • Stop the motor. • Press the touch control F for at least 4 seconds, until the touch control T1 flashes.
Something not Working If the appliance is not working correctly, please carry out the following checks, before contacting your local Service Force agent. IMPORTANT: If you call out an engineer to a fault listed below, or to repair a fault caused by incorrect use or installation, a charge will be made even if the appliance is under guarantee. Symptom Solution The cooker hood will not start • Check the hood is connected to the electricity supply. • Make sure the switch is in the ‘ON’ position.
John Lewis Partnership 171 Victoria Street London SW1E 5NN www.johnlewis.