JLBILIC02 Fridge Instruction manual
Safety information It is most important that this instruction book should be retained with the appliance for future reference. Should the appliance be sold or transferred to another owner, or should you move house and leave the appliance, always ensure that the book is supplied with the appliance in order that the new owner can get to know the functioning of the appliance and the relevant warnings. These warnings have been provided in the interest of safety.
• The appliance is intended for keeping foodstuff and/or beverages in a normal household as explained in this instruction booklet. • Do not use a mechanical device or any artificial means to speed up the thawing process. • Do not use other electrical appliances (such as ice cream makers) inside of refrigerating appliances, unless they are approved for this purpose by the manufacturer. • Do not damage the refrigerant circuit.
• Please refer to the correct positioning and location instructions that can be found in the Installation section of this user guide. • The appliance must not be located close to radiators or cookers. • Make sure that the mains plug is accessible after the installation of the appliance. • Do not place carbonated or fizzy drinks in the freezer compartment as it creates pressure on the container, which may cause it to explode, resulting in damage to the appliance.
Contents For the user For the installer Safety information 2 Control panel 6 6 6 6 6 6 7 7 Display Switching on Functions Menu Switching off Temperature regulation Shopping Function Door open alarm First use Cleaning the interior Daily use Use of the fridge compartment Movable shelves Positioning the door shelves Bottle rack Air recycling Helpful hints and tips Hints for energy saving Hints for fresh food refrigeration Hints for refrigeration Care and Cleaning Periodic cleaning Defrosting of the r
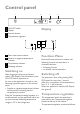
Control panel 1 1 2 3 4 2 ON/OFF switch Display Function button Temperature regulator 3 4 Display 1 2 3 1 Door open alarm indicator 2 Positive or negative temperature indicator 3 Temperature indicator 4 Shopping indicator 4 Functions Menu Each time Function button is pressed, the following functions are activated in a clockwise direction: • Shopping function • no symbol: normal operation.
The Shopping function shuts off automatically after approximately 6 hours. It is possible to de-activate the function at any time by pressing Function button (see "Activation of functions" ) . • turn the knob clockwise to obtain the maximum coldness • turn the knob counter- clockwise to obtain the minimum coldness. The intermediate position is usually the most suitable.
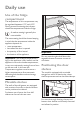
Daily use Use of the fridge compartment The temperature of this compartment may be regulated between +2°C and +8°C. During normal functioning the indicator shows the temperature inside the fridge. A medium setting is generally the most suitable. The exact setting should be chosen keeping in mind that the temperature inside the appliance depends on: • room temperature • how often the door is opened • the quantity of food stored • the location of the appliance.
You can activate the fan by pressing the fan switch. The fan light comes on. Bottle rack Place the bottles (with the opening facing front) in the pre-positioned shelf. Important! Switch on the fan when the ambient temperature exceeds 25°C. Important! If the shelf is positioned horizontally, place only closed bottles. This bottle holder shelf can be tilted in order to store previously opened bottles. To obtain this result, pull the shelf up so it can rotate upwards and be placed on the next higher level.
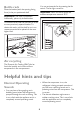
Hints for energy saving Hints for refrigeration • Do not open the door frequently or leave it open longer than absolutely necessary. • If the ambient temperature is high and the Temperature Regulator is set to low temperature and the appliance is fully loaded, the compressor may run continuously, causing frost or ice on the evaporator. If this happens, set the Temperature Regulator toward warmer settings to allow automatic defrosting and so a saving in electricity consumption.
operation will improve the performance of the appliance and save electricity consumption. It is important to periodically clean the defrost water drain hole in the middle of the refrigerator compartment channel to prevent the water overflowing and dripping onto the food inside. Use the special cleaner provided, which you will find already inserted into the drain hole. Important! Take care of not to damage the cooling system.
What to do if… Warning! Before troubleshooting, disconnect the mains plug from the mains socket. Only a qualified electrician or competent person must do the troubleshooting that is not in this manual. Important! There are some sounds during normal use (compressor, refrigerant circulation). Problem Possible cause Solution The appliance does not operate. The lamp does not operate. The appliance is switched off. Switch on the appliance. The mains plug is not connected to the mains socket correctly.
Problem Possible cause Solution Water flows on the ground. The melting water outlet does not flow in the evaporative tray above the compressor. Attach the melting water outlet to the evaporative tray. The temperature in the appliance is too low. The temperature regulator is not Set a higher temperature. set correctly. The temperature in the appliance is too high. The temperature regulator is not Set a lower temperature. set correctly. The door is not closed correctly. Refer to "Closing the door".
Technical Information Dimension Width 560 mm Height 1780 mm Depth 550 mm Further technical information are situated in the rating plate on the internal left side of the appliance. Installation Read the "Safety Information" carefully for your safety and correct operation of the appliance before installing the appliance.
Positioning A Warning! If you are discarding an old appliance that has a lock or catch on the door, you must ensure that it is made unusable to prevent young children being trapped inside. Important! The appliance should have the plug accessible after installation.
GREEN & YELLOW The appliance is supplied with a 13 amp plug fitted 2 . In the event of having to change the fuse in the plug supplied, a 13 amp ASTA approved (BS 1362) fuse must be used. 13 AMP. FUSE Warning! A cut off plug inserted into a 13 amp socket is a serious safety (shock) hazard. Ensure that it is disposed of safely. Door reversibility BROWN BLUE The door of the appliance opens to the right. If you want to open the door to the left, follow these steps before you install the appliance: 1.
Push the appliance in the direction of the arrows (1) until the upper gap cover stops against the kitchen furniture. Make sure that the distance between the appliance and the cupboard front-edge is 44 mm. Push the appliance in the direction of the arrows (2) against the cupboard on the opposite side of the hinge. Make sure that the clearance between the appliance and the cupboard is 4 mm. Installing the appliance Caution! Make sure that the mains cable can move freely. 2 Do the following steps: 1.
6. Remove the correct part from the hinge cover (E). Make sure to remove the part DX, in the case of right hinge, SX in opposite case. 7. Attach the covers (C, D) to the lugs and the hinge holes. Install the vent grille (B). Attach the hinge covers (E) to the hinge. 4mm 44mm 4. Attach the appliance to the niche with 4 screws. I D 5. C E Push the sealing strip between the appliance and the adjacent cabinet. E 8. 18 B Disconnect the parts (Ha), (Hb), (Hc) and (Hd).
Ha 11. Open the appliance door and the kitchen furniture door at an angle of 90°. Insert the small square (Hb) into guide (Ha). Put together the appliance door and the furniture door and mark the holes. Remove the small squares and drill holes with ø 2 mm at 8 mm from the outer edge of the door. Place the small square on the guide again and fix it with the screws supplied. Hb Hc Hd 9. Install the part (Ha) on the inner side of the kitchen furniture. 8 mm ca. 50 mm Ha 21 m m Hb 12.
Do a final check to make sure that: • All screws are tightened. • The sealing strip is attached tightly to the cabinet. • The door opens and closes correctly. Hb Hd Repairs-After Sales Service Mod. : . . . . . . . . . . . . . . . . . . . . . . . . . . . . . . . . . . PNC : . . . . . . . . . . . . . . . . . . . . . . . . . . . . . . . . . . S.No. : . . . . . . . . . . . . . . . . . . . . . . . . . . . . . . . . . .
Environmental concerns consequences for the environment and human health, which could otherwise be caused by inappropriate waste handling of this product. For more detailed information about recycling of this product, please contact your local council, your household waste disposal service or the shop where you purchased the product. The symbol on the product or on its packaging indicates that this product may not be treated as household waste.
or serious malfunctioning. Contact your local John Lewis branch.
John Lewis Partnership 171 Victoria Street London SW1E 5NN www. johnlewis.