Microwave Oven JLBIMW02 User Manual
Contents Safety information Children and vulnerable people safety General Safety Safety Instructions Installation Electrical connection Use Care and cleaning Internal light Disposal Product description General overview Accessories Control panel Electronic programmer Display Before first use Initial Cleaning First Connection Daily use Navigating the menus The menus in overview Activating a heating function Heat-up indicator Residual heat Energy saving Microwave mode Microwave Microwave functions Setting the
Safety information Before the installation and use of the appliance, carefully read the supplied instructions. The manufacturer is not responsible if an incorrect installation and use causes injuries and damages. Always keep the instructions with the appliance for future reference.
• • • • • • • • • • • • • • • 4 Ensure that the appliance is switched off before replacing the lamp to avoid the possibility of electric shock. Do not use a steam cleaner to clean the appliance. Do not use harsh abrasive cleaners or sharp metal scrapers to clean the glass door since they can scratch the surface, which may result in shattering of the glass.
• • The appliance should be cleaned regularly and any food deposits removed. Failure to maintain the appliance in a clean condition could lead to deterioration of the surface that could adversely affect the life of the appliance and possibly result in a hazardous situation.
Safety Instructions Installation Warning! Only a qualified person must install this appliance. • Remove all the packaging. • Do not install or use a damaged appliance. • Obey the installation instruction supplied with the appliance. • Always be careful when you move the appliance because it is heavy. Always wear safety gloves. • Do not pull the appliance by the handle. • Keep the minimum distance from the other appliances and units.
• Do not apply pressure on the open door. • Do not use the appliance as a work surface or as a storage surface. • Open the appliance door carefully. The use of ingredients with alcohol can cause a mixture of alcohol and air. • Do not let sparks or open flames to come in contact with the appliance when you open the door. • Do not put flammable products or items that are wet with flammable products in, near or on the appliance. Warning! Risk of damage to the appliance.
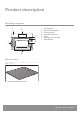
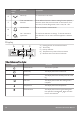
Product description General overview 1 7 2 3 4 5 4 3 1. 2. 3. 4. 5. 6. 7. Control panel Electronic programmer Heating element Microwave generator Lamp Shelf support, removable Shelf positions 2 1 6 Accessories Wire shelf For cookware, cake tins, roasts.
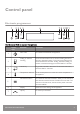
Control panel Electronic programmer 1 2 3 4 5 6 7 8 9 10 11 Use the sensor fields to operate the appliance. Sensor field 1 2 3 Function Comment ON / OFF To activate and deactivate the appliance. Grilling or Assisted Cooking Touch the sensor field once to choose a heating function or the menu: Assisted Cooking. Touch the sensor field again to switch between the functions: Grilling, Assisted Cooking. To activate or deactivate the light, touch the field for 3 seconds.
Sensor field 8 9 10 11 Function Comment Down key To move down in the menu. Time and additional functions To set different functions. When a heating function operates, touch the sensor field to set the timer or the functions: Function Lock, Favourite Programme, Heat + Hold, Set + Go. Minute Minder To set the function: Minute Minder. OK / Microwave Quick Start To confirm the selection or settings. To activate the Microwave function. You can use it when the appliance is deactivated.
Symbol Function Heat-up Indicator The display shows the temperature in the appliance. Heat + Hold The function is active.
Before first use Warning! Refer to Safety chapters. Initial Cleaning Remove all accessories and removable shelf supports from the appliance. Refer to "Care and cleaning" chapter. Clean the appliance before first use. Put the accessories and the removable shelf supports back to their initial position. First Connection When you connect the appliance to the mains or after the power cut, you have to set the language, the display contrast, the display brightness and the time of the day. 1. Press or 2.
Daily use Warning! Refer to Safety chapters. 2. Press or to select the menu option. 3. Press to move to the submenu or accept the setting. At each point you can go back to the main menu with . Navigating the menus 1. Activate the appliance. The menus in overview Main menu Symbol Menu item Application Grilling A heating function to grill flat food items in the middle of the shelf. To make toast. Assisted Cooking Contains a list of automatic programmes.
Symbol Submenu Description Display Brightness Adjusts the display brightness by degrees. Set Language Sets the language for the display. Buzzer Volume Adjusts the volume of press-tones and signals by degrees. Key Tones Activates and deactivates the tone of the touch fields. It is not possible to deactivate the tone of the ON / OFF touch field. Alarm/Error Tones Activates and deactivates the alarm tones. Service Shows the software version and configuration.
Microwave mode Microwave Information about operation General: • After you deactivate the appliance, let the food stand for some minutes. Refer to the microwave cooking tables: standing time. • Remove the aluminium foil packaging, metal containers, etc. before you prepare the food. Cooking: • If possible, cook food covered with material suitable for use in the microwave. Only cook food without a cover if you want to keep a crust. • Do not overcook the dishes by setting the power and time too high.
Tips for the microwave Result Remedy You cannot find details for the amount of food prepared. Look for similar food. Increase or shorten the length of the cooking times according to the following rule: double the amount = almost double the time, half the amount = half the time. The food has got too dry. Set shorter cooking time or select lower microwave power. The food is still not defrosted, hot or cooked after the time has elapsed. Set longer cooking time or select higher microwave power.
Cookware / Material Microwave Grilling Defrosting Heating Cooking Browning cookware, e. g. crisp pan or crunch plate -- X X -- Ready meals in packaging3) X X X X 1) With no silver, gold, platinum or metal plating / decorations 2) Without quartz or metal components, or glazes which contain metals 3) You must follow the manufacturer’s instructions about the maximum temperatures. X suitable -- not suitable Other things to think about… • Food items have different shapes and qualities.
4. Touch to set the function: Duration. Refer to "Setting the clock functions". When the time of the function: Duration is longer than 7 minutes the Microwave power is decreased to 600 W. The maximum setting of the time for the function: Duration is 90 minutes. You can change the microwave power (touch and then or ) and the function: Duration any time when the Microwave function operates. 5. When the set time ends, an acoustic signal sounds for 2 minutes. The Microwave function deactivates automatically.
Power setting Use • • • 400 Watt 300 Watt 200 Watt • • • • • • Continuing to cook meals Cooking delicate food Heating baby food Simmering rice Heating delicate food Melting cheese • 100 Watt • • • • • Defrosting meat, fish, bread Defrosting cheese, cream, butter Defrosting fruit and cakes (gateaux) Raising yeast dough Heating up cold dishes and drinks Microwave Oven User Manual 19
Clock functions Clock functions table Clock function Application Minute Minder To set a countdown (max. 2 h 30 min). This function has no effect on the operation of the appliance. Use to activate the function. Press the minutes and to set Duration To set the length of an operation (max. 23 h 59 min). End Time To set the switch-off time for a heating function (max. 23 h 59 min). If you set the time for a clock function, the time starts to count down after 5 seconds.
3. Set the temperature above 80 °C. 4. Press again and again until the display shows: Heat + Hold. 5. Press to confirm. When the function ends, an acoustic signal sounds. The function stays on if you change the heating functions. Extra Time The function: Extra Time makes the heating function continue after the end of Duration. Applicable to all heating functions with Duration or Weight Automatic. 1. When the cooking time ends, an acoustic signal sounds. Press a sensor field.
Automatic programmes Warning! Refer to Safety chapters. Recipes online You can find the recipes for the automatic programmes specified for this appliance on our website. To find the proper Recipe Book check the PNC number on the rating plate on the front frame of the appliance cavity. Assisted Cooking with Recipe Automatic This appliance has a set of recipes you can use. The recipes are fixed and you cannot change them. 1. Activate the appliance. 2. Select the Assisted Cooking menu. Press to confirm. 3.
Using the accessories Warning! Refer to Safety chapters. Inserting the accessories Wire shelf: Push the shelf between the guide bars of the shelf support and make sure that the feet point down. • All accessories have small indentations at the top of the right and left side to increase safety. The indentations are also anti-tip devices. • The high rim around the shelf is a device which prevents cookware from slipping.
Additional functions Favourite Programme You can save your favourite settings, such as duration, temperature or heating function. They are available in the menu: Favourite Programme. You can save 20 programmes. You cannot save Microwave and microwave combi functions as favourite programmes. Saving a programme 1. Activate the appliance. 2. Set a heating function or an automatic programme. 3. Touch again and again until the display shows: SAVE. 3. Press to confirm. 4. Select your favourite programme name. 5.
4. Set the time. 5. Press again and again until the display shows: Set + Go. 6. Press to confirm. Press a sensor field (except for ) to start the function: Set + Go. The set heating function starts. When the heating function ends, an acoustic signal sounds. – if the appliance is deactivated and you set the function: Minute Minder. When the function ends, the display goes back to the night brightness.
Hints and tips Warning! Refer to Safety chapters. The temperature and baking times in the tables are guidelines only. They depend on the recipes and the quality and quantity of the ingredients used. • Set the shelf into the shelf position as recommended in the grilling table. • Always set the pan to collect the fat into the first shelf position. • Grill only flat pieces of meat or fish. • Always preheat the empty oven with the grill functions for 5 minutes.
Microwave cooking tables Defrosting meat Food Power (Watts) Quantity (g) Time (min) Standing time Comments (min) Whole cuts of meat 200 500 10 - 12 10 - 15 Turn halfway through. Steak 200 200 3-5 5 - 10 Turn halfway through, remove defrosted parts. Mixed minced meat 200 500 10 - 15 10 - 15 Turn halfway through, remove defrosted parts. Goulash 200 500 10 - 15 10 - 15 Turn halfway through, remove defrosted parts.
Defrosting fish Food Power (Watts) Quantity (g) Time (min) Standing time Comments (min) Whole Fish 100 500 10 - 15 15 - 20 Turn halfway through. Fish fillets 100 500 10 - 12 15 - 20 Turn halfway through. Defrosting sausage Food Power (Watts) Quantity (g) Time (min) Standing time Comments (min) Sliced sausage 100 100 2-4 20 - 40 Turn halfway through.
Food Power (Watts) Quantity Time (min) Standing time Comments (min) Dry cake (e. g. Pound cake) 100 1 piece 2-4 15 - 20 Turn plate halfway through. Fruit cake 100 1 piece 1-2 15 - 20 Turn plate halfway through. Bread 100 1000 g 15 - 20 10 - 15 Turn halfway through. Sliced bread 100 500 g 8 - 12 10 - 15 Turn halfway through. Bread rolls 100 4 rolls 5-8 5 - 10 Turn halfway through.
Food Power (Watts) Quantity Time (min) Standing time Comments (min) Baby milk (bottle, 180 ml) 1000 200 g 0:20 - 0:40 - Put spoon into bottle, stir and check temperature. Convenience food 600 400 - 500 g 14 - 20 5 Remove any aluminium lids, turn halfway through. Frozen ready meals 400 400 - 500 g 4-6 5 Remove any aluminium lids, turn halfway through. Milk 1000 1 cup approx. 200 ml 1:15 - 1:45 - Put spoon in the container. Water 1000 1 cup approx.
Food Power (Watts) Quantity Time (min) Standing time Comments (min) Vegetables, short cooking 600 500 g 14 - 18 - Add approx. 50 ml water, cook covered, stir halfway through. 600 500 g 14 - 20 - Add approx. 50 ml water, cook covered, stir halfway through. 600 500 g 18 - 24 - Add approx. 50 ml water, cook covered, stir halfway through. Potatoes in their 1000 jacket 800 g + 600 ml 5-7 300 W / 15 - 20 Cook covered, stir halfway through.
Care and cleaning Warning! Refer to Safety chapters. 2. Pull the front end of the shelf support away from the side wall. 3. Pull the supports out of the rear catch. Install the shelf supports in the opposite sequence. Notes on cleaning • Clean the front of the appliance with a soft cloth with warm water and a cleaning agent. • To clean metal surfaces, use a usual cleaning agent. • Clean the appliance interior after each use. Fat accumulation or other food remains may result in a fire.
Troubleshooting Warning! Refer to Safety chapters. What to do if... Problem Possible cause Remedy The oven does not heat up. The oven is deactivated. Activate the oven. The oven does not heat up. The clock is not set. Set the clock. The oven does not heat up. The necessary settings are not set. Make sure that the settings are correct. The oven does not heat up. The automatic switch-off is activated. Refer to "Automatic switch-off". The oven does not heat up. The Child Lock is on.
Service data If you cannot find a solution to the problem yourself, contact your dealer or an Authorised Service Centre. The necessary data for the service centre is on the rating plate. The rating plate is on the front frame of the appliance cavity. Do not remove the rating plate from the appliance cavity. We recommend that you write the data here: Model (MOD.) ......................................... Product number (PNC) ......................................... Serial number (S.N.) ..............
Repairs - after sales service Your appliance comes with a three year warranty. If it is not working correctly refer to "Troubleshooting". If a fault occurs which you can not resolve through following the advice and information contained within this instruction manual, the next step is to contact John Lewis technical support on: may cause injury or serious malfunctioning.
John Lewis, Southampton 023 8021 6400 John Lewis, Stratford (Opening 2011) John Lewis at home, Swindon 01793 733180 John Lewis electrical appliances are also available in Waitrose Food and Home Canary Wharf 020 7719 0300 John Lewis, Trafford 0161 491 4040 Cheltenham 01242 241425 John Lewis at home, Turnbridge Wells 01892 506830 Rushden 01933 355099 Salisbury 01722 329429 John Lewis, Watford 01923 244266 Southend 01702 603403 John Lewis, Welwyn 01707 323456 36 Microwave Oven User Manual
ENVIRONMENTAL CONCERNS Recycle the materials with the symbol . Put the packaging in applicable containers to recycle it. Help protect the environment and human health and to recycle waste of electrical and electronic appliances. Do not dispose appliances marked with the symbol with the household waste. Return the product to your local recycling facility or contact your municipal office.
Microwave Oven User Manual
Microwave Oven User Manual 39
892964007-C-082014 ( Subject to change without notice.