JLBIOS602 built-in oven Instruction manual
Impor tant Saf ety Inf ormation Important Safety Information It is most important that this instruction manual should be retained with the appliance for future reference.
Contents For the User Important Safety Information Description of the Oven Control Panel When the oven is first installed 2 4 7 8 To set the correct time of day Before first use "On/Off" Button How to select a Cooking Function How to set the temperature and cooking time 8 8 9 9 9 Function Symbols Using the Oven Hints and Tips Condensation and steam Cookware The effects of dishes on cooking results The Cooling Fan The Safety Thermostat Programming the Oven 10 10 11 11 11 11 11 11 12 How to set the m
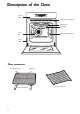
Description of the Ov en Oven Control Panel Air Vents for Cooling Fan Grill Element Oven Light Oven Fan Telescopic Shelf Supports Rating Plate Oven accessories Grill/roasting pan Removable handles 4 Grill trivet Anti-tip shelf (x 2)
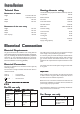
Installation Technical Data Heating elements rating Dimensions of recess Conventional Oven (Top element+Bottom element) 1,800 W Height in-column: 580 undertop: 593 560 550 Width Depth mm mm mm mm Dimensions of the o vity ovven ca cavity Top element 800 W Bottom element 1,000 W Fan Oven 2,000 W Inner Grill element 1,650 W Full Grill element 2,450 W Pizza Oven Height Width Depth 335 mm 395 mm 400 mm Oven capacity 53 litres 2,000 W/1,000 W Thermal Grilling 1,675 W Convection Fan 25
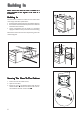
Building In Please ensure that when the oven is installed it is easily accessible for the engineer in the event of a breakdown. Building In The surround or cabinet into which the oven will be built must comply with these specifications: " the dimensions must be as shown in the relevant diagrams; " the materials must withstand a temperature increase of at least 60°C above ambient; " proper arrangements must be made of a continuous supply of air to the oven to prevent the oven overheating.
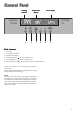
Contr ol Panel Control Cooking function 1 Temperature display 2 3 Time display 4 5 6 Push buttons 1. 2. 3. 4. 5. 6. ON / OFF Oven Function Control Fast Heat Up Function Decreasing Control “ “ (Time or Temperature) Increasing Control “ “ (Time or Temperature) Minute minder / Cooking duration function / End of cooking function All the oven functions are controlled by an electronic programmer. You can select any combination of cooking function, cooking temperature and automatic timing.
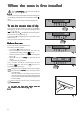
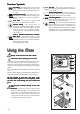
When the o irst installed ovven is ffirst Remove all packaging packaging, both inside and outside the oven, before using the oven. When the oven is first connected to the electrical supply, wait for the display automatically show 12:00 and the symbol flash. Ensure the correct time of day is set before using the oven. To set the cor corrrect time of da dayy Fig. 1 a) press Time function button and, while the symbol is flashing (Fig. 1), set the correct time of day by pressing buttons “ “ or “ “ (Fig. 2).
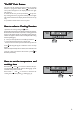
"On/Off" Push Button The oven must be switched on before setting any cooking function or programme. When button is pressed, the oven symbol will appear in the display, and the oven light will switch on. To switch off the oven, you can press button at any time. Any cooking function or programme will stop, the oven light will switch off and the time display will show the time of day only. It is possible to switch off the oven at any time.
Function Symbols 1 2 3 4 5 Fan cooking - This setting allows you to roast or roast and bake simultaneously using any shelf, without flavour transference. Pre-set temperature: 175°C Conventional cooking - The heat comes from both the top and bottom element, ensuring even heating inside the oven. Pre-set temperature: 200°C Inner Grill - can be used for grilling small quantities.
Hints and Tips Condensation and steam The Saf ety Thermostat Safety The oven is supplied with an exclusive system which produces a natural circulation of air and the constant recycling of steam. This system makes it possible to cook in a steamy environment and keep the dishes soft inside and crusty outside. Moreover, the cooking time and energy consumption are reduced to a minimum. During cooking steam may be produced which can be released when opening the oven door. This is absolutely normal.
Pr ogramming the Ov en Programming Oven How to set the minute minder 1) Press button Time functions to select the Minute Minder function (Fig. 8). The relevant symbol will flash and the control panel will display "0.00". 2) Press button “ “ to select the required time. Maximum time is 23 hours 59 minutes. After it has been set, the Minute Minder will wait 3 seconds and then start running (Fig. 9). 3) When the programmed time has elapsed, an acoustic alarm will be heard.
To Pr ogramme the Ov en to Switch Programme Oven On and Off 1) Carry out the "Cooking Duration" setting as described in the relevant chapter. 2) Press button Time functions until the "End of Cooking" is selected and the relevant symbol flashes. function The control panel will display the end of cooking time (that is, the actual time + cooking duration time - Fig. 14). 3) Press button “ “ to select the required end of cooking time.
"Fast Heat Up" function After a cooking function has been selected and the temperature has been adjusted, the cavity will gradually heat up until the selected temperature is reached. This will take from 10 to 15 minutes, depending on selected function and temperature. If it is necessary to reach the required temperature in a shorter time, the "Fast Heat Up" Function can be used. 1) Switch the oven on by pressing button .
The Fan Ov en Oven The air inside the oven is heated by the element around the fan situated behind the back panel.The fan circulates hot air to maintain an even temperature inside the oven. The advantages of cooking with this function are: " Faster Preheating As the fan oven quickly reaches temperature, it is not usually necessary to preheat the oven although you may find that you need to allow an extra 5-7 minutes on cooking times.
The Con en Convventional Ov Oven When using this setting, heat comes from both the top and bottom elements. This allows you to cook on a single level and is particularly suitable for dishes which require extra base browning such as quiches and flans. Gratins, lasagnes and hotpots which require extra top browning also cook well in the conventional oven.This form of cooking gives you the opportunity to cook without the fan in operation. ! How to Use the Conventional Oven 1. Switch the oven ON. 2.
Cooking Char t- Con ChartConvventional and Fan cooking Weight (gr.) Cooking times in the tables do not include pre-heating. We recommend to pre-heat the oven for about 10 minutes before cooking cooking..
Grilling Grilling must be carried out with the oven door closed. The grill pan handles must be removed from the pan during grilling. Always use oven gloves to remove and replace the grill pan handles. Ensure that you support the grill pan when removing it from the oven. ! How to Use the Full Grill 1. Switch the oven ON. 2. Select the Full Grill function by pressing the Oven Function control button Oven function until the symbol appears in the display.
w to Use the Thermal Grill How ! Ho Thermal grilling offers an alternative method of cooking food items normally associated with conventional grilling. The grill element and the oven fan operate alternately, circulating hot air around the food. The need to check and turn the food is reduced. Thermal grilling helps to minimise cooking smells in the kitchen. With the exception of toast and rare steaks, you can thermally grill all the foods you would normally cook under a conventional grill.
Pizza Ov en Oven The bottom element provides direct heat to the base of pizzas, quiches or pies, while the fan ensures air is circulated to cook the pizza toppings or pie fillings. To obtain the best results use the lower shelf levels. 1. Switch the oven ON. 2. Select the Pizza Oven Function by pressing the Oven Function control button Oven function until the symbol appears on the display. 3. If necessary, press “ “ or “ temperature setting. “ buttons to adjust the Weight (gr.
Cleaning the Ov en Oven Bef or e cleaning al wa ys allo w the cooling fan Befor ore alwa ways allow to cool the oven down before switching off at the electricity suppl supplyy. This appliance cannot be cleaned with steam or with a steam cleaning machine. The oven should be kept clean at all times. A build-up of fats or other foodstuffs could result in a fire, especially in the grill pan.
Ov en Ca vity Oven Cavity Oven Shelves and Shelf Supports The enamelled oven cavity is best cleaned whilst the oven is still warm. Wipe the oven over with a soft cloth soaked in warm soapy water after each use. From time to time it will be necessary to do a more thorough cleaning, using a proprietary oven cleaner. Clean the oven shelf support before proceeding to the catalytic cleaning of the oven.
Cooking to reduce soilage Cook at the recommended temperatures. Higher temperatures during roasting will increase soilage.Try cooking at lower temperatures for an increased length of time, you will save energy and often the joint is more tender. Use minimal, if any, extra oil or fat when roasting meat; potatoes only require brushing with fat before cooking. Extra fat in the oven during roasting will increase splashing and soilage. It is NOT necessary to add water to the meat tin when roasting.
Something not w orking working If the appliance is not working correctly, please carry out the following checks before contacting your local Customer Care Department. SYMPTOM # The oven does not come on. SOLUTION $ Press the OVEN ON button, then select a cooking function. $ Check the fuse and ensure the socket switch or the switch from the mains supply to the oven are ON. $ Check that the Demo mode has not accidentally been activated.
Repairs - After Sales Ser vice Service If your oven is not performing satisfactorily; consult the fault finding guides within this instruction book (What to do if...). In the event of a fault occurring which you cannot resolve yourself from advice given within this instruction manual.Your first step is to contact our extended warranty administrators on 0870 0107887 who will give you details for your local Service Force centre. When contacting the Service Force centre, please quote the model (Mod.
JLBIOS602 0,79 kWh 0,78 kWh 53,0 43 min. 41 min.
John Lewis Partnership 171 Victoria Street London SWIE 5NN 35695-7601 05/07 Grafiche MDM - Forlì www.johnlewis.