JLBIOS603 built-in oven Instruction manual
Impor tant Saf ety Inf ormation Important Safety Information It is most important that this instruction manual should be retained with the appliance for futur e rref ef er ence ppliance be sold or transf er wner ou future efer erence ence..
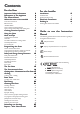
Contents For the User For the Installer Important Safety Information Description of the Appliance The Control Panel When the oven is first installed 2 4 7 8 To set the correct time Before first use "On/Off" Button How to select a Cooking Function How to set the temperature and cooking time 8 8 9 9 9 Cooking Function Symbols Using the Oven Hints and Tips Condensation and steam Cookware The effects of dishes on cooking results The Safety Thermostat The Cooling Fan Programming the Oven 12 13 13 13 14
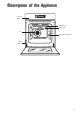
Description of the Appliance Control Panel Grill Element Oven Light Fan Telescopic shelf supports Rating Plate 4
Installation Technical Data Dimensions of recess Heating elements rating Height Width Depth 580 mm 560 mm 550 mm Dimensions of the o vity ovven ca cavity Conventional Oven (Top element+Bottom element) 1,800 W Top element 800 W Bottom element 1,000 W Fan Oven 2,000 W Inner Grill element 1,650 W 2,450 W Height Width Depth 335 mm 395 mm 400 mm Full Grill element Pyrolytic cleaning function 2,450 W Oven capacity 53 litres Thermal Grilling 1,675 W Convection Fan 25 W Oven Light 40 W Cool
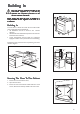
Building In The oven must be installed according to instructions supplied on p. 5-6 and qualified and competent personnel to relevant National Standards the by the Please ensure that when the oven is installed it is easily accessible for the engineer in the event of a breakdown.
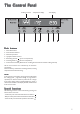
The Contr ol Panel Control Cooking function 1 2 Temperature display 3 4 Time display 5 6 7 Push buttons 1. 2. 3. 4. 5. 6. 7. ON / OFF Control Oven functions Control Fast heat-up Control Pyrolytic Function Control Decreasing Control “ “ (Time or Temperature) Increasing Control “ “ (Time or Temperature) Time functions Control (Minute timer / Cooking duration function / End of cooking function) All the oven functions are controlled by an electronic programmer.
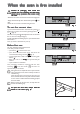
When the o irst installed ovven is ffirst Remove all packaging, both inside and outside the oven including the advertising labels and any protective film, before using the oven. When the oven is first connected to the electrical supply, the display will automatically show 12:00 and the symbol flash. Ensure the correct time is set before using the oven. will Fig. 1 To set the cor corrr ect time a) press Time functions button and, while the symbol is flashing (Fig.
"On/Off" Button The oven must be switched on before setting any cooking function or programme. When button is pressed, the oven symbol will appear in the display, and the oven light will switch on. To switch off the oven, you can press button at any time. Any cooking function or programme will stop, the oven light will switch off and the time display will show the time only. It is possible to switch off the oven at any time. How to select a Cooking Function 1) Switch on the oven by pressing the button.
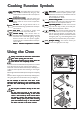
Cooking Function Symbols 1 2 3 4 5 Fan cooking - This setting allows you to roast or roast and bake simultaneously using any shelf, without flavour transference. Pre-set temperature: 175 °C Conventional cooking - The heat comes from both the top and bottom element, ensuring even heating inside the oven. Pre-set temperature: 200°C Full Grill - The full grill element will be on. Recommended for large quantities. Pre-set temperature: 250 °C Inner Grill - can be used for grilling small quantities.
Oven accessories Grill/roasting pan Grill trivet Removable handles Shelf (x 2) Hints and Tips Condensation and steam Condensation and Steam The oven is supplied with an exclusive system which produces a natural circulation of air and the constant recycling of steam. This system makes it possible to cook in a steamy environment and keep the dishes soft inside and crusty outside. Moreover, the cooking time and energy consumption are reduced to a minimum.
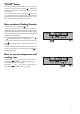
Pr ogramming the Ov en Programming Oven How to set the minute timer 1) Press Time functions button to select the Minute timer function (Fig. 8). The relevant symbol will flash and the control panel will display "0.00". 2) Press button “ “ to select the required time. Maximum time is 23 hours 59 minutes. After it has been set, the Minute timer will wait 3 seconds and then start running. 3) When the programmed time has elapsed, an acoustic alarm will be heard.
To Pr ogramme the Ov en to Switch Programme Oven Off 1) Carry out the "Cooking Duration" setting as described in the relevant chapter. 2) Press Time functions button until the "End of Cooking" function is selected and the relevant symbol flashes. The control panel will display the end of cooking time (that is, the actual time + cooking duration time - Fig. 13). 3) Press button “ “ to select the required end of cooking time. 4) After this is set, the programmer will wait 3 seconds and then start running.
Fast Heat-up function After a cooking function has been selected and the temperature has been adjusted, the cavity will gradually heat up until the selected temperature is reached. This will take from 10 to 15 minutes, depending on selected function and temperature. If it is necessary to reach the required temperature in a shorter time, the Fast Heat-up function can be used. 1) Switch the oven on by pressing button . 2) Set the required cooking function and temperature as explained in the previous pages.
The Fan Ov en Oven The air inside the oven is heated by the element around the fan situated behind the back panel.The fan circulates hot air to maintain an even temperature inside the oven. The advantages of cooking with this function are: " " " Faster Preheating As the fan oven quickly reaches temperature, it is not usually necessary to preheat the oven although you may find that you need to allow an extra 5-7 minutes on cooking times.
The Con en Convventional Ov Oven When using this setting, heat comes from both the top and bottom elements. This allows you to cook on a single level and is particularly suitable for dishes which require extra base browning such as quiches and flans. Gratins, lasagnes and hotpots which require extra top browning also cook well in the conventional oven.This form of cooking gives you the opportunity to cook without the fan in operation. to Use the Conventional !How Oven 1. Switch the oven ON. 2.
Cooking Char t- Con en ChartConvventional and Fan Ov Oven This chart is intended as a guide only. It may be necessary to increase or decrease the temperature to suit your individual requirements. Only experience will enable you to determine the correct setting for your personal requirements. Cooking times do not include pre-heating time. A short oven pre-heating (about Weight (gr.) 10 minutes) is necessary before any cooking.
Grilling Grilling must be carried out with the oven door closed. T he grill pan handles must be removed from the pan during grilling. Al wa ys use o Alwa ways ovven glo glovves to remove and replace the grill pan handles. Ensure that you support the grill pan when removing it from the oven. ! How to Use the Full Grill 1. Switch the oven ON. 2. Select the Full Grill cooking function by pressing the Oven functions button until the symbol appears in the display. 3.
w to Use the Thermal Grill How ! Ho Thermal grilling offers an alternative method of cooking food items normally associated with conventional grilling. The grill element and the oven fan operate together, circulating hot air around the food. The need to check and turn the food is reduced. Thermal grilling helps to minimise cooking smells in the kitchen. With the exception of toast and rare steaks, you can thermally grill all the foods you would normally cook under a conventional grill.
Pizza Ov en Oven The bottom element provides direct heat to the base of pizzas, quiches or pies, while the fan ensures air is circulated to cook the pizza toppings or pie fillings. To obtain the best results use the lower shelf levels. 1. Switch the oven ON. 2. Select the Pizza Oven cooking function by pressing the Oven functions button until the symbol on the display. 3. If necessary, press “ “ or “ temperature setting.
Cleaning the Ov en Oven Bef or e cleaning al wa ys allo w the cooling fan Befor ore alwa ways allow to cool the oven down before switching off at the electricity suppl supplyy. This appliance cannot be cleaned with steam or with a steam cleaning machine. The oven should be kept clean at all times. A build-up of fats or other foodstuffs could result in a fire, especially in the grill pan.
Ho w to use the ppyr yr ol ytic cleaning How yrol olytic function 1 Before activating the pyrolytic cleaning function, remove any excessive spillage and make sure that the oven is empty. Do not leave anything inside it (e.g. pans, grids, baking tray, dripping pan, etc.) as this could heavily damage them. Ensure that the oven door is closed before activating the pyrolytic cleaning function. When the pyrolytic cleaning function is on, it is advisable not to use a hob if it is fitted above the oven.
2. The Cooking Duration symbol will flash for 5 seconds; during this time push “ “ or “ “ buttons to select the pyrolytic 1 (P I) or pyrolytic 2 (P 2) function (Fig. 21). 3. Once you have chosen the desired pyrolytic function (P I or P 2), the “Pyro” writing will flash in the display waiting for confirmation to start the pyrolytic cleaning function. 4. To confirm which pyrolytic function you desire, press the Pyrolytic button.
2. The Cooking Duration symbol will start flashing; during this time push “ “ or “ “ buttons to select the pyrolytic 1 (P I) or pyrolytic 2 (P 2) function. 3. Once you have chosen the desired pyrolytic function, the “Pyro” writing will flash in the display waiting for confirmation to start the pyrolytic cleaning function. At this time, push the Time functions button until the and the arrow symbol "End of Cooking" symbol will flash (Fig. 24).
Cleaning The Ov en Door Oven The oven door is made up of four glasses. It is possible to remove them for easier cleaning. The oven door may bang shut if you try to extract the inner glasses when the oven door is still fitted to the oven. Before cleaning the oven door, we recommend you to remove it from the oven. Proceed as follows: 1 . open the oven door completely and locate the two hinges which link the door to the oven; 2 . unlock and turn the small levers located on the two hinges; 3 .
Clean the oven door glass with warm water and a soft cloth only. Never use harsh abrasives as they could damage the special heat-resistant surface of the inner glasses. Once the cleaning is carried out, refit the oven door, following the procedure in reverse. The two pieces of glass in the middle have been eated to rresist esist heat. The e mark ed speciall are marked speciallyy tr treated Theyy ar with a small dot located on a corner and a black frame rrespectiv espectiv el espectivel elyy.
Something not w orking working If the oven is not working correctly, please carry out the following checks, before contacting your local Repair agent. IMPORTANT: If you call out an engineer to a fault listed below, or to repair a fault caused by incorrect use or installation, a charge will be made even if the appliance is under guarantee. SYMPTOM $ The oven does not come on. SOLUTION % Press the OVEN ON button, then select a cooking function.
JLBIOS603 0,79 kWh 0,78 kWh 53,0 43 min. 41 min. 1130 cm² John Lewis Partnership 171 Victoria Street London SWIE 5NN 35690-7901 09/05 Grafiche MDM - Forlì www.johnlewis.