JLBIOS610 Built-in oven Instruction manual
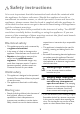
Safety instructions It is most important that this instruction book should be retained with the appliance for future reference. Should the appliance be sold or transferred to another owner, or should you move house and leave the appliance, always ensure that the book is supplied with the appliance in order that the new owner can get to know the functioning of the appliance and the relevant warnings. These warnings have been provided in the interest of safety.
• Do not put any strain on the oven door when open. • Never pour water directly into the oven when it is hot. This could cause damage to or discolouration of the enamel. • Rough handling, especially around the edges of the front panel, can cause the glass to break. • Do not store flammable materials inside the oven. These could ignite when the oven is switched on. • Do not store moist foods inside the oven. This could damage the oven enamel.
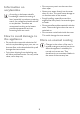
Contents For the user For the installer Safety instructions 2 Electrical connections 30 Description of the appliance 5 5 6 7 7 Installation instructions 31 Technical data 37 General overview The electronic oven controls Oven features Oven accessories Before using for the first time 8 Setting the clock 8 Using the oven 9 9 9 Using your appliance Heat indicator Inserting the oven shelf, baking tray and roasting pan Steam cooking functions Meat probe Automatic programmes Options Clock function
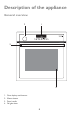
Description of the appliance General overview 2 1 3 4 1. 2. 3. 4.
The electronic oven controls Indicators 8 14 1 1. 2. 3. 4. 5. 6. 7. 8. 9. 10. 11. 12. 13. 9 2 13 3 10 4 5 12 6 11 7 14.
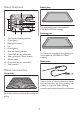
Oven features Baking tray 1 2 11 3 4 5 6 10 9 1. 2. 3. 4. 5. 6. 7. 8. 9. 10. 11. For cakes and biscuits (not suitable for VIGOROUS STEAM cooking). 7 Roasting pan 8 Top heat and heating elements Oven lighting Meat probe socket Fan Oven lighting Rear wall heating element Oven shelf runners, removable Steam generator/ Steam rosette Bottom Heat Oven shelf runners, removable Shelf positions For baking and roasting or for collecting fat (not suitable for VIGOROUS STEAM cooking).
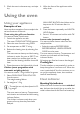
Patisserie tray QuickSponge 180 For rolls, pretzels and biscuits. Can be used for the steam functions. Discolouration of the surface has no impact on function. Extremely absorbent sponge for absorbing any residual water from the steam generator. Before using for the first time 3. Confirm using the SELECTION button. The appliance switches itself off and is now ready for use. Setting the language 1.
3. Wash the oven in the same way, and wipe dry. 4. Wipe the front of the appliance with a damp cloth. Using the oven With HEAT & HOLD, the chicken can be kept warm for 30 minutes after it is cooked. 3. Press the button repeatedly until HEAT & HOLD flashes. 4. Set to + 30 minutes and confirm with OK button. Lemon cake (automatic recipes) You want to bake a lemon cake from the recipe booklet. • Select the options RECIPES MENU, RECIPES BAKING, LEMON SPONGE CAKE from the menu The oven starts to heat up.
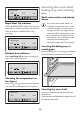
Inserting the oven shelf, baking tray and roasting pan CONVENTIONAL 180ûC 12.12 00.07 Shelf runner safety and anti-tip device Rapid Heat Up indicator As a shelf runner safety device, all insertable components have a small curved indentation at the bottom on the right and left-hand edge. Always insert insertable components so that this indentation is at the back of the oven interior. This indentation is also important for preventing the insertable components from tipping.
The high rim around the oven shelf is an additional device to prevent cookware from slipping. Important! Always use water only. A buzzing sound is heard when the water has been used up. When more water is added, the buzzing sound is switched off. Because of the automatic steam dispersal period of approx. 5 minutes at the end of the cooking time and the heating up time of approx. 2 minutes, settings of less than 10 minutes have little effect. Steam will also escape when the door is opened.
4. After the oven has cooled down, soak up any remaining water from the steam generator using a sponge and, if necessary, wipe out with a little vinegar. Leave the door open to let the oven dry completely. VIGOROUS STEAM 96ûc 12.25 Important! Only the meat probe supplied may be used. If replacing, please use only original replacement parts. Inserting the meat probe 1. Switch on the appliance. 2.
temperature display. Then change the temperature using the or button. OVEN FUNCTIONS 2. Use the Automatic programmes with the meat probe 30û 1. Switch on the appliance. 2. Insert meat probe. In the text line MEATPROBE is displayed and the symbol flashes. If OVEN FUNCTIONS is already displayed in the text line, before the desired core temperature has been set, then press the SELECTION button, until the symbol flashes and then perform the setting. POULTRY 2,5 KG 12.
To choose one recipe in one of those 4 use the arrow buttons. In addition to the oven functions for individually setting baking and roasting, you have the option of working with various automatic programmes: 1. Meat programmes with weight input (OVEN FUNCTIONS menu) 2. Meat programmes with meat probe (OVEN FUNCTIONS menu) 3.
7. The audible signal can be stopped by pressing any button. POWDER CAKE Delaying the start time 160ûc Running the programme can also be automatically started at a later time (see Clock Functions END ). The clock function END can be set, if the programme has been running for less than two minutes. 13.05 00.00 With the recipes POWDER CAKE and FROZEN PIZZA using the or buttons, the suggested temperature can be increased or decreased by 10°C.
2. If necessary, use the SELECTION button to change to the clock function DURATION and input the desired cooking time (see “Clock Functions” section) or use the SELECTION button to change to the MEATPROBE function and input the desired core temperature (see ”MEATPROBE” section). 3. Using the OPTION button, change to the Options menu. 4. Using the OK button, select the suggested menu option STORE MEMORY. The next free memory position is displayed. 7. Use the or button to move the dash to the right or left.
EXTRA TIME MENU DAD’S PIZZA 230ûc 12.29 You can call up the first three saved “Personal Recipes” directly in the Oven Functions menu. Further “Personal Recipes” can be called up in the MEMORY MENU under the menu option START MEMORY. – EXTRA TIME ON The TIME EXTENSION function is offered when a DURATION was set and has elapsed. – EXTRA TIME OFF The TIME EXTENSION function is not offered.
– DISPLAY OFF 6. Using the arrow buttons or select the desired value. 7. Press the OK button. In the display SAVED appears for a few seconds. Afterwards, you will find yourself back in the Oven Functions menu. After the appliance is switched off, the time of day display goes out automatically. As soon as the appliance is switched on, the display automatically switches itself on. The DISPLAY OFF setting saves energy.
We recommend pre-heating the empty oven using the RAPID HEAT UP function for biscuits that quickly spread into one another, bread rolls and Swiss rolls. Heat+Hold can be activated or deactivated in the SETTINGS MENU menu. EXTRA TIME MENU Important! Important: Do not put the food to be cooked into the oven, until RAPID HEAT UP is completed and the oven is operating using the desired function. Allows the last oven function to continue to run after the time has elapsed.
After a clock function has been selected, the corresponding symbol flashes for about 5 seconds. During this time, the desired times can be set or modified using the or button When the desired time has been set, the corresponding symbol continues to flash for approx. 5 seconds. After this the symbol illuminates. The set time begins to run. MINUTE MINDER 14.35 00.00 2. 2. Using the or button, set the desired Countdown time (max. 99 minutes). After about 5 seconds the display shows the time remaining.
3. Using the or button, set the desired cooking time. After about 5 seconds the remaining cooking time is displayed. The symbol lights up. When the time has elapsed, an audible signal sounds for 2 minutes. The oven switches itself off. CONVENTIONAL 200ûc 14.35 DURATION and END can be used simultaneously, if the oven is to be switched on and off automatically at a later time. 1. Select the oven function and temperature. 2. Using the DURATION function, set the time that the dish needs to cook. 3.
TIME OF DAY –— OVEN FUNCTIONS 12.00 13.25 3. Using the or button, set the current time. 4. Confirm using the SELECTION button. The appliance is now ready to use. Cleaning and care Oven interior Warning! First switch off the appliance and let it cool down before carrying out any cleaning. Clean the appliance after each use. In this way, dirt is easier to clean off and is not allowed to burn on. 1. When the oven door is opened, the oven light switches itself on automatically. 2.
2. Using the OPTION button 3. Using the arrow buttons or , select the menu option CLEANING MENU. 4. Confirm using the OK button. The oven now heats up to the required temperature. The duration of the process (15 mins.) is shown in the display. 5. When the STEAM CLEANING programme is completed, an audible signal sounds. • Switch off the oven. • Take the fuses out of the fuse box, or switch off. To protect the oven light bulb and the glass cap, lay a cloth on the bottom of the oven.
Replacing the oven side light bulb/ cleaning the glass cap Oven door glass and water collecting channel 1. Take out the side rails. 2. Unscrew the metal frame using a cross-tip screwdriver. 3. Take off the metal frame and seal, and clean. 4. If necessary: replace bulb with a 25 Watt, 230V, 300°C heat-resistant oven light bulb. The oven door is fitted with three panels of glass mounted one behind the other and a water collecting channel.
Cleaning the door glass and the water collecting channel 4. Take hold of the door trim (B) on the upper edge of the door at both sides and press inwards to release the clip seal. Then remove the door trim by pulling upwards. Clean the door glass panels and the water collecting channel thoroughly with a solution of water and washing-up liquid. Then dry them carefully. B Inserting door glass panels and the water collecting channel 1.
C D E 3. Take hold of the door trim (B) at each side, position it on the inside edge of the door and push the door trim (B) onto the upper edge of the door. On the open side of the door trim (B) there is a guide bar (C). This must be pushed between the outer door panel and the guide rail (D). The clip seal (E) must be snapped in. 5. Fold up the clamping levers (A) on both door hinges back into their original positions. B 90° 6. Close the oven door. 4. Open the oven door as far as it will go.
A Something not working If the oven is not working correctly, please carry out the following checks, before contacting your local Service Force Centre. Problem The oven is not heating up Important! If you call out an engineer to a fault listed below, or to repair a fault caused by incorrect use or installation, a charge will be made even if the appliance is under guarantee.
Problem Possible cause Possible solutions F11 appears in the clock display The meat probe has short Insert the meat probe plug into circuited or the plug of the meat the socket on the oven side wall probe is not firmly in position in as far as it will go. the socket A fault code that is not listed above appears in the clock display Electronic fault Switch the appliance off and on again via the house fuse or the safety switch in the fuse box.
your household waste disposal service or the shop where you purchased the product. Old appliance Warning! Warning: So that the old appliance can no longer cause any danger, make it unusable before disposing of it. Packaging material The packaging materials are environmentally friendly and can be recycled. The plastic components are identified by markings, e.g. >PE<, >PS<, etc. Please dispose of the packaging materials in the appropriate container at the community waste disposal facilities.
Electrical connections The oven is designed to be connected to 230-240V~(50Hz) electricity supply. The oven has an easily accessible terminal block which is marked as follows: Letter L - Live terminal Letter N - Neutral terminal - Earth terminal Connection via Min. size Cable/flex Cooker Control Circuit 2,5 mm² Caution! This oven must be earthed! The cable used to connect the oven to the electrical supply must comply to the specifications given below.
Installation instructions • Anti-shock protection must be provided by the installation. • The built-in unit must meet the stability requirements of DIN 68930. • Built-in cookers and cooking surfaces are equipped with special attachment systems. For safety reasons, they must only be combined with appliances from the same manufacturer. The use of heat protection strips is prohibited for cookers and ovens with Pyrolytic, if the recess has a rear wall and closed ground-level compartment.
Technical data Voltage: 230/240 Volts 50 Hz Wattage: 3.
Please retain your purchase receipt safely for the service engineer to verify the purchase details. Before calling out an engineer, please ensure you have read the details under the heading “Something Not Working”. When you contact your local Service Force Centre you will need to give the following details: 1. Your name, address and post code 2. Your telephone number 3. Clear and concise details of fault 4. The purchase date as found on your receipt 5.
John Lewis Partnership 171 Victoria Street London SW1E 5NN www. johnlewis.