JLLFW1811 Fridge Instruction manual
Safety information It is most important that this instruction book should be retained with the appliance for future reference. Should the appliance be sold or transferred to another owner, or should you move house and leave the appliance, always ensure that the book is supplied with the appliance in order that the new owner can get to know the functioning of the appliance and the relevant warnings. These warnings have been provided in the interest of safety.
. Make sure that you can come to the mains plug of the appliance. 4. Do not pull the mains cable. 5. If the power plug socket is loose, do not insert the power plug. There is a risk of electric shock or fire. 6. You must not operate the appliance without the lamp cover of interior lighting. • This appliance is heavy. Care should be taken when moving it. • Do not remove nor touch items from the freezer compartment if your hands are damp/wet, as this could cause skin abrasions or frost/freezer burns.
• The appliance must not be located close to radiators or cookers. • Make sure that the mains plug is accessible after the installation of the appliance. • Ice lollies can cause frost burns if consumed straight from the appliance. Care and cleaning • Before maintenance, switch off the appliance and disconnect the mains plug from the mains socket. • Do not clean the appliance with metal objects. • Do not use sharp objects to remove frost from the appliance. Use a plastic scraper.
Contents For the user Safety information 2 Control Panel 6 6 6 6 6 7 7 7 7 7 8 Display Switching on Switching off Temperature regulation Functions Menu Child Lock Function Shopping Function Eco Mode Function Quick Chill function Holiday Function H First use Cleaning the interior Daily use Use of the fridge compartment Taste Guard Filter Movable shelves Vegetable Drawer Bottle rack Positioning the door shelves Quick Chill shelf Bottle and can holder Removing the bottle and can holder Helpful hints and
Control Panel Functions On/Off OK A B C D E A - Appliance button ON/OFF D - Function button B - Temperature regulation button E - Confirmation button C - Temperature and function indicator Display Positive Temperature indicator If on the Shoppingfunction is on Temperature indicator If on the Eco Modefunction is on If on the Child Lock function is on If on theQuick Chillfunction is on Switching on Switching off Insert the plug into the power outlet.
After some seconds the storage temperature is shown again. The selected-temperature will be reached within 24 hours. Shopping Function If you need to insert a large amount of warm food, for example after doing the grocery shopping, we suggest activating the Shopping function to chill the products more rapidly and to avoid warming the other food which is already in the refrigerator. The Shopping function is activated by pressing key (D) (several times if necessary) until the corresponding icon appears .
long holiday period ( e. g. the summer holidays) without the formation of a bad smell. The Holiday Function H may be regulated by pressing the key B. By pressing the key B the current temperature setting flashes on the indicator. Press the key B again. When on the display appears the letter H confirm the choice of the temperature or by pressing the key E, (you will hear the buzzer) or by waiting for some seconds (you will not hear the buzzer).
Daily use Use of the fridge compartment Important! Make sure that the air lever flap is closed to obtain proper function. The temperature of this compartment may be regulated between +2°C and +8°C. During normal functioning the indicator shows the temperature inside the fridge. Movable shelves The walls of the refrigerator are equipped with a series of runners so that the shelves can be positioned as desired. A medium setting is generally the most suitable.
Bottle rack Place the bottles (with the opening facing front) in the pre-positioned shelf. Important! If the shelf is positioned horizontally, place only closed bottles. This bottle holder shelf can be tilted in order to store previously opened bottles. To obtain this result, pull the shelf up so it can rotate upwards and be placed on the next higher level. Bottle and can holder The side of the bottle and can holder is moveable to enable a more flexible placement of cans and bottles in front of the grid.
Removing the bottle and can holder 1. Take out the Quick Chill Shelf with holder from the cabinet 2. to loosen the holder from the shelf, bend the hooks/brackets that surround the backside of the shelf. Helpful hints and tips Normal Operating Sounds Hints for fresh food refrigeration • You may hear a faint gurgling and a bubbling sound when the refrigerant is pumped through the coils or tubing. This is not a fault with the appliance and is a completely normal operating sound.
Bananas, potatoes, onions and garlic, if not packed, must not be kept in the refrigerator. Milk bottles: these should have a cap and should be stored in the bottle rack on the door. Care and Cleaning Many proprietary kitchen surface cleaners contain chemicals that can attack/damage the plastics used in this appliance. For this reason it is recommended that the outer casing of this appliance is only cleaned with warm water with a little washing-up liquid added.
food inside. Use the special cleaner provided, which you will find already inserted into the drain hole. Periods of non-operation When the appliance is not in use for long periods, take the following precautions: • disconnect the appliance from electricity supply • remove all food • defrost 2)and clean the appliance and all accessories • leave the door/doors ajar to prevent unpleasant smells.
Problem Possible cause Solution is displayed in the temperature display An error has occurred in measuring the temperature Call your service representative (the cooling system will continue to keep food products cold, but temperature adjustment will not be possible) The compressor operates continually. The Temperature regulator may be set incorrectly. Set a warmer temperature. The door is not closed correctly. Refer to "Closing the door". The door has been opened too frequently.
Problem Possible cause Solution The temperature in the There is no cold air circulation in refrigeration is too high. the appliance. The appliance does not operate. Make sure that there is cold air circulation in the appliance. Large quantities of food to be cooled were put in at the same time. Insert smaller quantities of food to be cooled at the same time. The appliance is switched off. Switch on the appliance. The mains plug is not connected to the mains socket correctly.
Installation Read the "Safety Information" carefully for your safety and correct operation of the appliance before installing the appliance. Levelling When placing the appliance ensure that it stands level. This can be achieved by two adjustable feet at the bottom in front. Location To ensure best performance, if the appliance is positioned below an overhanging wall unit, the minimum distance between the top of the cabinet and the wall unit must be at least 40 mm .
Climate class Ambient temperature SN +10°C to + 32°C N +16°C to + 32°C ST +16°C to + 38°C T +16°C to + 43°C 5 Blue: As the colours of the wires in the mains lead of this appliance may not correspond with the coloured markings identifying the terminals in your plug, proceed as follows: 1. Connect the wire coloured green and yellow to the terminal marked either with the letter “E“ or by the earth symbol or coloured green and yellow. 2.
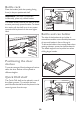
1 Important! The filter should be handled carefully so fragments do not loosen from the surface. Make sure that the air lever flap is closed to obtain proper function. Slacken the screws and insert the spacer under the screw head, then retighten the screws. Door reversibility Installation of the Taste Guard filter Warning! Before carrying out any operations, remove the plug from the power socket.
accessory bag the two plugs and cover the holes left open after having removed the handle. f A A 3. 4. 5. e Remove the door. Unscrew the pin (f) of the bottom hinge and install it on the opposite side. Unscrew the pin of the upper hinge and install it on the opposite side. 9. 6. 7. 8. Make sure that the front board of the door is parallel to the front board of the top. 10. Reposition, level the appliance, wait for at least four hours and then connect it to the power socket.
Repairs-After Sales Service Mod. : . . . . . . . . . . . . . . . . . . . . . . . . . . . . . . . . . . PNC : . . . . . . . . . . . . . . . . . . . . . . . . . . . . . . . . . . S.No. : . . . . . . . . . . . . . . . . . . . . . . . . . . . . . . . . . . Your appliance is covered by a 3 year parts and labour guarantee (see separate details given at point of sale). Please retain your purchase receipt safely for the service engineer to verify the purchase details.
John Lewis Partnership 171 Victoria Street London SW1E 5NN www. johnlewis.