JLTDC01 condenser dryer with heat pump Instruction manual
1 Important Safety Information It is most important that this instruction manual should be retained with the appliance for future reference. Should the appliance be sold or transferred to another owner, or should you move house and leave the appliance, always ensure that the book is supplied with the appliance in order that the new owner can get to know the functioning of the appliance and the relevant warnings. These warnings have been provided in the interest of safety.
2 Ecological hints To save energy we recommend that you follow these hints: • Try to load the maximum capacity of the machine as small loads are uneconomical. • Always load well spun laundry. The higher the spin speed, the lower the electricity consumtion and the shorter the drying times. • Do not over-dry laundry, this avoids creasing and saves energy. • Clean the filters regularly to avoid excessive drying times and high electricity consumption.
Contents For the User For the Installer Important Safety Information 2 Installation 6 Description of the Appliance 5 Technical Specifications 6 Unpacking 7 Transporting the appliance 7 Positioning 7 Stacking kit (optional accessory 7 Door reversal 8 Electrical connection 9 The Control Panel 10 Programme Chart 12 Using the tumble dryer 13 Hints & Tips on Drying 15 Maintenance and Cleaning 16 External cleaning Cleaning the filters Cleaning the door Cleaning the door seal Cleani
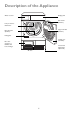
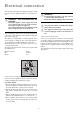
Description of the Appliance Display panel Water reservoir Fine strainer (lint filter) Lamp for interior illumination Large mesh filter (lint filter) Micro-fine filter (lint filter) Rating plate Loading door (reversible) Base door upstream of fluff filter and heat exchanger Screwed feet (with height adjustment) Air slots 5
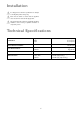
Installation 1 It is dangerous to alter the specifications or attempt to modify this product in any way. 1 Care must be taken to ensure that the appliance does not stand on its electrical supply cable. 1 Any electrical work required to install this appliance should be carried out by a qualified electrician or competent person. Technical Specifications DIMENSIONS Height Width Depth 85 cm (33.5’’) 60 cm (23.6’’) 60 cm (23.
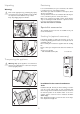
Unpacking Positioning Warning! It is recommended that, for your convenience, the machine is positioned close to your washing machine. The tumble dryer must be installed in a clean place, where dirt does not build up. To keep vibration and noise to a minimum when the dryer is in use, it should be placed on a firm, level surface. Once in its permanent operating position, check that the dryer is absolutely level with the aid of a spirit level. If it is not, raise or lower the feet until it is.
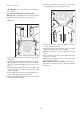
7.Unscrew cover plates E from the front of the machine, rotate through 180, screw on the opposite side. Door reversal 1 Warning! The door may only be reversed by a specialist. Instructions for qualified personnel/specialist Warning! Before reversing the door, disconnect the mains plug; with a permanent connection: remove the fuse. 1.Open door. 8.Unscrew door lock F, push down slightly and remove from the front of the machine. 9.
Electrical connection Any electrical work required to install this appliance should be carried out by a qualified electrician or competent person. 1 WARNING! A cut off plug inserted into a 13 amp socket is 1 WARNING – THIS APPLIANCE MUST BE a serious safety (shock) hazard. Ensure that the cut off plug is disposed of safely. EARTHED. Should the appliance power supply cable need to be replaced, this must be carried out by a Service Force agent (see page 23).
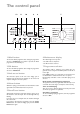
The control panel 12 1 11 2 9 10 3 4 7 8 6 5 1 Wool button 6 Maintenance display To select the Wool programme after setting the programme selector to WOOL/SILK. If no button is pressed, the Wool programme is automatically set. The related light comes up when • the tank must be emptied or • the filters must be cleaned. 2 Silk button 7 Programme selector To select the SILK programme after setting the programme selector to WOOL/SILK.
10 Delay start button Changing a programme To change a programme which has been selected by mistake once the programme has started, first turn the programme selector to OFF and then reset the programme. The programme can no longer be changed directly once the programme has started. If nevertheless there is an attempt to change the programme on the programme selector, the programme progress display and the maintenance indicators flash.
Programme Chart Automatic drying Type of laundry Degree of drying required Max-load 1) Extra dry 6kg Store dry 6kg Cupboard dry 6kg Damp dry 6kg Iron dry 6kg Extra damp 6kg Extra dry 3kg Cupboard dry 3kg Iron dry 3kg Jeans Heavy cotton 6kg Easy care fabrics Easy iron 1kg Woolen fabrics Wool 1kg Silk Silk 1kg Synthetics Refresh 1kg Cottons Synthetics 1) Never overfill the drum (do not load large quilts, for example) • Silk is a special programme for drying silk using wa
Using the tumble dryer 1 If the appliance was not transported in an upright po- Selecting additional functions sition, leave it to stand for 12 hours before connecting it to the electricity supply and using it for the first time, so that the oil can flow back to the compressor. Otherwise the compressor could be damaged. INTENSITY For precise setting of the residual moisture content of the laundry, the degrees of dryness +, ++ or +++ can be set in addition to most programmes.
Setting time delay Drying cycle complete / removing laundry 3 With the DELAY START button, you can delay the Once the drying cycle is complete, the END and CREASE GUARD indicators light up. If the ALARM button has been pressed, an acoustic signal sounds intermittently. start of a programme by between 30 minutes (30' and a maximum of 23 hours (23h). 1.Select the programme 2.Press the DELAY START button as many times as necessary until the required start delay appears on the multi display, e.g.
3 Hints & Tips on Drying • Always load well spun laundry. The higher the spin speed the lower the electricity consumption and the shorter the drying time. • DO NOT load dripping wet laundry into the dryer. Roll the article in a towel or spin to remove excess water. • Close poppers and zips and fasten any buttons. • Sort the laundry. Separate synthetics from cotton/linens, and dry separately. • Remove the laundry immediately after the programme has finished.
Maintenance and Cleaning 5.Remove fluff from fine strainer. It is best to use a damp hand for this purpose. You must disconnect the appliance from the electricity supply, before you can carry out any cleaning or maintenance work. Clean the entire filter area 3 The strainer area does not have to be cleaned after External cleaning every drying cycle, but should be checked regularly and cleaned of fluff if necessary. 6.
Cleaning the fluff filter the pressure points on the sides and pull the filter mat and frame up and out of the housing. If the indicator PLINTH FILTER lights up, the fluff filter and the filter mat in the base of the appliance must be cleaned. 3 To protect the heat pump from dirt, the dryer is fit- ted with a special filter mat, which is located in the filter housing. Here too large amounts of fluff build up over time, which affect the function of the appliance.
Emptying the water reservoir Cleaning the drum Empty water reservoir after every drying cycle. If the water reservoir is full, an active programme will be interrupted automatically and the FULL TANK display will light up. In order to continue the programme, the water reservoir must be emptied. 1 Warning! Do not use abrasives or steel wool to clean the drum. 3 Lime in the water or cleaning agents may form a barely visible lining on the inside of the drum.
Programming options Objective Implementation 1. Turn the programme selector to any programme. Permanently programme on the audi- 2. Press the ALARM button and hold down for approx. 5 seconds. ble signal which reminds you that the A brief signal sounds several times. The ALARM display flashes several times. programme is complete. The setting is permanently programmed. The setting is cancelled as described under 1 and 2. 1. Turn the programme selector to any programme. 2.
Something Not Working If the tumble dryer is not working correctly, please carry out the following checks before contacting your local Service Force Centre. If, during operation, the error code (E plus number or letter) appears on the multi-display: Switch the appliance off and on again. Reset programme. Press the START/PAUSE button. If the error is still displayed, please inform your local Service Force Centre and quote the error code.
Repairs - After Sales Service Spare Parts In the unlikely event of your appliance requiring service, or if you wish to purchase spare parts, please contact our extended warranty administrators by telephoning: Always insist on genuine spare parts. An authorised service engineer should service this product, and only genuine spare parts should be used. Under no circumstances should you attempt to repair the machine yourself.
John Lewis Partnership 171 Victoria Street London SW1E 5NN www. johnlewis.