Installation Instructions 12in. Deep Simplicity Closet Organizer MODEL: JLH-530, JLH-531 www.johnlouishome.
IMPORTANT: DO NOT RETURN TO STORE! For missing or damaged parts, technical or assembly questions, please call John Louis Customer Service at 1-800-480-6985 IMPORTANTE: ¡NO LO DEVUELVA A LA TIENDA! Llame al servicio al cliente local de John Louis al 1-800-480-6985 para aclarar sus dudas sobre pérdidas, daños, asuntos écnicos y ensamblaje.
Quantity: 4 Quantity: 8 Quantity: 6 Quantity: 6 Quantity: 14 Bar Spacer Tower Bracket Shelf End Shelf mounting L- Clip Quantity: 4 Barrel Nut Quantity: 4 Barrel Bolt Quantity: 12 #8 3/4 in. Quantity: 48 Quantity: 18 #4 3/4 in. Wall Anchor Quantity: 4 #8 1/2 in. Quantity: 44 #8 1 1/2 in. Quantity: 4 Cam Bolt Quantity: 20 Mushroom Cap Adjustable Shelf Pin Quantity: 16 #8 1 in.
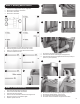
IMPORTANT - Read Before Assembly Assembly instructions are written for 8 ft. configuration A. All assembly processes are the same for each configuration EXCEPT for the order or locations of the assembly process. Use selected configuration for shelf locations. Shelf lengths and Garment bars may need to be cut depending upon configuration desired. STEP 2 - Attaching Garment Bars 1. 2. 3. 4. 5. 6. 4ft. garment bars are used for double hang. On the pilot hole side of the bar, measure in 4 in. from the end.
STEP 3 - Marking Measurements 1. 2. 3. 4. 1 2 3 3 4 6 Locate the 3 main height locations for your configuration. Measure up & mark the 84 in. shelf location. Mark the 42 in. shelf location. Mark the 72 in. shelf location. 1 2 3 4 5 5. 6. 7. 8. Draw a 6 ft. long level line out from wall end at 84 in. location. Draw a 4ft. long level line out from wall end at 42 in. location. Draw a 2 2 in. long level line out from wall end at 72 in. location. Locate stud locations at level lines. 5 7 6 7. 8.
14. Repeat for opposite side. 15. Secure brackets to tower using #6 3/4 in. screws. 11 13 12 4. 5. 6. 7. 8. Position shelf end template onto side wall. Align template line with adjacent wall line. Level template. Mark required Shelf End position for required depth (12in. or 16in. depth). Secure Shelf End using #8 - 1 1/2in. screws (use wall anchor if no stud is present). 4 5 6 7 8 8 15 STEP 5 - Installing Top Shelf & Tower It is recommended to install hardware into wall studs. Typically 16 in.
14. 15. 16. 17. Plumb level tower side. Mark tower bracket hole locations on wall. Remove shelf and tower. Align shelf end hardware with the mark on the tower & mark screw hole locations. 18. Secure shelf end to tower top using #8 1/2in. screws at hole locations. NOTE: If shelf is mounted level with the tower top, the shelf end hardware should be “centered” on the end of the front rail of the tower top.
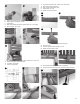
STEP 7 - Installing Long Hang Shelf 8 On the 72in. level line space shelf mounting L-clip hardware equidistant in the following manner: • 2 L-clip hardware within the 24in. shelf location 1. Center the top screw hole of the shelf mounting L-clip hardware with the level line & mark all hole locations. Secure L-clip to wall using #8 1 1/2 in. screws at hole locations (Use wall anchors provided if no stud is present). Repeat for remaining L-clip locations. 2. 9. 10. 11. 12. 13.
8 8 18. 19. 20. 21. 22. 18 On the pilot hole side of the bar, measure in 4 in. from the end. Mark location & repeat for other end. Align side of bar spacer with the mark. Secure with #8 1in. screw. Repeat at each marked location. 20 19 9. 10. 11. 12. 13. Position shelf end template onto tower side. Align template line with adjacent wall line. Level template. Mark required Shelf End position for required depth (12in. or 16in. depth). Secure using #8 - 3/4in. screws. 9 11 10 12 21 23. 24. 25. 26.
STEP 8 - Installing Adjustable Shelves 1. 2. 3. 4. Select 24 in. adjustable shelf & insert shelf pins into shelf ends. Adjustable shelves may be placed anywhere within the tower. Place the shelf into the tower by inserting the pins into the tower grooves. Create a shoe shelf by inserting the shelf upside down with the back one groove higher than the front. 1 3. 4. 3 Re-drill hole 1 - 1 1/4 in. deep using a 1/4 in. drill bit. Repeat steps for each shelf end. Insert shelf pin into holes at each end.
10 10‘ (3.05 m) 21.25” (53.96 cm) 72” (183 cm) 8‘ (2.43m) F B 21.75” (55.24 cm) 6‘ (1.82m) D B B B E 26.25” (66.675cm) 96” (243.84 cm) G G 8’ CLOSET CONFIGURATION A • A CONFIGURACION DE 2.43M • A CONFIGURATION DE 2.43M • 72” Long hang shelf can be placed at any height. • Design can be reversed. • Requires cutting of B shelf. CONFIGURATION NOTES: 48” (121.92 cm) A A 42” (106.6cm) 42” (106.6cm) 84” (213.3 cm) 10‘ (3.
CONFIGURATION NOTES: • Requires cutting of A shelf. • A shelves may be placed at any height • Requires drilling of B shelf for use as adjustable shelf. • Design can be reversed.. G 10‘ (3.05 m) 45.75” (116.205 cm) A 8‘ (2.43m) 120” (304.8 cm) 26.25” (66.675cm) E B B B B D 6‘ (1.82m) 48” (121.92 cm) G 10’ CLOSET CONFIGURATION B • B CONFIGURACION DE 3.05M • B CONFIGURATION DE 3.05M A 10‘ (3.
CONFIGURATION NOTES: • Requires cutting of A shelf. • Requires drilling of B shelf for use as adjustable shelf. • Design can be reversed. 10‘ (3.05 m) 8‘ (2.43m) D B B B B E 26.25” (66.675cm) 6‘ (1.82m) 72” (182.88cm) G G 6’ CLOSET CONFIGURATION C • C CONFIGURACION DE 1.82M • C CONFIGURATION DE 1.82M 45.75” (116.205 cm) A A 10‘ (3.05 m) 84” (213.3 cm) 42” (106.6cm) 42” (106.