
Install Instructions
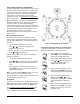
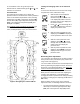


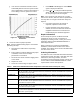


Table Of Contents

A421 Series Standard Electronic Temperature Controls Installation Instructions
11
• The control band (differential) is defined by the On
and OFF values, and the control band between On
and OFF remains fixed (not adjustable).
•Only the OFF value can be adjusted, the control
band remains fixed, and the On value
automatically shifts equal to the OFF value
adjustment.
•The OFF value can only be adjusted to values that
maintain the entire control band within the
restricted temperature adjustment range defined
by HtS and LtS. See Figure 9.
• The basic and advanced menus are not available.
Only the restricted adjustment mode menu is
available and only the OFF value can be adjusted.
See Figure 11.
Setting the Control to Restricted Adjustment Mode
To set up the restricted adjustment feature:
1. Ensure that the A421 is not in the restricted mode
(the jumper is positioned on both pins). See
Figure 10.
2. Select the OFF and On values that define the
application’s required control band (Figure 9).
3. Change the HtS and LtS temperature values to
define the restricted adjustment range (Figure 9).
4. Disconnect power to the control and reposition the
jumper to one pin (Figure 10). Reconnect power.
Control adjustment is now restricted to changing only
the OFF value, which shifts the On/OFF control band
within the restricted adjustment range defined by HtS
and LtS (Figure 9).
Note: To completely restrict (and lockout) all user
adjustment on the control, set the HtS value equal to
the On or OFF value and the LtS value equal to OFF or
On value. Then the (On to OFF) control band is equal
to the restricted adjustment range (LtS to HtS) and the
OFF value cannot be adjusted in the restricted mode.
Adjusting the Control In Restricted Mode
To adjust the OFF value (and shift the On/OFF control
band) within the restricted adjustment range, when the
control is in the restricted adjustment mode:
1. In the Main Screen, press MENU to go to the
restricted adjustment mode menu and display the
OFF parameter code screen (Figure 11).
2. Press MENU again to go to the OFF value screen.
3. In the OFF value screen, press or to change
the OFF value (only within the restricted
adjustment range).
4. Press MENU to save the selected OFF value and
return to the OFF code screen.
Figure 9: Adjustment Behavior in
Restricted Adjustment Mode
Figure 10: Repositioning the Jumper to
Restrict Control Adjustment