
Install Instructions
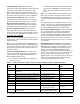


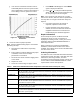


Table Of Contents

A421 Series Standard Electronic Temperature Controls Installation Instructions
13
g. If the sensor’s measured resistance value is
substantially different from the expected value
for that temperature, check the sensor wiring. If
sensor wiring is correct, replace the sensor.
3. Check the A421 for proper operation.
Note: Perform Troubleshooting Steps 1 and 2 before
performing this step.
a. Disconnect the load from the output relay
terminals.
b. Ensure that the Parameter Adjustments jumper
is installed, so that access to adjust
parameters is unrestricted.
c. Reconnect the sensor leads and supply power
to the control.
d. Replace the cover.
e. Check the control settings for proper values.
f. Press MENU until On appears. Press MENU
again to display the On value.
g. Press or to change the On temperature
above and below the sensor temperature until
the relay energizes and de-energizes.
Note: If the anti-short cycle delay is set to a value
other than 0 minutes, when the control is powered On,
the relay does not energize until the time delay has
elapsed.
h. If the output relay does not perform as
expected, replace the A421 control.
i. If proper operation of the A421 control is
verified, reconnect the load and consult the
equipment manufacturer’s instructions for
troubleshooting the controlled equipment.
Repair Information
Do not attempt to repair or recalibrate the A421
temperature control. In case of a defective or
improperly functioning control, contact your nearest
Authorized Johnson Controls/PENN Distributor or
Sales Representative.
When contacting your Johnson Controls/PENN
Distributor, have the model number of the control
available. This number can be found on the label inside
the cover of the control.
Ordering Information
See Table 6 to order a standard A421 Series Electronic
Temperature Control. See Table 7 and Table 8 to order
A99 sensors, mounting hardware, and other
accessories used to install A421 controls. Contact your
nearest Johnson Controls/PENN distributor or sales
representative to order these products.
Figure 12: Temperature versus Sensor
Resistance
Table 6: A421 Series Standard Electronic Temperature Controls Selection Chart (Part 1 of 2)
Product Type Description
A421ABC-02C Line-Voltage Type 1 Electronic Temperature Control: Type 1 (NEMA), IP20 standard enclosure for
DIN rail and surface-mount applications. Rated for 120/240 VAC. Includes an A99BB-200C temperature
sensor with 6.6 ft (2.0 m) cable.
A421ABC-03C Line-Voltage Type 1 Electronic Temperature Control: Type 1 (NEMA), IP20 standard enclosure for
DIN rail and surface-mount applications. Rated for 120/240 VAC. Includes an A99BB-300C temperature
sensor with 9.75 ft (3.0 m) cable.
A421ABC-04C Line-Voltage Type 1 Electronic Temperature Control: Type 1 (NEMA), IP20 standard enclosure for
DIN rail and surface-mount applications. Rated for 120/240 VAC. Includes an A99BB-400C temperature
sensor with 13.1 ft (4.0 m) cable.
A421ABC-06C Line-Voltage Type 1 Electronic Temperature Control: Type 1 (NEMA), IP20 standard enclosure for
DIN rail and surface-mount applications. Rated for 120/240 VAC. Includes an A99BB-600C temperature
sensor with 19.5 ft (6.0 m) cable.
A421AEC-01C Line-Voltage Type 4X Electronic Temperature Control: Type 4X (NEMA), IP66 watertight enclosure
for surface-mount applications. Rated for 120/240 VAC. Includes an A99BB-25C temperature sensor
with 9-7/8 in. (0.25 m) cable.