
Product Overview
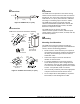
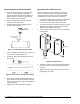
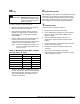
Table Of Contents

Mounting Using an Immersion Well
1. Select the mounting location in the pipe line.
A 1/2 in., 14 NPT, opening is required to
properly install the immersion well (WEL11A-
601R). The pipe’s diameter must be greater
than the length of the well probe.
2. Insert an appropriate amount of thermally
conductive paste in the well.
3. Install the immersion well. Tighten hex nut
securely using a wrench.
Tighten
with Wrench
1/2 inch 14 NPT
Opening
Figure 7: Installing the Immersion Well
4. Using a straight slot screwdriver, loosen the set
screw at top of the immersion well.
5. Thread the spring, then the bushing, onto the
sensor lead.
Figure 8: Insert Sensor, Spring, and Bushing
6. Insert sensor, spring, and bushing into well, so
that at least one-half of the bushing is inserted
into the well, as shown in Figure 8 (bushing will
compress spring).
7. Tighten the set screw against the bushing.
Mounting with a PVC Enclosure
The PVC enclosure can be mounted in a variety of
ways. See Figure 6 for mounting dimensions. When
mounting the PVC enclosure, refer to the Mounting
Considerations section, as well as the following:
• To minimize false readings caused by air movement
through the conduit hole, seal that part of the
enclosure after the sensor has been inserted.
• If a conduit connection is required, snap the conduit
adapter into the bottom opening of the enclosure
and tighten the adapter’s set screw.
1. Loosen the two PVC enclosure screws and remove
the front plate.
Sensor
Sensor
Clip
Front
Plate
PVC Enclosure
Screws
Figure 9: PVC Enclosure
2. Thread the sensor through the bottom opening and
snap the sensor in the sensor clip inside the PVC
enclosure.
3. Replace the front plate on the PVC enclosure and
firmly tighten the screws.
4 A99B Series Temperature Sensors Product/Technical Bulletin