
Product Overview
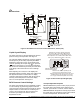

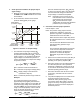
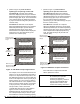
Table Of Contents

P—
P470 Electronic Pressure Control with Display Product/Technical Bulletin
7
Changing Setpoint Values and Anti-short
Cycle Delay Time-Interval
Follow the steps below to change the P470 control
setpoint values and anti-short cycle delay time-interval.
1. Press the Menu button once and
the display changes to a flashing
ci1
(Cut-in Setpoint 1).
If you want to change Cut-in
setpoint 1, proceed to Step 3.
If you want to change another
setpoint value or the anti-short
cycle delay time-interval, proceed
to Step 2.
Note: After 30 seconds of inactivity, the control
reverts to the operating pressure display.
2. Press the Up button once to go to
Cutout Setpoint 1 (
co1
). Press the
Up button again to go to
Cut-in Setpoint 2 (
ci2
), and again
to go to Cutout Setpoint 2 (
co2
),
and once more to go to anti-short
cycle delay (
ASd
).
You may press the Up button
again to go back to Cut-in
Setpoint 1, or press the Down
button (repeatedly) to scroll
through the parameters in reverse
order.
3. Once the parameter you want to
change is flashing on the display,
press the Menu button once. The
current pressure setpoint value
(or delay time-interval) is
displayed.
4. Press the Up or Down button to
change the setpoint value (or
time-interval).
5. Press the Menu button to save
the new value. The display then
returns to the operating pressure
display.
Note: If the Menu button is not pressed within
30 seconds after changing a setpoint or
time-interval value, the control reverts to the
previously programmed setpoint or time
interval value.
Scrolling Through the Adjustable
Setpoints
Figure 10 illustrates the order of the adjustable
setpoints displayed when scrolling through them using
the Up or Down buttons. Press the Up button to scroll
through and display the adjustable setpoints in a
clockwise direction. Press the Down button to scroll
through and display the adjustable setpoints in a
counterclockwise direction.
ci1
ASd
co2
ci2
Up
Button
Down
Button
co1
Figure 10: Order of the Adjustable Setpoints and
Time Delay Interval
IMPORTANT: Before applying power to the
control and controlled equipment,
make sure installation, wiring,
and control settings are
according to the application
requirements. Then power the
equipment and observe the
controlled equipment for at least
three complete operating cycles
before leaving the installation.