
Install Instructions
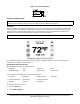
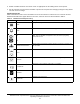
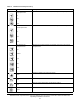
Table Of Contents
- Applications
- North American Emissions Compliance
- United States
- Canada
- Installation
- Parts Included
- Location Considerations
- Installing the Thermostat Controller
- Wiring
- Setup and Adjustments
- Overview
- Customizing the Home Screen
- Touchscreen Icons
- User Lockout
- Using the USB Port
- Loading the Firmware
- Backing Up the Settings
- Restoring the Settings
- Choosing the Communication Mode (TEC3620-00-000, TEC3621-00-000, TEC3622-00-000, and TEC3623-00-000 Models)
- Configuring the Thermostat Controller
- Installer Configuration Menu
- Screen Reset
- Selecting the Unit Type
- By default, the thermostat controller is configured for 4-pipe fan coil mode. To change to a 2-pipe or Pressure-Dependent VAV mode:
- Configuring the Supply Fan - Fan Coil Only
- Setting the Control Mode
- Setting the Fan Mode - Fan Coil Only
- Configuring the Zone Space or Equipment Size
- Changeover
- Dehumidification Control - Fan Coil Only
- Temperature Setpoints
- Configuring Occupancy
- Selecting Schedule Source
- Scheduling
- Setting the Local Schedule
- Overriding the Occupancy Mode
- Enabling Optimal Start
- Enabling the Motion Sensor (TEC3x21-00-000, TEC3x23-00-000 Models)
- PID/PRAC+ Automatic Control Tuning
- Configurable Binary Inputs
- Aux Control
- Commissioning Mode
- Sensor Priority
- Available Fault Diagnostics
- Menus and Submenus
- Troubleshooting
- Repair Information
- TEC3000 Series Proportional Fan Coil and Individual Zone Thermostat Controllers with Dehumidification Capability (Part 1 of 2)

TEC3000 Series Proportional Fan Coil and Individual Zone Thermostat Controllers with Dehumidification
Capability Installation Instructions
17
8. Press BACnet Instance ID.
9. Enter the unique BACnet instance ID through the keypad.
10. Press Save.
11. Press to return to the previous screen.
12. Press BACnet Address.
13. Enter the BACnet MS/TP address through the keypad.
14. Press Save.
15. After selecting N2 in Step 5, press Save.
16. Press to return to the previous screen.
17. Press N2 Address.
18. Enter the N2 address through the keypad.
19. Press Save.
Configuring the Thermostat Controller
Use the Menu icon on the home screen to access and change the basic operating parameters of the thermostat
controller. During normal operation, press the Menu icon once to access the following parameters:
Installer Configuration Menu
The thermostat controller comes from the factory with default settings for all configuration parameters. The
UI menu navigation and default settings are shown in Table 10. Before any outputs turn on, the controller must be
configured for the equipment connected. You need to start from the home screen to perform any of the following
tasks.
Screen Reset
The current screen returns to the home screen if the current screen is not touched for 3 minutes.
Selecting the Unit Type
There are three unit types. They are:
• 4-pipe—This unit type has both heating and cooling coils plus a supply fan. This configuration can also be used
on configurations that are heating or cooling only.
• 2-pipe—This unit type has a single set of pipes that can serve hot or chilled water plus a supply fan. The
Supply Temp Type allows for the connection of an analog sensor or an aquastat to a binary input. Based on the
water temperature or aquastat state, the unit controls heating or cooling.
• VAV—This unit type is designed for a pressure-dependent zone damper and the supply fan outputs are
disabled. The TEC senses the supply air temperature coming from the unit. The Supply Temp Type setting
allows for the connection of an analog sensor or binary duct thermostat. Based on the air temperature or duct
thermostat state, the zone damper controls for heating or cooling. The TEC does not control the unit delivering
the air. The logic needs to be part of another controller.
By default, the thermostat controller is configured for 4-pipe fan coil mode. To change to a 2-pipe or
Pressure-Dependent VAV mode:
1. Press the Menu icon.
• Faults Status • Display Settings • Equipment Setup • Controller Information
• Setpoints • Control Setup • System Status • Commissioning
• Schedule • Network Setup • Control Status • Update