
User's Manual


38
minnkotamotors.com
I-PILOT SETUP
From the Humminbird:
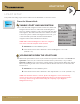
ENABLE I-PILOT LINK NAVIGATION
To start i-Pilot Link navigation from the control head, i-Pilot Link
Navigation must be turned on. When i-Pilot Link Navigation is
turned on, starting navigation on the control head will start i-Pilot
Link navigation. The related i-Pilot Link menus will also be added
to the menu system. If i-Pilot Link navigation is turned off, your
control head will operate with its traditional Humminbird
navigation features with a GPS Receiver attached.
NOTE: When i-Pilot Link Navigation is turned on, navigation
from other connected autopilots will be cancelled.
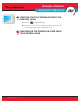
1. Main Menu: Press the MENU key twice.
2. Select the Accessories tab > i-Pilot Link > i-Pilot Link Navigation > On or Off.
(Default = On)
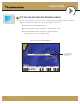
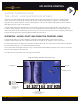
UPLOAD DATA FROM THE I-PILOT LINK
When Auto Upload Data is turned on, the control head copies the i-Pilot Link’s saved iTracks and
Spot-Locks. In this case, the control head and i-Pilot Link are synchronized, so if you delete a
Spot-Lock or iTrack on the control head, it will be deleted on the i-Pilot Link. When Auto Upload
Data is off, deleting an item on the control head will not affect the data stored on the i-Pilot Link
and vice versa.
1. Main Menu: Press the MENU key twice.
2. Select the Accessories tab > i-Pilot Link > Auto Upload Data > On or Off. (Default = On)
NOTE: The maximum number of iTracks, Spot-Locks, Waypoints, routes, and tracks may
vary due to the setup of your Waypoint Management directory. Groups and sub-groups also
use storage, and the storage limit is influenced by the complexity of your Waypoint
Management directory.
I-PILOT SETUP
This system wide setting may be selected either from the Humminbird or from the remote.