www.joinwit.com NOTICE All trademarks and names mentioned in this manual belong to Shanghai Joinwit. Shanghai Joinwit has the right of the manual interpretation. Trademarks All trademarks mentioned in this manual are registered property of Joinwit. Explanation The content of this manual is subject to Joinwit’s explanation.
www.joinwit.com Contents i. overview ----------------------------------------------------------1 ii. Technical Specifications ----------------------------------------2 iii. Technical Specifications ----------------------------------------3 iv. Instrument Introduction --------------------------------------4-5 v. Instructions for Use -----------------------------------------5-19 vi. Troubleshooting ------------------------------------------------19 vii.
www.joinwit.com i、Overview JW3209 is the company highly cost-effective optical multimeter. It’s the integration of power meter and light source. JW3209 has the function of recording, storing and uploading the data tested by the instrument. They are widely used in the fiber-optic line project construction, testing and maintenance, such as digital data network, telecommunication network and cable television.
www.joinwit.com ii、Technical Specifications① Instrument model JW3209A parameters JW3209C Power meter Calibration 850、1300、 1310、1490、1550、1625 wavelength(nm) Testing range(dBm) Display resolution(dB) -70~+6 0.01 Uncertainty(dB) ≤±0.25 linearity(dB) ≤±0.1 Frequency indentification range -50~+26 <10K Source Working wavelenght(nm) 1310/1550(customizable) Typical Output Power(dBm) -5(customizable) Stability(dB,30min,20℃) ≤0.
www.joinwit.com iii、Standard 1. 2. 3. 4. 5. 6. 7. 8. 9.
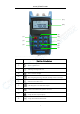
www.joinwit.com (11) (10) (9) (1) (8) (2) (7) (3) (6) (5) (4) 图 4-1 Function Introduction ① :Turn on or off the meter ② :Switching wavelength under test ③ :Turn on or off the backlight ④ :data testing storage\Viewing; automatic switching of source wavelength ⑤ :delete the current data record ⑥ :unit change;turn on or off the source output ⑦ :relative value measurement;system is set to zero ⑧ :change the source output frequency ⑨ :change the instrument function mode 4
www.joinwit.com ⑩ Meter display window Mini USB interface: ⑪ data communication interface;adapter power supply interface ⑫ Laser source output port ⑬ Power meter testing input port v、Instructions for Use When powered by dry battery, the bottom left corner of the instrument screen will display Auto-off sign after turning on ;if no other operations within 10mins, the instrument will be off automatically, short press “ ” the auto-off will be cancelled.
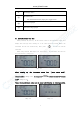
www.joinwit.com 1. Power meter mode (1) :Sequentially switching to the meter internal tested wavelength (2) :change among dBm、dB、XW in turn (image5-4) dBm unit dB unit xW unit Image 5-4 (3) : ① Short press button,start REF function.
www.joinwit.com When the meter needs “System Zero”, the dust cap of the power meter detecting port must be tightened to ensure no light input. And then long press this button for about 5 seconds to have the automatic “System Zero” and the previous screen. (image 5-6) Image 5-6 (4) : Press the button under power meter mode,SAVE function will respond.
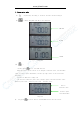
www.joinwit.com 1 Image 5-8 (5) button: Delete data:in the data view status,press button to delete the current record. 2. Source mode (1) button:Sequentially switching to the meter internal source wavelength. (2) button:turn on or off the laser output in the source .(image 5-9) Image 5-9 (3) button:After turning on the laser in the source module, press the button to come to 0HZ, 270HZ, 1000HZ, 2000HZ in turn.
www.joinwit.com 图 5-11 Short press button,the meter top right corner displays”--AU”to indicate this function is started. Meanwhile, the laser output wavelength in the source module will be switched automatically according to the change of the same wavelength in the power meter module. For example:the meter internal source module has 1310/1490/1550 wavelength,the test wavelength in the power meter module is 850/1300/1310/1490/1550/1625.
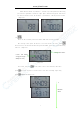
www.joinwit.com frequency with the power range more than -20dBm. 6.Power meter calibration mode In the power meter mode,press“ ”and“ ”, at the same time, “U-01”will appear on the screen top right corner, indicating that the meter has come to power value calibration mode. Press “ ”and “ ” to increase or decrease the absolute optical power value. When the adjusted value is what you need, you can press “ ” to save the current calibration value.
www.joinwit.com are successfully installed. 7.1 Install driver Running the CD-ROM on the computer to find the “driver”installation file,image 5-16。 Image 5-16 Double-click the icon,image 5-17 appears Image 5-17 click“INSTALL” ,After a moment,image 5-18 appears. Image 5-18 Click “OK” and exit the installation interface. Driver installation has not been completed at this time, please continue the operation below. Connect the instrument and the computer by USB data cord.
www.joinwit.com Image 5-19 Click Next to appear image 5-20。 Image 5-20 After a moment,image 5-21 appears. Image 5-21 Click Finish, driver installation is completed. Please check that if the driver is installed to avoid the communication problem between the instrument and the computer Open device manager (right-click My Computer to select properties. Then select the hardware tab on the system properties interface.
www.joinwit.com Image 5-22 Image 5-23 After the successful driver installation, you can turn off the instrument and disconnect the USB. 7.2 Instruction for the Software Use (1)Open the PC software to show the image 5-24.
www.joinwit.com Image 5-24 The instrument is connected to the computer by a USB cable and in the state of being switched on. In the port(COM and LPT) column, you can see the port used by the instrument is “COM4”(image 5-25) Image 5-25 So when to select the software port, you can click the drop-down menu to choose “COM4”.
www.joinwit.com Image 5-26 After port selection, click the “Open Com“button, and then click “Connect” button.(image 5-27) When the successful connection box appears, click OK to finish connection. And now you can start the communication between the instrument and computer。(image5-28) Image 5-27 Image 5-28 (2) The data processing function use First, fill in the basic information, including the testing person, instrument type and so on.
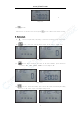
www.joinwit.com Image 5-30 You can process the data in the data display area, including delete, save and print. Choose the data needing process; click the “Delete Select” button to delete the selected data, as in the image 5-31 and 5-32,and also the corresponding data stored in the meter are also deleted. Image 5-31 Image 5-32 Click the “Delete all” button to appear the “Delete all” box in the image 5-33, click OK to delete all the data and also empty the stored data in the meter.
www.joinwit.com Image 5-33 Click the “Save or Print” button to appear the sheet in the image 5-34. The sheet can be edited, saved, printed and etc. Click button to appear save box in the image 5-35. You can operate the file name, save path, etc.
www.joinwit.
www.joinwit.com Image 5-38 (5)Close Software Click the “Exit”button is OK.
www.joinwit.com and to avoid measurement deviation due to the long exposure to the air. 4. Carefully insert or remove the optical adapter connector to avoid port scratches. 5. Clean the optical adapter connector regularly and use the special cleaning swab to wipe around it gently. viii、Quality Assurance To repair JW3209 by yourself is not advised. 1. Instrument warranty is within 18 months against shipment. Joinwit Company promises 18 months product warranty against shipment.
www.joinwit.com Attachment1 Product Warranty Card Joinwit Optoelectronic Tech, Co., Ltd Product warranty card Product model: Product serial number: purchase date: User name: Tel: Address: Zip code: Fax: E——mail: Stamp: (Please keep this part.
www.joinwit.com Attachment2 Warranty Conditions Joinwit Optoelectronic Tech, Co., Ltd Warranty conditions warranty: Within 18 months after buying date Warranty terms: i. In the warranty period, if the product failure occurs under normal use, the user can produce this warranty card and invoice or receipt (copy) to enjoy free repair service. ii. In the following situations, the repair is charged.