2-18 19-35 36-52
INTRODUCTION Dear customer! Congratulations on your choice to buy a Jonsered product! Your purchase gives you access to professional help with repairs and service whenever this may be necessary. If the retailer who sells your machine is not one of our authorized dealers, ask for the address of your nearest servicing dealer. It is our wish that you will be satisfied with your product and that it will be your companion for a long time. Think of this operator′s manual as a valuable document.
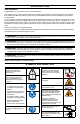
WHAT IS WHAT? 8 27 9 7 17 28 5 3 14 2 30 11 10 15 12 6 21 4 25 1 22 16 29 23 13 20 19 24 18 26 1. Grass blade 22. Trimmer head 2. Grease filler cap 23. Socket wrench 3. Bevel gear 24. Transport guard 4. Cutting attachment guard 25. Hex wrench 5. Shaft 26. Harness 6. Handlebar 27. Start throttle button 7. Throttle control 28. Throttle wire 8. Stop switch 29. Operator’s manual 9. Throttle lock-out 30. Clamp assembly 10. Harness clamp 31.
GENERAL SAFETY PRECAUTIONS Important Personal protective equipment ●● A clearing saw, brushcutter or trimmer can be dangerous if used incorrectly or carelessly, and can cause serious or fatal injury to the operator or others. It is extremely important that you read and understand the contents of this operator's manual. aaWARNING: You must use approved personal protective equipment whenever you use the machine.
Boots Wear anti-slip and stable boots. Make sure the throttle control is locked when the throttle lock-out is released. Clothing Wear clothes made of a strong fabric and avoid loose clothing that can catch on shrubs and branches. Always wear heavy, long pants. Do not wear jewelry, shorts sandals or go barefoot. Secure hair so it is above shoulder level. First Aid Kit A first aid kit should be carried by operators of clearing saws, brushcutters or trimmers.
Cutting attachment guard In areas that have a warm and dry climate there is a significant risk of fire. We therefore fit certain mufflers with a spark arrestor mesh. Check whether the muffler on your machine is fitted with this kind of mesh. This guard is intended to prevent loose objects from being thrown towards the operator. The guard also protects the operator from accidental contact with the cutting attachment. Check that the guard is undamaged and not cracked.
Check the cutting attachment for damage or cracks. A damaged cutting attachment should always be replaced. The nylon lining inside the locking nut must not be so worn that you can turn it by hand. The lining should offer a resistance of at least 1.5 Nm (1,1 ft lb). The nut should be replaced after it has been put on approximately 10 times. Sharpening grass cutters and grass blades See the cutting attachment packaging for correct sharpening instructions.
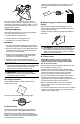
ASSEMBLY NOTE: Make sure unit is assembled correctly as shown in this manual. Fitting the handlebar 1. Remove the screw at the rear of the throttle handle. 2. Slide the throttle handle onto the right side of the handlebar. 3. Align the screw hole in the throttle handle with the hole in the handlebar. Assembling the cutting equipment 4. Refit the screw in the hole in the rear of the throttle handle.
Standard harness Safety release At the front is an easily accessible, quick release. Use this in an emergency situation that requires you to free yourself from the machine and harness quickly. Correct balance Forestry clearing The machine is balanced by moving the suspension ring on the machine forwards or backwards. The machine is correctly balanced when it freely hangs horizontally from the support hook. In this way the risk of hitting stones is reduced if you need to release the handlebar.
FUEL HANDLING Fuel safety [(R+M)/2]. If you run the engine on a lower octane grade gasoline, so-called knocking can occur. This gives rise to a high engine temperature, which can result in serious engine damage. Never start the machine: ●● If you have spilt fuel on it. Wipe off the spillage and allow remaining fuel to evaporate. ●● When working at continuous high revs a higher octane rating is recommended. ●● If you have spilt fuel on yourself or your clothes, change your clothes.
If you have spilled fuel on it. Wipe off the spillage and allow remaining fuel to evaporate. aaWARNING: The catalytic converter muffler gets very hot during and after use. This also applies during idling. Be aware of the fire hazard, especially when working near flammable substances and/or vapours. Clean the area around the fuel cap. Contamination in the tank can cause operating problems. Ensure that the fuel is well mixed by shaking the container before filling the tank.
2. Choke: Set the choke control in the choke position. Warm engine 1. Primer bulb: Press the air purge diaphragm repeatedly until fuel begins to fill the diaphragm (about 10 times). The diaphragm need not be completely filled. 2. Repeat pulling the cord until engine attempts to start (or maximum 3 pulls).
WORKING TECHNIQUES IMPORTANT: aaWARNING: Neither the operator of the This section describes the basic safety precautions for working with trimmers. If you encounter a situation where you are uncertain how to proceed you should ask an expert. Contact your servicing dealer. Avoid all usage which you consider to be beyond your capability. You must understand the difference between forestry clearing, grass clearing and grass trimming before use.
Grass trimming with a trimmer head Trimming ●● Hold the trimmer head just above the ground at an angle. It is the end of the trimmer line that does the work. Let the trimmer line work at its own pace. Never press the trimmer line into the area to be cut. ●● Do not allow the trimmer head to constantly come into contact with the ground during normal cutting. Constant contact of this type can cause damage and wear to the trimmer head.
aaWARNING: The cutting attachment may be spinning during carburetor adjustments. Wear your protective equipment and observe all safety instructions. Be sure the cutting attachment stops turning when the engine idles. When the unit is turned off, make sure the cutting attachment has stopped before the unit is set down. CAUTION: If the cutting attachment rotates when the engine is idling the idle adjustment screw T should be turned counterclockwise until the cutting attachment stops.
electrode gap is 0.024 inch (0.6 mm). The spark plug should be replaced after about a month in operation or earlier if necessary. Maintenance schedule CAUTION: Always use the recommended spark plug type. Use of the wrong spark plug can damage the piston/cylinder. ●● Make sure the throttle trigger lock and the throttle function correctly from a safety point of view. Air filter ●● Check that the cutting attachment does not rotate at idle.
TECHNICAL DATA A05328CBJN Engine Cylinder displacement, cm3 Cylinder bore, mm Stroke, mm Idle speed, rpm Recommended max. fast idle speed, rpm Speed of output shaft, rpm Max. engine output, acc.
U.S. EPA / CALIFORNIA / ENVIRONMENT CANADA EMISSION CONTROL WARRANTY STATEMENT IMPORTANT: This product is compliant with U.S. EPA Phase 3 regulations for exhaust and evaporative emissions. To ensure EPA Phase 3 compliance, we recommend using only genuine replacement parts. Use of non-compliant replacement parts is a violation of federal law. YOUR WARRANTY RIGHTS AND OBLIGATIONS: The U.S.
1 2 3 6m 20 3m 10 4 5 6 7 9 8