EPA I EPA I Operator’s manual (EPA) Please read the operator’s manual carefully and make sure you understand the instructions before using the machine.
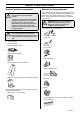
KEY TO SYMBOLS Key to symbols Refuelling. WARNING! Chain saws can be dangerous! Careless or incorrect use can result in serious or fatal injury to the operator or others. Filling with oil and adjusting oil flow. Please read the operator’s manual carefully and make sure you understand the instructions before using the machine. If your machine bears this symbol it is equipped with carburettor heating.
CONTENTS Contents KEY TO SYMBOLS Key to symbols .............................................................. CONTENTS Contents ....................................................................... Before using a new chain saw ...................................... SAFETY INSTRUCTIONS Personal protective equipment ...................................... Machine′s safety equipment ......................................... Checking, maintaining and servicing the machine′s safety equipment ..................
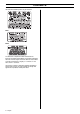
CONTENTS You will find the following labels on your machine: EPA I EPA II The Emissions Compliance Period referred to on the Emission Compliance label indicates the number of operating hours for which the engine has been shown to meet Federal emissions requirements. Category C = 50 hours, B = 125 hours, and A = 300 hours. Jonsered has a policy of continuous product development and therefore reserves the right to modify the design and appearance of products without prior notice.
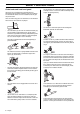
SAFETY INSTRUCTIONS Personal protective equipment ! WARNING! Most chain saw accidents happen when the chain touches the operator. You must use approved personal protective equipment whenever you use the machine. Personal protective equipment cannot eliminate the risk of injury but it will reduce the degree of injury if an accident does happen. Ask your dealer for help in choosing the right equipment. ! WARNING! Long or continuous exposure to high noise levels may cause permanent hearing impairment.
SAFETY INSTRUCTIONS Chain brake and front hand guard due to kickback, you should also apply the chain brake manually if there is a risk of the chain accidentally hitting anyone or anything close by. Your chain saw is equipped with a chain brake that is designed to stop the chain immediately if you get a kickback. The chain brake reduces the risk of accidents, but only you can prevent them. Take care when using your saw and make sure the kickback zone of the bar never touches any object.
SAFETY INSTRUCTIONS it cannot affect the movement of the front hand guard, the chain brake can only be activated by the inertia of the counterweight. • The inertia activated chain brake is a valuable feature but there are certain factors to remember (see point above). Throttle lock The throttle lock is designed to prevent accidental operation of the throttle control. When you press the lock (A) (i.e. when you grasp the handle) it releases the throttle control (B).
SAFETY INSTRUCTIONS Muffler The muffler is designed to keep noise levels to a minimum and to direct exhaust fumes away from the user. Checking, maintaining and servicing the machine′s safety equipment ! ! WARNING! The exhaust fumes from the engine are hot and may contain sparks which can start a fire. Never start the machine indoors or near combustible material! WARNING! All servicing and repair work on the machine requires special training. This is especially true of the machine′s safety equipment.
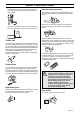
SAFETY INSTRUCTIONS Checking the inertia brake release Throttle lock Hold the chain saw over a stump or other firm object. Let go of the front handle so that the bar drops towards the stump as the chain saw rotates around the rear handle. • Make sure the throttle control is locked at the idle setting when the throttle lock is released. • Press the throttle lock and make sure it returns to its original position when you release it.
SAFETY INSTRUCTIONS Vibration damping system Never use a muffler if the spark arrestor mesh is missing or defective. ! Regularly check the vibration damping units for cracks or deformation. Make sure the vibration damping units are securely attached to the engine unit and handle unit. Stop switch WARNING! Never use a machine with faulty safety equipment. The machine’s safety equipment must be checked and maintained as described in this section.
SAFETY INSTRUCTIONS Cutting equipment designed to minimise kickback ! WARNING! Faulty cutting equipment or the wrong combination of bar and chain increases the risk of kickback! Use only the bar and chain combinations that we recommend. See the Technical data section. The only way to avoid kickback is to make sure that the kickback zone of the bar never touches anything.
SAFETY INSTRUCTIONS • Level of kickback reduction. The level of kickback reduction offered by a chain is only indicated by its model number. See the Technical data section to find the model numbers of chains that are recommended for use with your model of chain saw.
SAFETY INSTRUCTIONS • • Always file cutting teeth from the inside face. Reduce the pressure on the return stroke. File all the teeth on one side first, then turn the chain saw over and file the teeth on the other side. • Place the gauge over the raker lip. • Place the file over the part of the lip that protrudes through the gauge and file off the excess. The clearance is correct when you no longer feel any resistance as you draw the file over the gauge. File all the teeth to the same length.
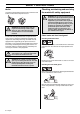
SAFETY INSTRUCTIONS • Use the combination spanner to tighten the bar nuts while lifting the tip of the bar at the same time. Check that you can pull the chain round freely by hand and that it does not sag from the underside of the bar. Checking chain lubrication • Check the chain lubrication each time you refuel. Aim the tip of the bar at a light coloured surface about 20 cm (8 inches) away. After 1 minute running at 3/4 throttle you should see a distinct line of oil on the light surface.
SAFETY INSTRUCTIONS Needle bearing lubrication Bar The clutch drum is fitted with one of the following drive sprockets: Check regularly: • Whether there are burrs on the edges of the bar. Remove these with a file if necessary. • Whether the groove in the bar has become badly worn. Replace the bar if necessary. • Whether the tip of the bar is uneven or badly worn. If a hollow forms on the underside of the bar tip this is due to running with a slack chain.
SAFETY INSTRUCTIONS How to avoid kickback ! WARNING! Kickback can happen very suddenly and violently; kicking the chain saw, bar and chain back at the user. If this happens when the chain is moving it can cause very serious, even fatal injuries. It is vital you understand what causes kickback and that you can avoid it by taking care and using the right working technique. Do not let go of the handles! 3 Most kickback accidents happen during limbing.
SAFETY INSTRUCTIONS Unless the user resists this pushing force there is a risk that the chain saw will move so far backwards that only the kickback zone of the bar is in contact with the tree, which will lead to a kickback. • Never use any accessories other than those recommended in this manual. See instructions under the headings Cutting equipment and Technical data. ! Cutting with the bottom edge of the bar, i.e. from the top of the object downwards, is known as cutting on the pull stroke.
SAFETY INSTRUCTIONS objects. Then grasp the starter handle with your right hand and pull the starter cord. Never wrap the starter cord around your hand Fuel safety • Always store fuel in an approved container designed for that purpose. • For longer periods of storage or for transport of the chain saw, the fuel and chain oil tanks should be emptied. Ask where you can dispose of waste fuel and chain oil at your local gas station.
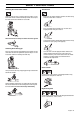
SAFETY INSTRUCTIONS • • Make sure you can move and stand safely. Check the area around you for possible obstacles (roots, rocks, branches, ditches, etc.) in case you have to move suddenly. Take great care when working on sloping ground. Take the utmost care when cutting through branches or logs that are in tension. A log or branch that is in tension can suddenly spring back into its natural position before or after you cut it.
SAFETY INSTRUCTIONS In most cases you can avoid these problems by cutting in two stages; from the top and from the bottom. You need to support the object so that it will not trap the chain or split during cutting. ! WARNING! If the chain jams in the cut: stop the engine! Don’t try to pull the chain saw free. If you do you may be injured by the chain when the chain saw suddenly breaks free. Use a lever to open up the cut and free the chain saw.
SAFETY INSTRUCTIONS Tree felling technique ! WARNING! It takes a lot of experience to fell a tree. Inexperienced users of chain saws should not fell trees. Do not attempt any task that you feel unsure of! Safe distance The safe distance between a tree that is to be felled and anyone else working nearby is at least 21/2 tree lengths. Make sure that no-one else is in this ”risk zone” before or during felling.
SAFETY INSTRUCTIONS The directional cuts should run 1/4 of the diameter through the trunk and the angle between the top cut and bottom cut should be 45°. All control over the felling direction is lost if the felling hinge is too narrow or non-existent, or if the directional cuts and felling cut are badly placed. The line where the two cuts meet is called the directional cut line. This line should be perfectly horizontal and at right angles (90°) to the chosen felling direction.
SAFETY INSTRUCTIONS Freeing a tree that has fallen badly Limbing ! WARNING! Most kickback accidents happen during limbing! Pay close attention to the position of the kickback zone of the bar when you are limbing branches that are in tension! Freeing a ”trapped tree” It is very dangerous to remove a trapped tree and there is high accident risk. The safest method is to use a winch. • Tractor-mounted • Portable Make sure that you can stand and move about safely. Work on the left side of the trunk.
WHAT IS WHAT? What is what on the chain saw? 1 Cylinder cover 16 Spike bumper 2 Front handle 17 Chain catcher (Catches chain if it jumps or breaks.) 3 Front hand guard 18 Clutch cover 4 Starter 5 Chain oil tank 19 Right hand guard (Protects right hand if chain breaks or jumps.) 6 Starter handle 7 Adjuster screws, carburettor 8 Choke control/Start throttle lock 9 Rear handle 10 Stop switch (Ignition on/off switch.
ASSEMBLY Fitting the bar and chain ! The chain is correctly tensioned when it does not sag from the underside of the bar, but can still be turned easily by hand. Hold up the bar tip and tighten the bar nuts with the combination spanner. WARNING! Always wear gloves, when working with the chain, in order to protect your hands from injury. Check that the chain brake is in disengaged position by moving the front hand guard towards the front handle.
FUEL HANDLING Fuel Mixing CAUTION! The machine is equipped with a two-stroke engine and must always been run using a mixture of gasoline and two-stroke engine oil. It is important to accurately measure the amount of oil to be mixed to ensure that the correct mixture is obtained. When mixing small amounts of fuel, even small inaccuracies can drastically affect the ratio of the mixture. • Always mix the gasoline and oil in a clean container intended for fuel.
FUEL HANDLING Chain oil • The chain lubrication system is automatic and we recommend the use of special oil (chain oil) with good adhesion characteristics. Fuelling ! WARNING! Taking the following precautions, will lessen the risk of fire: Do not smoke or place hot objects near fuel. Always shut off the engine before refuelling. When refuelling, open the fuel cap slowly so that any excess pressure is released gently. Tighten the fuel cap carefully after refuelling.
STARTING AND STOPPING Starting and stopping ! Warm engine WARNING! Note the following before starting: Never start a chain saw unless the bar, chain and all covers are fitted correctly. Otherwise the clutch can come loose and cause personal injuries. Use the same procedure as for starting a cold engine but without setting the choke control in the choke position. The correct choke/start throttle setting is obtained by moving the choke control to the choke position and then pushing it in again.
STARTING AND STOPPING Pull the front hand guard towards the front handle. The chain brake is now disengaged. Your saw is ready for use. Stopping Stop the engine by switching off the ignition.
MAINTENANCE Carburettor Your Jonsered product has been designed and manufactured to specifications that reduce harmful emissions. After your unit has been run 8-10 tanks of fuel the engine has broken in. To ensure that your unit is at peak performance and producing the least amount of harmful emissions after break in, have your authorized servicing dealer, who has a revolution counter at his disposal, to adjust your carburetor for optimum operating conditions..
MAINTENANCE until the engine runs smoothly. The high speed needle H is correctly set when the saw “4-cycles” a little. If the machine “whistles“ the setting is too lean. If there is too much exhaust gas at the same time as the machine “4-cycles” much, the setting is too rich. Turn the high speed needle H until the setting sounds correct. • Undo the screw in the centre of the pulley and remove the pulley. Insert and fasten a new starter cord to the pulley. Wind approx.
MAINTENANCE Fitting the starter Spark plug • To fit the starter, first pull out the starter cord and place the starter in position against the crankcase. Then slowly release the starter cord so that the pulley engages with the pawls. The spark plug condition is influenced by: • Fit and tighten the screws that hold the starter. • Incorrect carburettor adjustment. • Wrong fuel mixture (too much oil). • A dirty air filter.
MAINTENANCE Needle bearing lubrication Cooling system The clutch drum is fitted with one of the following drive sprockets: To keep the working temperature as low as possible the machine is equipped with a cooling system. A Spur sprocket (the chain sprocket is welded on the drum) The cooling system consists of: 5 B Rim sprocket (replaceable) 4 3 Both versions have a needle bearing on the drive shaft, which has to be greased regularly (once a week).
MAINTENANCE Heated handles (CS 2156W, CS 2159W) On models with the model code W, both the front handle bar and the rear handle are equipped with electrical heating coils. These are supplied with electricity from a generator built into the chain saw. When the switch is pushed upwards, the heat is switched on. When the switch is pushed downwards, the heat is switched off.
MAINTENANCE Below you will find some general maintenance instructions. Weekly maintenance 3 2 1 Daily maintenance 1 2 3 4 4 7 1 2 5 6 8 0,5 mm 5 6 7 9 Check the throttle trigger for smooth operation. If any binding occurs, or if engine fails to return to idle, the machine should be taken to your dealer, befor it is used again. Also, be sure that the trigger cannot be pulled until the throttle trigger lockout is depressed. Clean the chain brake and check that it operates safely.
TECHNICAL DATA Technical data CS 2156 CS 2159 3,45/56,5 3,60/59,0 Engine Cylinder volume, cu.
TECHNICAL DATA Recommended original and replacement bar and chain combinations Following is a list of recommended cutting equipment for the Jonsered chain saw model 2156 and 2159. The combinations of power head, bar and chain have been investigated in accordance with the kickback and vibration requirements of ANSI B 175.1–2000. The guide bar nose radius is determined by either the maximum number of teeth in the nose sprocket or the corresponding maximum nose radius of a solid bar.
FEDERAL EMISSION CONTROL WARRANTY STATEMENT YOUR WARRANTY RIGHTS AND OBLIGATIONS The EPA (The US Environmental Protection Agency), Environment Canada and Jonsered are pleased to explain the emissions control system warranty on your 2001 and later small nonroad engine. In U.S. and Canada, new small nonroad engines must be designed, built and equipped to meet the federal stringent anti-smog standards.
1088891-95 ´®z*xy3¶5A¨ ´®z*xy3¶5A¨ 2003-10-23