Operator´s manual EPA I Please read these instructions carefully and make sure you understand them before using the saw.
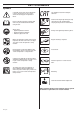
KEY TO SYMBOLS Symbols CAUTION! Chain saws can be dangerous! Careless or incorrect use can result in serious or fatal injury to the operator or others. Please read the instructions carefully and make sure you understand them before using the saw. Always wear: • Approved protective helmet • Approved hearing protection • Protective glasses or visor Both of the operator´s hands must be used to operate the chain saw. Please see page 30 in your "Chain saw operator´s safety manual".
CONTENTS Before using a new saw • Read the instructions carefully. • Check cutting equipment is correctly fitted and adjusted. See page 25. • Refuel and start the saw. Check the carburetor settings. See pages 26-29. • Do not use the saw until sufficient chain oil has reached the chain, see page 14. IMPORTANT! If the carburetor mixture is too lean it greatly increases the risk of engine failure. Poor maintenance of the air filter will cause carbon build-up on the spark plug and lead to difficult starting.
SAFETY INSTRUCTIONS PERSONAL PROTECTIVE EQUIPMENT MOST CHAIN SAW ACCIDENTS HAPPEN WHEN THE CHAIN TOUCHES THE OPERATOR. You must wear approved safety equipment whenever you use a chain saw. Personal safety equipment cannot eliminate the risk of injury but it will reduce the degree of injury if an accident does happen. Ask your chain saw dealer for help in choosing the right equipment.
SAFETY INSTRUCTIONS 1 Chain brake and front hand guard YOUR chain saw is equipped with a chain brake that is designed to stop the chain immediately if you get a kickback. The chain brake reduces the risk of accidents, but only You can prevent them. Take care when using your saw and make sure the kickback zone of the bar never touches any object. 1 The chain brake (A) can either be activated manually (by your left hand) or automatically by the inertia release mechanism (a freeswinging pendulum).
SAFETY INSTRUCTIONS 6 The way the chain brake is triggered, either manually or automatically, depends on the force of the kickback and the position of the chain saw in relation to the object that the kickback zone of the bar strikes. If you get a violent kickback while the kickback zone of the bar is farthest away from you the chain brake will be activated by the movement of the counterweight (INERTIA ACTIVATED).
SAFETY INSTRUCTIONS 5 Vibration damping system 6 Stop switch Your chain saw is equipped with a vibration damping system that is designed to minimise vibrations and make operation easier. Use the stop switch to switch off the engine. When you use a chain saw vibrations are generated by the uneven contact between the chain and the wood you are cutting. Cutting hardwoods (most broadleaf trees) creates more vibration than cutting softwoods (most conifers).
SAFETY INSTRUCTIONS Inspecting, maintaining and servicing chain saw safety equipment 3 SPECIAL TRAINING IS REQUIRED to service and repair chain saws. This is especially true of chain saw safety equipment. If your chain saw fails any of the checks described below take it to your SERVICE AGENT. When you buy any of our products we guarantee the availability of professional repairs and service. If the retailer who sells your saw is not a SERVICING DEALER, ask him for the address of your nearest SERVICE AGENT.
SAFETY INSTRUCTIONS 2 Throttle lock 1 Make sure the throttle control is locked at the idle setting when you release the throttle lock. 2 Press the throttle lock and make sure it returns to its original position when you release it. 4 Right hand guard Check that the right hand guard is not damaged and that there are no visible defects, such as cracks.
SAFETY INSTRUCTIONS 7 Muffler Never use a chain saw that has a faulty muffler. CUTTING EQUIPMENT This section describes how to choose and maintain your cutting equipment in order to: • Reduce the risk of kickback. • Reduce the risk of the chain breaking or jumping. • Obtain maximum cutting performance. • Extend the life of cutting equipment. The 5 basic rules 1 Only use cutting equipment recommended by us! See the ”Technical data” section.
SAFETY INSTRUCTIONS 1 Cutting equipment designed to minimise kickback Faulty cutting equipment or the wrong combination of bar and chain increases the risk of kickback. Use only the bar and chain combinations recommended in the ”Technical data” section. The only way to avoid kickback is to make sure that the kickback zone of the bar never touches anything. By using cutting equipment with “built-in” kickback protection and keeping the chain sharp and well-maintained you can reduce the effects of kickback.
SAFETY INSTRUCTIONS 2 Sharpening your chain and adjusting raker clearance The risk of kickback is increased with a badly sharpened chain! It is very difficult to sharpen a chain correctly without the right equipment. We recommend you use a file gauge. This will help you obtain the maximum kickback reduction and cutting performance from your chain. A General information on sharpening cutting teeth • Never use a blunt chain.
SAFETY INSTRUCTIONS C General advice on setting raker clearance • When you sharpen the cutting teeth you reduce the RAKER CLEARANCE (cutting depth). To maintain cutting performance you must file back the raker teeth to the recommended height. See the ”Technical data” section to find the raker clearance for your saw chain. • On a low-kickback cutting link the front edge of the raker lip is rounded. It is very important that you maintain this radius or bevel when you adjust the raker clearance.
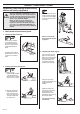
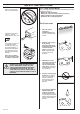
SAFETY INSTRUCTIONS 4 Lubricating cutting equipment 1 2 Undo the bar nuts that hold the clutch cover and chain brake, using the combination spanner. Then tighten the nuts by hand as tight as you can. Raise the tip of the bar and stretch the chain by tightening the chain tensioning screw using the combination spanner. Tighten the chain until it not hang slack on the underside of the bar. Poor lubrication of cutting equipment may cause the chain to snap and lead to serious, even fatal injuries.
SAFETY INSTRUCTIONS C Checking chain lubrication E Needle bearing maintenance • Check the chain lubrication each time you refuel. Aim the tip of the saw at a light coloured surface about 20 cm away. After 1 minute running at 3/4 throttle you should see a distinct line of oil on the light surface.
SAFETY INSTRUCTIONS HOW TO AVOID KICKBACK H Bar Check regularly: • Whether there are burrs on the edges of the bar. Remove these with a file if necessary. Kickback can happen very suddenly and violently; kicking the saw, bar and chain back at the user. If this happens when the chain is moving it can cause very serious, even fatal injuries. It is vital you understand what causes kickback and that you can avoid it by taking care and using the right working technique.
SAFETY INSTRUCTIONS General rules 1 If you understand what kickback is and how it happens then you can reduce or eliminate the element of surprise. By being prepared you reduce the risk. Kickback is usually quite mild, but it can sometimes be very sudden and violent. 2 Always hold the saw firmly with your right hand on the rear handle and your left hand on the front handle. 7 Take great care when you cut with the top edge of the bar, i.e. when cutting from the underside of the object.
SAFETY INSTRUCTIONS GENERAL SAFETY PRECAUTIONS 1 2 FUEL SAFETY (Refuelling, fuel mixture, storage.) Chain saws are designed solely for cutting wood. The only cutting equipment that can be used with this chain saw are the combinations of bars and chains recommended in the ”Technical data” section. WARNING! The catalytic converter muffler gets very hot during and after use. This also applies during idling. Be aware of the fire hazard, especially when handling the saw near flammable substances or vapours.
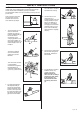
SAFETY INSTRUCTIONS GENERAL WORKING INSTRUCTIONS 4 Check the area around you for possible obstacles such as roots, rocks, branches, ditches, etc., in case you have to move suddenly. Take great care when working on sloping ground. 5 Take the utmost care when cutting through branches or logs that are in tension. A log or branch that is in tension can suddenly spring back into its natural position before or after you cut it.
SAFETY INSTRUCTIONS 2 Basic cutting technique General • Always use full throttle when cutting! • Reduce the speed to idle after every cut (running the engine for too long at full throttle without any load can lead to serious engine damage). Two factors decide whether the chain will jam or the log will split. The first is how the log is supported and the second is whether it is in tension. In most cases you can avoid these problems by cutting in two stages; from the top and from the bottom of the log.
SAFETY INSTRUCTIONS 2 The log is supported at one end. There is a high risk that it will split. 3 Tree felling technique It takes a lot of experience to fell a tree. Inexperienced users of chain saws should not fell trees. NEVER ATTEMPT A TASK YOU ARE UNSURE OF. A Safe distance A Start by cutting from below (about 1/3 of the way through). The safe distance between a tree that is to be felled and anyone else working nearby is at least 21/2 tree lengths.
SAFETY INSTRUCTIONS C Clearing the trunk and preparing your retreat Remove any branches that are in the way. To do this it is best to work from the top down and keep the trunk between you and the chain saw. Never limb above shoulder height. Remove any undergrowth from the base of the tree and check the area for obstacles (stones, branches, holes, etc.) so that you have a clear path of retreat when the tree starts to fall.
SAFETY INSTRUCTIONS We recommend that you use a bar that is longer than the diameter of the tree, so that you can make the FELLING CUT and DIRECTIONAL CUT with single cutting stokes. (See ”Technical data” to find out which lengths of bar are recommended for your saw). 4 Freeing a tree that has fallen badly = high accident risk A Freeing a “Trapped tree” The safest method is to use a winch. A Tractor-mounted B Portable There are methods for felling trees with a diameter larger than the bar length.
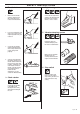
WHAT IS WHAT? What is what? 1. Cylinder cover. 16. Bumper. 2. Front handle. 17. Chain catcher. Catches chain if it jumps or breaks. 3. Front hand guard. 18. Clutch cover. 4. Starter cover. 19. Right hand guard. Protects right hand if chain breaks or jumps. 5. Chain oil tank. 6. Starter handle. 7. Adjuster screw, carburetor. 21. Throttle lock. Prevents accidental operation of throttle control. 8. Choke control/Start throttle lock. 22. Decompression valve. 9. Rear handle. 23.
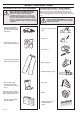
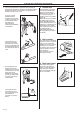
ASSEMBLY Mounting guide bar and chain Always wear gloves, when working with the chain, in order to protect your hands from injury. Check that the chain brake is in disengaged position by moving the front hand guard towards the front handle. Hold up the tip of the bar and tighten the chain. The chain is correctly tensioned when there is no slack on the underside of the bar, but it can still be turned easily by hand. Hold up the bar tip and tighten the bar nuts with the combination wrench.
FUEL HANDLING Fuelmix Mixing IMPORTANT! The chain saw is equipped with a two-stroke engine and must always been run using a mixture of gasoline and two-stroke engine oil. It is important to accurately measure the amount of oil to be mixed to ensure that the correct mixture is obtained. When mixing small amounts of fuel, even small inaccuracies can drastically affect the ratio of the mixture. Always provide for good ventilation when handling fuel.
FUEL HANDLING Chain oil • The chain lubrication system is automatic. Always use special chain oil with good adhesive characteristics. • In countries where no special chain oil is available, EP 90 transmission oil can be used. • Never use waste oil. This results in damage to the oil pump, the bar and the chain. • It is important to use oil of the right viscosity according to the air temperature. • In temperatures below 0oC (32oF) some oils become too viscous.
START AND STOP Start and stop Start WARNING! • Never start the saw engine without the bar, chain and clutch cover (chain brake) assembled - or else the clutch can come loose and cause personal injuries. • Always move the saw away from the fueling area before starting. • Place the saw on clear ground and make sure that the chain is not contacting anything. Also, make sure that you have a secure footing. • Keep people and animals well away from the working area.
MAINTENANCE Carburetor Conditions Your Jonsered product has been designed and manufactured to specifications that reduce harmful emissions. After your unit has been run 8-10 tanks of fuel the engine has broken in. To ensure that your unit is at peak performance and producing the least amount of harmful emissions after break in, have your authorized servicing dealer, who has a revolution counter at his disposal, to adjust your carburetor for optimum operating conditions.
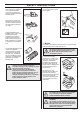
MAINTENANCE Starter device WARNING! • When the recoil spring is assembled in the starter housing, it is in tensioned position and can when treated carelessly, pop out and cause injuries. • Always be careful, when changing the recoil spring or the starter cord. Always wear safety goggles for eye protection. Tensioning the recoil spring • Lift the starter cord up in the notch on the starter pulley and turn the starter pulley 2 turns clockwise.
MAINTENANCE Muffler Air filter The air filter must be regularly cleaned from dust and dirt in order to avoid: • Carburetor malfunctions • Starting problems • Engine power reduction • Unnecessary wear on the engine parts • Abnormal fuel consumption Clean the air filter daily or more often if the air is exceptionally dusty in the working area. • Disassemble the air filter by removing the cylinder cover and unscrew the filter. When reassembling, make sure that the filter is tight against the filter holder.
MAINTENANCE Adjustment of the oil pump The oil pump is adjustable. Adjustments are made by turning the screw using a screwdriver or combination spanner. The saw is supplied from the factory with the screw set to position 2. Turning the screw clockwise will reduce the oil flow and turning the screw anti-clockwise will increase the oil flow. Heated handles (CS 2159 W) + – 1 2 3 On the model CS 2159 W both the front handle and the rear handle are equipped with electrical heating coils.
MAINTENANCE Below you will find some general maintenance instructions. If you have more questions, contact your servicing dealer. Weekly maintenance 1. Check that the AV elements are not soft or torn. 2. Lubricate the clutch drum bearing. 3. File off burrs, if any, on the sides of the bar. 4. Clean the spark plug and check the gap. The correct gap is 0,5 mm (0,020 inch). 5. Check the starter and the recoil spring. Clean the fins on the flywheel. 6. Clean the cooling fins on the cylinder.
TECHNICAL DATA CS 2159 Engine Cylinder volume, cu.
EMISSION CONTROL WARRANTY STATEMENT YOUR WARRANTY RIGHTS AND OBLIGATIONS WHAT IS COVERED The 2000 and later small nonroad engines are warranted for two years. If any emission related part on your engine (as listed above) is defective, the part will be repaired or replaced by Jonsered. REPAIR OR REPLACEMENT OF PARTS Repair or replacement of any warranted part will be performed at no charge to the owner at an approved Jonsered servicing dealer.
108 88 69-95 ´®z*xv•¶5v¨ 2002W43